Aller au contenu principal

Acer Aspire 3 A315-24P-R7VH Motherboard Replacement

Ce dont vous avez besoin

  1. Acer Aspire 3 A315-24P-R7VH Motherboard Replacement, Lower Case: étape 1, image 1 de 1
    • Power off the machine and unplug it from the wall charger.

  2. Acer Aspire 3 A315-24P-R7VH Motherboard Replacement: étape 2, image 1 de 2 Acer Aspire 3 A315-24P-R7VH Motherboard Replacement: étape 2, image 2 de 2
    • Close the laptop and flip it over.

    • Remove the eleven 6.5 mm Phillips screws from the lower case.

  3. Acer Aspire 3 A315-24P-R7VH Motherboard Replacement: étape 3, image 1 de 1
    • Insert an opening pick between the lower case and chassis.

    • Pry around the entire perimeter until the lower case releases.

    • Remove the lower case.

  4. Acer Aspire 3 A315-24P-R7VH Motherboard Replacement: étape 4, image 1 de 1
    Outil utilisé dans cette étape :
    Anti-Static Wrist Strap
    $7.95
    J'achète
    • Optional: Put on an anti-static wrist strap. Ground yourself by connecting the metal clip at the end to any unpainted metal surface outside of the laptop.

  5. Acer Aspire 3 A315-24P-R7VH Motherboard Replacement, Battery: étape 5, image 1 de 1
    • Grip the white battery connector and pull it directly out of its socket.

    • Do not pull on the wires.

  6. Acer Aspire 3 A315-24P-R7VH Motherboard Replacement: étape 6, image 1 de 2 Acer Aspire 3 A315-24P-R7VH Motherboard Replacement: étape 6, image 2 de 2
    • Unscrew the four 4.5 mm Phillips head screws that secure the battery.

  7. Acer Aspire 3 A315-24P-R7VH Motherboard Replacement: étape 7, image 1 de 2 Acer Aspire 3 A315-24P-R7VH Motherboard Replacement: étape 7, image 2 de 2
    • Lift the battery up and out of the chassis.

  8. Acer Aspire 3 A315-24P-R7VH Motherboard Replacement, SSD: étape 8, image 1 de 1
    • Unscrew the one 2.2 mm Phillips head screw that secures the SSD.

    • The SSD will lift to a slight angle.

  9. Acer Aspire 3 A315-24P-R7VH Motherboard Replacement: étape 9, image 1 de 1
    • Gently grasp the drive and pull it directly out of its socket.

  10. Acer Aspire 3 A315-24P-R7VH Motherboard Replacement: étape 10, image 1 de 1
    • Double check and make sure the replacement SSD is 2280 in size.

  11. Acer Aspire 3 A315-24P-R7VH Motherboard Replacement, Speaker: étape 11, image 1 de 2 Acer Aspire 3 A315-24P-R7VH Motherboard Replacement, Speaker: étape 11, image 2 de 2
    • Find the speakers at the bottom left and right corners of the laptop.

  12. Acer Aspire 3 A315-24P-R7VH Motherboard Replacement: étape 12, image 1 de 1
    • Unplug each speaker carefully.

    • There are no screws holding the speakers in place, so once unplugged, lift them out.

  13. Acer Aspire 3 A315-24P-R7VH Motherboard Replacement: étape 13, image 1 de 2 Acer Aspire 3 A315-24P-R7VH Motherboard Replacement: étape 13, image 2 de 2
    • Plug in the new speaker and place it in the corner that correlates to its shape. The speaker that is to go to the left corner of the laptop will be labeled with an L, likewise the speaker for the right will be labeled with an R.

  14. Acer Aspire 3 A315-24P-R7VH Motherboard Replacement, Motherboard: étape 14, image 1 de 1
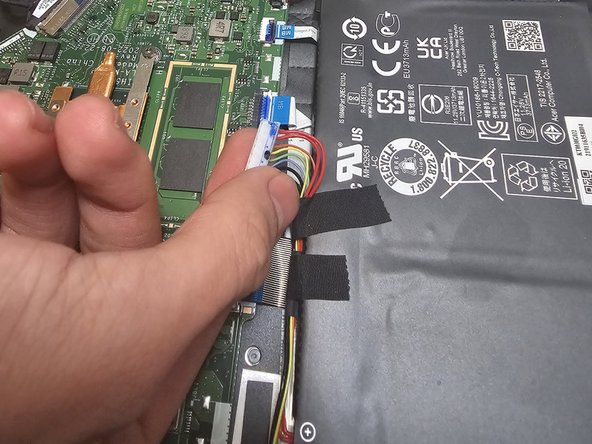
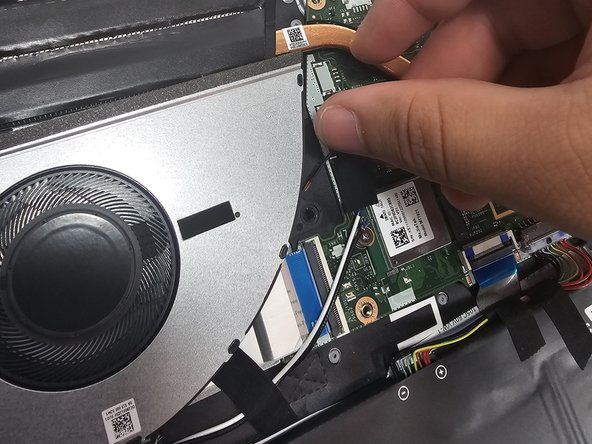
    • Disconnect the white ribbon cable from the motherboard, near the Network Interface Card, by lifting up the black locking flap then gently pulling it out of its socket.

  15. Acer Aspire 3 A315-24P-R7VH Motherboard Replacement: étape 15, image 1 de 3 Acer Aspire 3 A315-24P-R7VH Motherboard Replacement: étape 15, image 2 de 3 Acer Aspire 3 A315-24P-R7VH Motherboard Replacement: étape 15, image 3 de 3
    • Unscrew the three 4.5 mm screws that secure the heatsink.

  16. Acer Aspire 3 A315-24P-R7VH Motherboard Replacement: étape 16, image 1 de 3 Acer Aspire 3 A315-24P-R7VH Motherboard Replacement: étape 16, image 2 de 3 Acer Aspire 3 A315-24P-R7VH Motherboard Replacement: étape 16, image 3 de 3
    • Unscrew the two 5.6 mm Phillips screws that secure the fan.

    • Disconnect the fan cable connection.

    • Remove the fan.

  17. Acer Aspire 3 A315-24P-R7VH Motherboard Replacement: étape 17, image 1 de 1
    • Remove the one 4.5 mm Phillips screw holding the motherboard to the laptop frame.

  18. Acer Aspire 3 A315-24P-R7VH Motherboard Replacement: étape 18, image 1 de 2 Acer Aspire 3 A315-24P-R7VH Motherboard Replacement: étape 18, image 2 de 2
    • Gently lift the motherboard up and out of the chassis.

Conclusion

To reassemble your device, follow these instructions in reverse order.

Carlos

Membre depuis le 09/14/23

121 Réputation

1 tutoriel rédigé

Équipe

Gateway, Team 1-1, Pee Fall 2023 Membre de l'équipe Gateway, Team 1-1, Pee Fall 2023

GCC-PEE-F23S1G1

4 membres

6 tutoriels rédigés

0 commentaires

Ajouter un commentaire

Nombre de vues :

Dernières 24 heures : 5

7 derniers jours : 17

30 derniers jours : 65

Total : 292