Aller au contenu principal

ASUS N550JK-DS71T Laptop Hard Drive Replacement

Ce dont vous avez besoin

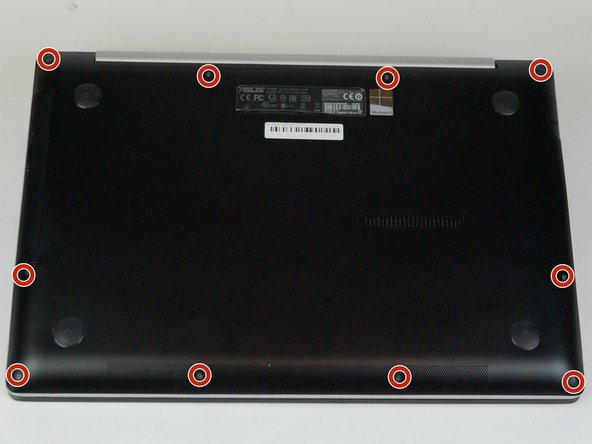
  1. ASUS N550JK-DS71T Laptop Hard Drive Replacement, Back Case: étape 1, image 1 de 2 ASUS N550JK-DS71T Laptop Hard Drive Replacement, Back Case: étape 1, image 2 de 2
    • Turn the laptop off and unplug all cables.

    • Flip over so the bottom is facing you.

    • Remove the ten 3mm Torx T5 screws from the bottom cover.

  2. ASUS N550JK-DS71T Laptop Hard Drive Replacement: étape 2, image 1 de 2 ASUS N550JK-DS71T Laptop Hard Drive Replacement: étape 2, image 2 de 2
    • Use a spudger to wedge between the laptop and bottom cover—lift upwards to pry open.

    • Run the spudger along the perimeter of the bottom cover to remove.

  3. ASUS N550JK-DS71T Laptop Hard Drive Replacement, Hard Drive: étape 3, image 1 de 2 ASUS N550JK-DS71T Laptop Hard Drive Replacement, Hard Drive: étape 3, image 2 de 2
    • Remove two 4mm black Phillips #1 screws from CD/DVD bracket.

    • Remove the single 4mm silver Phillips #1 screw from the bottom of the CD/DVD bracket.

    • Remove the CD/DVD bracket.

  4. ASUS N550JK-DS71T Laptop Hard Drive Replacement: étape 4, image 1 de 1
    • Remove the four 4mm silver Phillips #1 screws that are holding the hard drive in place.

  5. ASUS N550JK-DS71T Laptop Hard Drive Replacement: étape 5, image 1 de 2 ASUS N550JK-DS71T Laptop Hard Drive Replacement: étape 5, image 2 de 2
    • Lift up and remove the hard drive from the motherboard.

Conclusion

To reassemble your device, follow these instructions in reverse order.

3 autres ont terminé cette réparation.
Steven Hahn

Membre depuis le 01/29/18

875 Réputation

6 tutoriels rédigés

Équipe

USF Tampa, Team S5-G1, Passmore Spring 2018 Membre de l'équipe USF Tampa, Team S5-G1, Passmore Spring 2018

USFT-PASSMORE-S18S5G1

4 membres

6 tutoriels rédigés

0 commentaires

Ajouter un commentaire

Nombre de vues :

Dernières 24 heures : 1

7 derniers jours : 2

30 derniers jours : 13

Total : 2,530