Aller au contenu principal

Andis 1875-Watt Fold-N-Go Ionic Hair Dryer Outer Casing Replacement

Ce dont vous avez besoin

  1. Andis 1875-Watt Fold-N-Go Ionic Hair Dryer Outer Casing Replacement, Outer Casing: étape 1, image 1 de 1
    • Remove the two Phillips #00 screws:

    • One Phillips 16mm screw

    • One Phillips 14 mm screw

    • All of the hair dryer's components are held together by these two screws. Parts may quickly separate after screw removal. Tape can be used to hold everything in place.

  2. Andis 1875-Watt Fold-N-Go Ionic Hair Dryer Outer Casing Replacement: étape 2, image 1 de 3 Andis 1875-Watt Fold-N-Go Ionic Hair Dryer Outer Casing Replacement: étape 2, image 2 de 3 Andis 1875-Watt Fold-N-Go Ionic Hair Dryer Outer Casing Replacement: étape 2, image 3 de 3
    • Remove the top portion of the handle.

    • The model information and warnings are engraved on the top portion.

  3. Andis 1875-Watt Fold-N-Go Ionic Hair Dryer Outer Casing Replacement: étape 3, image 1 de 2 Andis 1875-Watt Fold-N-Go Ionic Hair Dryer Outer Casing Replacement: étape 3, image 2 de 2
    • Remove the settings switch by lifting straight up.

  4. Andis 1875-Watt Fold-N-Go Ionic Hair Dryer Outer Casing Replacement: étape 4, image 1 de 3 Andis 1875-Watt Fold-N-Go Ionic Hair Dryer Outer Casing Replacement: étape 4, image 2 de 3 Andis 1875-Watt Fold-N-Go Ionic Hair Dryer Outer Casing Replacement: étape 4, image 3 de 3
    • Remove the internal components from the rear portion of the handle.

    • Remove the switch

    • Remove the circuitboard

    • Remove the capacitor in black plastic

    • These parts are not secured to the handle by anything, but are all connected to each other by wires. They shouldn't be difficult to remove, but remember that they will come out together.

  5. Andis 1875-Watt Fold-N-Go Ionic Hair Dryer Outer Casing Replacement: étape 5, image 1 de 3 Andis 1875-Watt Fold-N-Go Ionic Hair Dryer Outer Casing Replacement: étape 5, image 2 de 3 Andis 1875-Watt Fold-N-Go Ionic Hair Dryer Outer Casing Replacement: étape 5, image 3 de 3
    • Remove the sliding black cover at the top of the handle.

  6. Andis 1875-Watt Fold-N-Go Ionic Hair Dryer Outer Casing Replacement: étape 6, image 1 de 2 Andis 1875-Watt Fold-N-Go Ionic Hair Dryer Outer Casing Replacement: étape 6, image 2 de 2
    • Remove the lower portion of the handle by sliding the peg out of the slot at the top of the handle.

  7. Andis 1875-Watt Fold-N-Go Ionic Hair Dryer Outer Casing Replacement: étape 7, image 1 de 2 Andis 1875-Watt Fold-N-Go Ionic Hair Dryer Outer Casing Replacement: étape 7, image 2 de 2
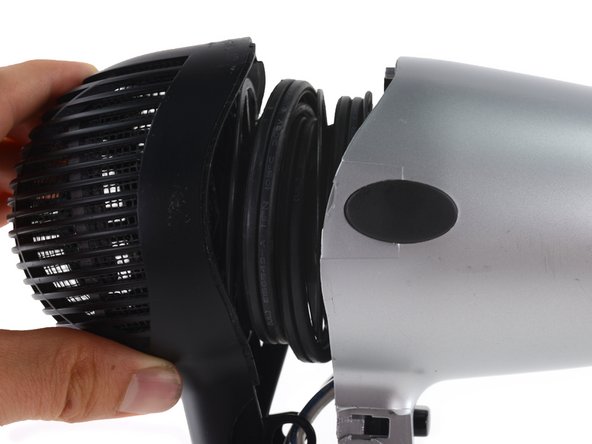
    • Separate the silver front casing from the black rear vent.

Conclusion

To reassemble your device, follow these instructions in reverse order.

Une autre personne a terminé cette réparation.

Scott Havard

Membre depuis le 06/27/16

49 675 Réputation

31 tutoriels rédigés

0 commentaires

Ajouter un commentaire

Nombre de vues :

Dernières 24 heures : 0

7 derniers jours : 3

30 derniers jours : 24

Total : 2,066