Aller au contenu principal

Asus W2W-A1 Speaker Replacement

Ce dont vous avez besoin

  1. Asus W2W-A1 Speaker Replacement, Keyboard: étape 1, image 1 de 3 Asus W2W-A1 Speaker Replacement, Keyboard: étape 1, image 2 de 3 Asus W2W-A1 Speaker Replacement, Keyboard: étape 1, image 3 de 3
    • Remove the battery, then unscrew the 7 3 mm Phillips screws behind the battery. Make sure they go in separate, organized piles.

    • Unscrew the 2 4 mm Phillips head screws by the battery.

  2. Asus W2W-A1 Speaker Replacement: étape 2, image 1 de 1
    • Remove the panel above the keyboard with a plastic spudger.

  3. Asus W2W-A1 Speaker Replacement: étape 3, image 1 de 1
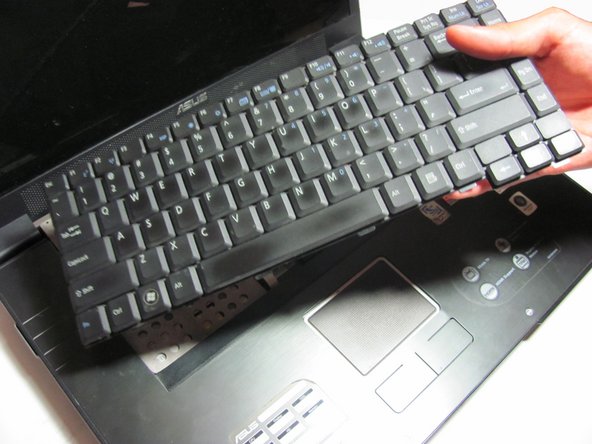
    • Once the panel is removed, use the spudger to pry out the keyboard.

    • Do not fully remove, for the keyboard is still attached to the ribbon cable.

  4. Asus W2W-A1 Speaker Replacement: étape 4, image 1 de 2 Asus W2W-A1 Speaker Replacement: étape 4, image 2 de 2
    • Detach the ribbon cable from the keyboard by pulling the end of the ribbon cable that is attached inside of the laptop.

    • Be sure to detach from the root rather than from near the middle. It should slide out with ease.

    • Now you can fully remove the keyboard from the laptop.

  5. Asus W2W-A1 Speaker Replacement, Front Panel: étape 5, image 1 de 1
    • Place your fingers or a spudger between the front panel and the rest of the laptop.

    • Pull upwards gently to detach the side you are grabbing.

    • Repeat on the other side until the panel easily peels off the laptop.

  6. Asus W2W-A1 Speaker Replacement, Touchpad: étape 6, image 1 de 2 Asus W2W-A1 Speaker Replacement, Touchpad: étape 6, image 2 de 2
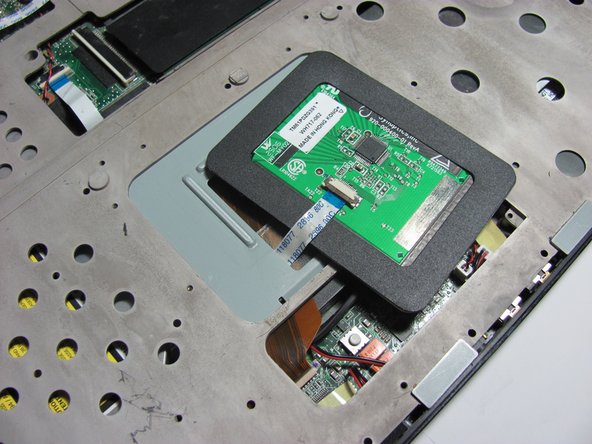
    • The touchpad should be loosely attached to the rest of the laptop by a ribbon cable.

  7. Asus W2W-A1 Speaker Replacement: étape 7, image 1 de 1
    • Gently pull the ribbon cable out of its socket attached to the touchpad.

    • You are now able to remove the touchpad.

  8. Asus W2W-A1 Speaker Replacement, Protective Cover: étape 8, image 1 de 1
    • Unscrew the 3 13 mm Phillips screws on the surface of the panel.

    • Unscrew the 4 mm Phillips screw beneath the panel.

  9. Asus W2W-A1 Speaker Replacement: étape 9, image 1 de 3 Asus W2W-A1 Speaker Replacement: étape 9, image 2 de 3 Asus W2W-A1 Speaker Replacement: étape 9, image 3 de 3
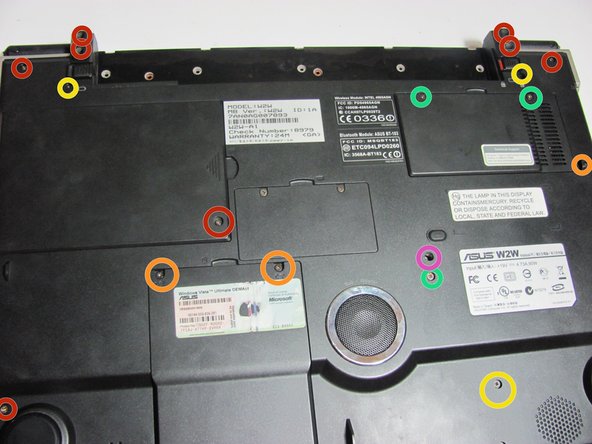
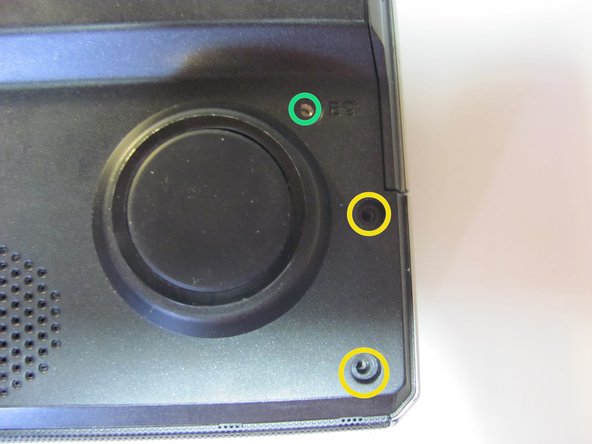
    • There are many different types of screws in this step so make sure to arrange the screws by their different sizes.

    • Unscrew the six 17 mm Phillips head screws on the stands on the back and the 2 "A" screws of the same size adjacent to the stands.

    • Unscrew the two C Phillips head screws on the hard drive panel. There is also one more C screw in the upper right corner of the laptop as shown.

    • Unscrew the eight 8mm lock phillips screws and the screws along the outside of the laptop.

    • Unscrew the three 3mm E Phillips screw and the one 3mm D Phillips screw.

    • Unscrew the 5mm Phillips head screw that lies just above the D screw.

  10. Asus W2W-A1 Speaker Replacement: étape 10, image 1 de 1
    • Unscrew the two 8 mm Phillips screws beneath the hard drive panel.

    • After finishing this step, flip the laptop over.

  11. Asus W2W-A1 Speaker Replacement: étape 11, image 1 de 1
    • Everything should now be loose enough for you to start removing the panel.

    • Do not fully remove the panel, for there are still ribbons attached on the inside.

  12. Asus W2W-A1 Speaker Replacement: étape 12, image 1 de 1
    • Carefully remove the ribbons from the base.

    • Then you can lift the panel to access the components beneath.

  13. Asus W2W-A1 Speaker Replacement, Speaker: étape 13, image 1 de 3 Asus W2W-A1 Speaker Replacement, Speaker: étape 13, image 2 de 3 Asus W2W-A1 Speaker Replacement, Speaker: étape 13, image 3 de 3
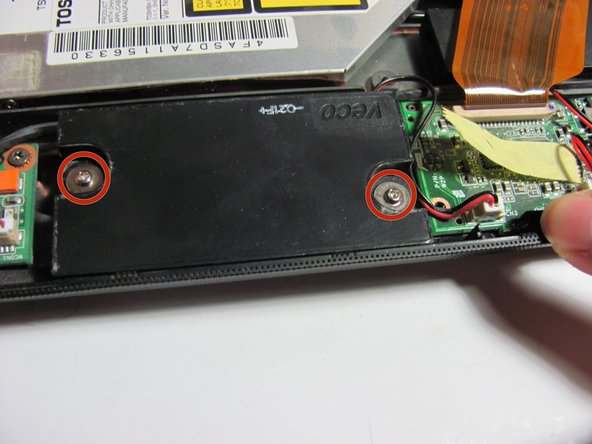
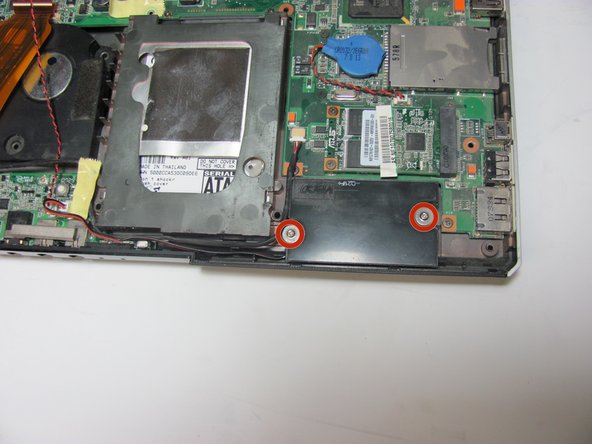
    • Remove the 2 4 mm, wide Phillips screws per speaker holding in the two speakers at the lower end of the device.

  14. Asus W2W-A1 Speaker Replacement: étape 14, image 1 de 1
    • Lift up the speakers to separate from the device.

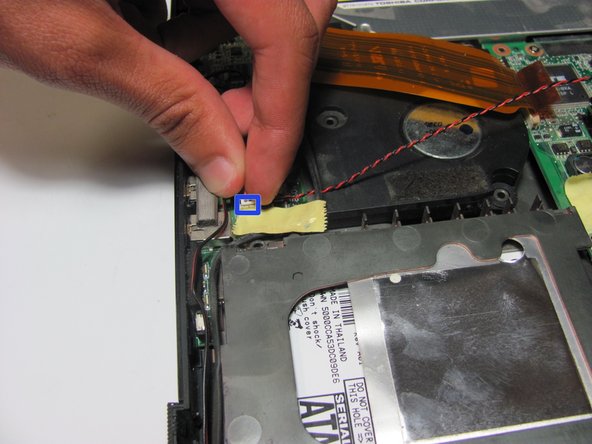
    • The speakers are connected to the device by a cable. Be careful not to rip this off.

  15. Asus W2W-A1 Speaker Replacement: étape 15, image 1 de 2 Asus W2W-A1 Speaker Replacement: étape 15, image 2 de 2
    • Grab the cable by the white connection to the laptop, and gently pull to disconnect.

Conclusion

To reassemble your device, follow these instructions in reverse order.

Nolan Schock

Membre depuis le 04/14/14

501 Réputation

5 tutoriels rédigés

Équipe

Cal Poly, Team 13-29, Maness Spring 2014 Membre de l'équipe Cal Poly, Team 13-29, Maness Spring 2014

CPSU-MANESS-S14S13G29

4 membres

8 tutoriels rédigés

0 commentaires

Ajouter un commentaire

Nombre de vues :

Dernières 24 heures : 0

7 derniers jours : 1

30 derniers jours : 2

Total : 185