Aller au contenu principal

Dell Alienware 14 Display Panel Replacement

Ce dont vous avez besoin

  1. Dell Alienware 14 Display Panel Replacement, Close the Display: étape 1, image 1 de 1
    • WARNING: Before working inside your computer, read the safety information that shipped with your computer and follow the steps in Before You Begin. . After working inside your computer, follow the instructions in "After Working Inside Your Computer".

    • Close the display, and turn the computer over.

  2. Dell Alienware 14 Display Panel Replacement, Remove the Screws: étape 2, image 1 de 2 Dell Alienware 14 Display Panel Replacement, Remove the Screws: étape 2, image 2 de 2
    • Remove the screws that secure the base cover to the computer base.

  3. Dell Alienware 14 Display Panel Replacement, Slide and Lift the Base Cover: étape 3, image 1 de 1
    • Slide and lift the base cover off the computer base.

  4. Dell Alienware 14 Display Panel Replacement, Align the Tabs: étape 4, image 1 de 1
    • Align the tabs on the NEW base cover with the slots on the computer base and slide the base cover into place.

  5. Dell Alienware 14 Display Panel Replacement, Replace the Screws: étape 5, image 1 de 1
    • Replace the screws that secure the base cover to the computer base.

  6. Dell Alienware 14 Display Panel Replacement, Turn the Computer Over: étape 6, image 1 de 1
    • Turn the computer over and open the display.

  7. Dell Alienware 14 Display Panel Replacement, Disconnecting the Battery Cable: étape 7, image 1 de 1
  8. Dell Alienware 14 Display Panel Replacement, Remove the Screws: étape 8, image 1 de 1
    • Remove the screws that secure the battery to the computer base.

  9. Dell Alienware 14 Display Panel Replacement, Using the Battery Cable: étape 9, image 1 de 1
    • Using the battery cable, lift the battery and release it from the tabs on the computer base.

  10. Dell Alienware 14 Display Panel Replacement, Turn the Computer Over: étape 10, image 1 de 1
    • Turn the computer over and open the display as far as possible.

  11. Dell Alienware 14 Display Panel Replacement, The Power Button: étape 11, image 1 de 1
    • Press and hold the power button for five seconds to ground the system board.

    • Close the display and turn the computer over.

  12. Dell Alienware 14 Display Panel Replacement, Align the Tabs: étape 13, image 1 de 1
    • Align the tabs on the NEW battery with the slots on the computer base.

  13. Dell Alienware 14 Display Panel Replacement, Align the Screw Holes: étape 14, image 1 de 1
    • Align the screw holes on the battery with the screw holes on the computer base.

  14. Dell Alienware 14 Display Panel Replacement, Replace the Screws: étape 15, image 1 de 1
    • Replace the screws that secure the battery to the computer base.

  15. Dell Alienware 14 Display Panel Replacement, Connect the Battery Cable: étape 16, image 1 de 1
    • Connect the battery cable to the system-board connector.

  16. Dell Alienware 14 Display Panel Replacement, Remove the Screws: étape 17, image 1 de 2 Dell Alienware 14 Display Panel Replacement, Remove the Screws: étape 17, image 2 de 2
    • WARNING: Before working inside your computer, read the safety information that shipped with your computer and follow the steps in Before Working Inside Your Computer. After working inside your computer, follow the instructions in After Working Inside Your Computer.

    • CAUTION: To avoid data loss, do not remove the hard drive while the computer is On or in Sleep state.

    • CAUTION: Hard drives are extremely fragile. Exercise care when handling the hard drive.

    • NOTE: The secondary hard-drive or solid-state drive is optional and can be installed in the optical drive bay.

    • Remove the screws that secure the secondary hard-drive assembly to the computer base.

  17. Dell Alienware 14 Display Panel Replacement, Lifting the Secondary Hard-Drive: étape 18, image 1 de 3 Dell Alienware 14 Display Panel Replacement, Lifting the Secondary Hard-Drive: étape 18, image 2 de 3 Dell Alienware 14 Display Panel Replacement, Lifting the Secondary Hard-Drive: étape 18, image 3 de 3
    • Carefully lift the secondary hard-drive assembly and then lift the latches to release the secondary hard-drive cable from the system-board connector.

  18. Dell Alienware 14 Display Panel Replacement, Lifting the Hard Drive: étape 19, image 1 de 1
    • Lift the secondary hard-drive assembly off the computer base.

  19. Dell Alienware 14 Display Panel Replacement, Turn the Assembly Over: étape 20, image 1 de 1
    • Turn the secondary hard-drive assembly over.

  20. Dell Alienware 14 Display Panel Replacement, Remove the Screw: étape 21, image 1 de 1
    • Remove the screw that secures the secondary hard-drive assembly to the main bracket.

  21. Dell Alienware 14 Display Panel Replacement, Remove the Screws: étape 22, image 1 de 1
    • Remove the screws that secure the secondary hard-drive to the secondary hard-drive bracket.

  22. Dell Alienware 14 Display Panel Replacement, Slide and Lift the Hard-Drive: étape 23, image 1 de 2 Dell Alienware 14 Display Panel Replacement, Slide and Lift the Hard-Drive: étape 23, image 2 de 2
    • Slide and lift the secondary hard-drive off the secondary hard-drive bracket.

  23. Dell Alienware 14 Display Panel Replacement, Disconnect the Interposer: étape 24, image 1 de 2 Dell Alienware 14 Display Panel Replacement, Disconnect the Interposer: étape 24, image 2 de 2
    • Disconnect the interposer from the secondary hard-drive connector.

  24. Dell Alienware 14 Display Panel Replacement, Connect the Interposer: étape 25, image 1 de 1
    • Connect the interposer to the secondary hard-drive connector.

  25. Dell Alienware 14 Display Panel Replacement, Placing the Secondary Hard-Drive: étape 26, image 1 de 1
    • Place the NEW secondary hard-drive in the secondary hard-drive bracket.

  26. Dell Alienware 14 Display Panel Replacement, Align the Screw Holes: étape 27, image 1 de 1
    • Align the screw holes on the secondary hard-drive with the screw holes on the secondary hard-drive bracket.

  27. Dell Alienware 14 Display Panel Replacement, Replace the Screws: étape 28, image 1 de 1
    • Replace the screws that secure the secondary hard-drive to the secondary hard-drive bracket.

  28. Dell Alienware 14 Display Panel Replacement, Align the Screw Hole: étape 29, image 1 de 1
    • Align the screw hole on the secondary hard-drive assembly with the screw hole on the main bracket.

  29. Dell Alienware 14 Display Panel Replacement, Replace the Screw: étape 30, image 1 de 1
    • Replace the screw that secures the secondary hard-drive assembly to the main bracket.

  30. Dell Alienware 14 Display Panel Replacement, Turn the Hard-Drive Assembly Over: étape 31, image 1 de 1
    • Turn the secondary hard-drive assembly over.

  31. Dell Alienware 14 Display Panel Replacement, Slide the Hard-Drive Cable: étape 32, image 1 de 1
    • Slide the secondary hard-drive cable into the system-board connector and press down on the connector latches to secure the cable.

  32. Dell Alienware 14 Display Panel Replacement, Align the Screw Holes: étape 33, image 1 de 1
    • Align the screw holes on the secondary hard-drive assembly with the screw holes on the computer base.

    • Replace the screws that secure the secondary hard-drive assembly to the computer base.

  33. Dell Alienware 14 Display Panel Replacement, Disconnecting the Status-Light Board Cable: étape 35, image 1 de 2 Dell Alienware 14 Display Panel Replacement, Disconnecting the Status-Light Board Cable: étape 35, image 2 de 2
    • WARNING: Before working inside your computer, read the safety information that shipped with your computer and follow the steps in Before Working Inside Your Computer. After working inside your computer, follow the instructions in After Working Inside Your Computer.

    • Lift the connector latch and pull the pull-tab to disconnect the status-light board cable from the system-board connector and slide the cable into the slot on the computer base.

  34. Dell Alienware 14 Display Panel Replacement, Remove the Screws: étape 36, image 1 de 1
    • Remove the screws that secure the palm -rest assembly to the computer base.

  35. Dell Alienware 14 Display Panel Replacement, Turn the Computer Over: étape 37, image 1 de 1
    • Turn the computer over and open the display as far as possible.

  36. Dell Alienware 14 Display Panel Replacement, Pry the Palm-Rest Assembly: étape 38, image 1 de 2 Dell Alienware 14 Display Panel Replacement, Pry the Palm-Rest Assembly: étape 38, image 2 de 2
    • Using a plastic scribe, pry the palm-rest assembly from the computer base.

  37. Dell Alienware 14 Display Panel Replacement, Lift the Palm-Rest Assembly: étape 39, image 1 de 1
    • Carefully lift the palm-rest assembly and turn it over.

  38. Dell Alienware 14 Display Panel Replacement, Release the Connector Latches: étape 40, image 1 de 2 Dell Alienware 14 Display Panel Replacement, Release the Connector Latches: étape 40, image 2 de 2
    • Release the connector latches to disconnect the flexi-cable from the system board.

    • Connect the flexi-cable to the connector on the system board.

  39. Dell Alienware 14 Display Panel Replacement, Turn the Palm-Rest Assembly: étape 44, image 1 de 1
    • Turn the NEW palm-rest assembly over and slide the status-light board cable through the slot on the computer base.

    • Align the palm-rest assembly over the computer base and snap the palm-rest assembly into place.

  40. Dell Alienware 14 Display Panel Replacement, Close the Display: étape 46, image 1 de 1
    • Close the display and turn the computer over.

  41. Dell Alienware 14 Display Panel Replacement, Replace the Screws: étape 47, image 1 de 1
    • Replace the screws that secure the palm-rest assembly to the computer base.

  42. Dell Alienware 14 Display Panel Replacement, Slide the Status-Light Board Cable: étape 48, image 1 de 1
    • Slide the status-light board cable into the system-board connector and press on the connector latch to secure the cable.

  43. Dell Alienware 14 Display Panel Replacement, Close the Display: étape 49, image 1 de 1
  44. Dell Alienware 14 Display Panel Replacement, Disconnecting the Display: étape 50, image 1 de 1
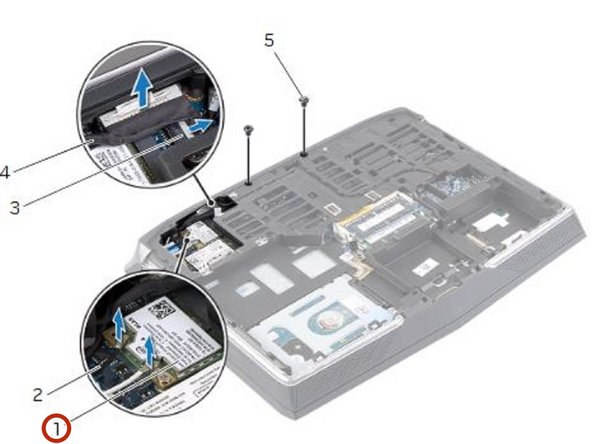
    • Disconnect the display and camera cables from the system-board connectors.

  45. Dell Alienware 14 Display Panel Replacement, Disconnect the Antenna Cables: étape 51, image 1 de 2 Dell Alienware 14 Display Panel Replacement, Disconnect the Antenna Cables: étape 51, image 2 de 2
    • Disconnect the antenna cables from the wireless mini-card.

  46. Dell Alienware 14 Display Panel Replacement, Remove the Screws: étape 52, image 1 de 1
    • Remove the screws that secure the display assembly to the computer base.

  47. Dell Alienware 14 Display Panel Replacement, Turn the Computer Over: étape 53, image 1 de 1
    • Turn the computer over and open the display as far as possible.

  48. Dell Alienware 14 Display Panel Replacement, Remove the Cables: étape 54, image 1 de 1
    • Remove the display, camera, and antenna cables from the slots on the computer base.

  49. Dell Alienware 14 Display Panel Replacement, Note the Cable-Routing: étape 55, image 1 de 1
    • Note the display, camera and antenna cable-routing and remove the cables from their routing guides.

  50. Dell Alienware 14 Display Panel Replacement, Slide the Cables: étape 56, image 1 de 1
    • Slide the cables through the slots on the computer base.

  51. Dell Alienware 14 Display Panel Replacement, Remove the Screws: étape 57, image 1 de 1
    • Remove the screws that secure the display assembly to the computer base.

  52. Dell Alienware 14 Display Panel Replacement, Lifting the Display Assembly: étape 58, image 1 de 1
    • Lift the display assembly off the computer base.

  53. Dell Alienware 14 Display Panel Replacement, Align the Screw Holes: étape 59, image 1 de 1
    • Align the screw holes on the NEW display assembly with the screw holes on the computer base.

  54. Dell Alienware 14 Display Panel Replacement, Replace the Screws: étape 60, image 1 de 1
    • Replace the screws that secure the display assembly to the computer base.

  55. Dell Alienware 14 Display Panel Replacement, Slide the Cables: étape 61, image 1 de 1
    • Slide the cables through the slots on the computer base.

  56. Dell Alienware 14 Display Panel Replacement, Close the Display: étape 62, image 1 de 1
    • Close the display and turn the computer over.

  57. Dell Alienware 14 Display Panel Replacement, Route the Cables: étape 63, image 1 de 1
    • Route the display, camera, and antenna cables through the routing guides.

  58. Dell Alienware 14 Display Panel Replacement, Replace the Screws: étape 64, image 1 de 1
    • Replace the screws that secure the display assembly to the computer base.

  59. Dell Alienware 14 Display Panel Replacement, Connecting the Cables: étape 65, image 1 de 1
    • Connect the display and camera cables to the system-board connectors.

  60. Dell Alienware 14 Display Panel Replacement, Connecting the Antenna Cables: étape 66, image 1 de 1
    • Connect the antenna cables to the wireless mini-card.

  61. Dell Alienware 14 Display Panel Replacement, Prying the Edge of the Display Bezel: étape 67, image 1 de 1
  62. Dell Alienware 14 Display Panel Replacement, Remove the Display Bezel: étape 68, image 1 de 1
    • Remove the display bezel off the display back-cover.

  63. Dell Alienware 14 Display Panel Replacement, Aligning the Display Bezel: étape 69, image 1 de 1
    • Align the NEW display bezel with the display back-cover, and gently snap the display bezel into place.

  64. Dell Alienware 14 Display Panel Replacement, Remove the Screws: étape 70, image 1 de 1
  65. Dell Alienware 14 Display Panel Replacement, Remove the Display Hinges: étape 71, image 1 de 1
    • Remove the display hinges off the display back-cover.

  66. Dell Alienware 14 Display Panel Replacement, Align the Screw Holes: étape 72, image 1 de 1
    • Align the screw holes on the NEW display hinges with the screw holes on the display back-cover.

  67. Dell Alienware 14 Display Panel Replacement, Replace the Screws: étape 73, image 1 de 1
    • Replace the screws that secure the display hinges to the display back-cover.

  68. Dell Alienware 14 Display Panel Replacement, Remove the Screws: étape 74, image 1 de 1
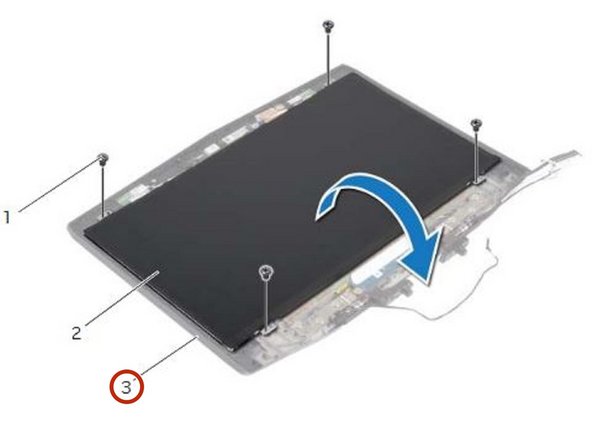
  69. Dell Alienware 14 Display Panel Replacement, Placing the Display Back-Cover: étape 75, image 1 de 2 Dell Alienware 14 Display Panel Replacement, Placing the Display Back-Cover: étape 75, image 2 de 2
    • Carefully turn the display panel over and place it on the display back-cover.

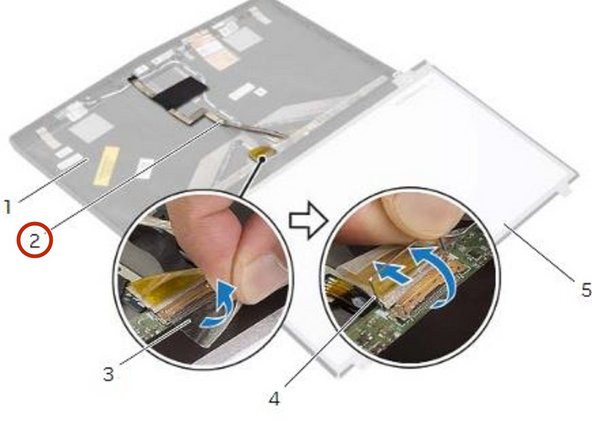
  70. Dell Alienware 14 Display Panel Replacement, Peeling the Tape: étape 76, image 1 de 2 Dell Alienware 14 Display Panel Replacement, Peeling the Tape: étape 76, image 2 de 2
    • Peel the tape that secures the display cable to the display-panel connector.

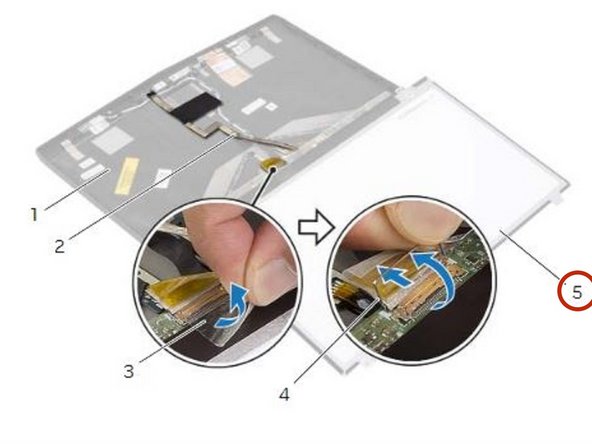
  71. Dell Alienware 14 Display Panel Replacement, Lifting the Connector Latch: étape 77, image 1 de 3 Dell Alienware 14 Display Panel Replacement, Lifting the Connector Latch: étape 77, image 2 de 3 Dell Alienware 14 Display Panel Replacement, Lifting the Connector Latch: étape 77, image 3 de 3
    • Lift the connector latch and disconnect the display cable from the display-panel connector.

  72. Dell Alienware 14 Display Panel Replacement, Lifting the Display Panel: étape 78, image 1 de 2 Dell Alienware 14 Display Panel Replacement, Lifting the Display Panel: étape 78, image 2 de 2
    • Lift the display panel off the display back-cover.

  73. Dell Alienware 14 Display Panel Replacement, Connecting the Display Cable: étape 79, image 1 de 1
    • Connect the display cable to the display-panel connector and press down on the connector latch to secure the cable.

  74. Dell Alienware 14 Display Panel Replacement, Adhering the Tape: étape 80, image 1 de 1
    • Adhere the tape to secure the display cable.

  75. Dell Alienware 14 Display Panel Replacement, Rotate the Display Panel: étape 81, image 1 de 1
    • Carefully rotate the NEW display panel and align the screw holes on the display panel with the screw holes on the display back-cover.

  76. Dell Alienware 14 Display Panel Replacement, Replace the Screws: étape 82, image 1 de 1
    • Replace the screws that secure the display panel to the display back-cover.

Conclusion

To reassemble your device, follow these instructions in reverse order.

Terrence15

Membre depuis le 12/18/17

79 091 Réputation

441 tutoriels rédigés

Équipe

RampUP America, Inc. Membre de l'équipe RampUP America, Inc.

Community

42 membres

1 985 tutoriels rédigés

0 commentaires

Ajouter un commentaire

Nombre de vues :

Dernières 24 heures : 0

7 derniers jours : 2

30 derniers jours : 3

Total : 403