Aller au contenu principal

Dell Alienware M17x R4 Hard Drive Replacement

Ce dont vous avez besoin

  1. Dell Alienware M17x R4 Hard Drive Replacement, Loosen the Screws: étape 1, image 1 de 1
    • WARNING: Before working inside your computer, read the safety information that shipped with your computer and follow the steps in Before You Begin.

    • WARNING: If you remove the hard drive from the computer when the drive is hot, do not touch the metal housing of the hard drive.

    • Loosen the captive screws that secure the hard-drive assembly to the computer base.

  2. Dell Alienware M17x R4 Hard Drive Replacement, Disconnecting the Hard-Drive Assembly: étape 2, image 1 de 1
    • Using the pull-tab, lift the hard-drive assembly to disconnect it from the connector on the system board.

  3. Dell Alienware M17x R4 Hard Drive Replacement, Lifting the Hard-Drive Assembly: étape 3, image 1 de 1
    • Lift the hard-drive assembly out of the computer base.

  4. Dell Alienware M17x R4 Hard Drive Replacement, Remove the Screws: étape 4, image 1 de 1
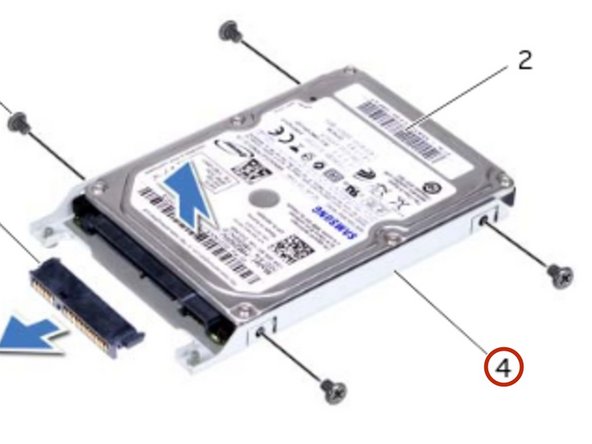
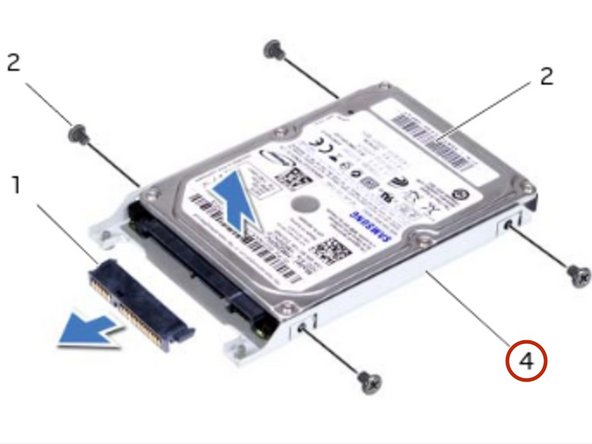
    • Remove the screws that secure the hard drive to the hard-drive bracket.

  5. Dell Alienware M17x R4 Hard Drive Replacement, Lifting the Hard-Drive: étape 5, image 1 de 2 Dell Alienware M17x R4 Hard Drive Replacement, Lifting the Hard-Drive: étape 5, image 2 de 2
    • Lift the hard-drive off the hard-drive bracket.

  6. Dell Alienware M17x R4 Hard Drive Replacement, Remove the Interposer: étape 6, image 1 de 1
    • Remove the interposer from the hard drive.

  7. Dell Alienware M17x R4 Hard Drive Replacement, Connect the Interposer: étape 7, image 1 de 2 Dell Alienware M17x R4 Hard Drive Replacement, Connect the Interposer: étape 7, image 2 de 2
    • Connect the interposer to the NEW hard drive.

  8. Dell Alienware M17x R4 Hard Drive Replacement, Place the Hard Drive: étape 8, image 1 de 2 Dell Alienware M17x R4 Hard Drive Replacement, Place the Hard Drive: étape 8, image 2 de 2
    • Place the hard drive in the hard-drive bracket.

  9. Dell Alienware M17x R4 Hard Drive Replacement, Replace the Screws: étape 9, image 1 de 1
    • Replace the screws that secure the hard drive to the hard-drive bracket.

  10. Dell Alienware M17x R4 Hard Drive Replacement, Align the Connector: étape 10, image 1 de 1
    • Align the connector on the hard drive with the connector on the system board and press the hard drive until it is fully seated.

  11. Dell Alienware M17x R4 Hard Drive Replacement, Tightening and Securing Screws: étape 11, image 1 de 1
    • Tighten the captive screws that secure the hard-drive assembly to the computer base.

Conclusion

To reassemble your device, follow these instructions in reverse order.

Terrence15

Membre depuis le 12/18/17

79 091 Réputation

441 tutoriels rédigés

Équipe

RampUP America, Inc. Membre de l'équipe RampUP America, Inc.

Community

42 membres

1 985 tutoriels rédigés

0 commentaires

Ajouter un commentaire

Nombre de vues :

Dernières 24 heures : 0

7 derniers jours : 2

30 derniers jours : 13

Total : 1,514