Aller au contenu principal
Pour réparer ensemble - Je crée un compte

Fitbit Alta HR Battery Replacement

Ce dont vous avez besoin

  1. Fitbit Alta HR Battery Replacement, Remove straps: étape 1, image 1 de 2 Fitbit Alta HR Battery Replacement, Remove straps: étape 1, image 2 de 2
    • Push in the clip and slide off the strap from each side.

    Demander à FixBot

    Ajouter un commentaire

  2. Fitbit Alta HR Battery Replacement, Remove front cover: étape 2, image 1 de 1
    • Use a spudger to remove the front cover.

    Demander à FixBot

    Ajouter un commentaire

  3. Fitbit Alta HR Battery Replacement, Lift display: étape 3, image 1 de 1
    • Use a spudger to lift the display.

    Demander à FixBot

    Ajouter un commentaire

  4. Fitbit Alta HR Battery Replacement, Disconnect heart rate monitor: étape 4, image 1 de 1
    • Use a spudger to disconnect the cable that connects the heart rate monitor to the motherboard.

    Demander à FixBot

    Ajouter un commentaire

  5. Fitbit Alta HR Battery Replacement, Remove screws from motherboard: étape 5, image 1 de 1
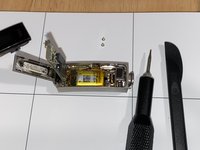
    • Use a hex 0.7 screwdriver to remove the screws from the motherboard.

    Demander à FixBot

    Ajouter un commentaire

  6. Fitbit Alta HR Battery Replacement, Lift motherboard: étape 6, image 1 de 2 Fitbit Alta HR Battery Replacement, Lift motherboard: étape 6, image 2 de 2
    • Use a spudger to lift the motherboard.

    Demander à FixBot

    Ajouter un commentaire

  7. Fitbit Alta HR Battery Replacement, Lift battery and remove innards: étape 7, image 1 de 1
    • Use a spudger to lift the battery.

    • When the battery is lifted, the connected components (display, motherboard, battery) will come out.

    Demander à FixBot

    Ajouter un commentaire

    • Use a soldering iron to desolder the two battery contacts from the motherboard.

    Demander à FixBot

    Ajouter un commentaire

    • Ensure positive and negative wires are in the correct positions. There are + and – signs on the motherboard. Red is positive. Black is negative.

    • Use a soldering iron and lead-free solder to solder the new battery to the motherboard.

    Demander à FixBot

    Ajouter un commentaire

Conclusion

To reassemble your device, follow these instructions in reverse order.

Annulation : je n'ai pas terminé ce tutoriel.

4 autres ont terminé cette réparation.

Wendy Sato

Membre depuis le 11/12/16

259 Réputation

1 tutoriel rédigé

1 commentaire de tutoriel

No work no on

deepakkumar8529575607 - Réponse Partager

Ajouter un commentaire

Nombre de vues :

Dernières 24 heures : 0

7 derniers jours : 4

30 derniers jours : 47

Total : 3,472