Aller au contenu principal

HP Stream 13-c002dx Speakers Replacement

Ce dont vous avez besoin

  1. HP Stream 13-c002dx Speakers Replacement, Keyboard: étape 1, image 1 de 2 HP Stream 13-c002dx Speakers Replacement, Keyboard: étape 1, image 2 de 2
    • Begin by placing your laptop on a clean surface such as a table and away from any liquids which may spill and damage components.

    • Flip the laptop over so the bottom is facing up.

    • Use your Phillips #0 screwdriver to remove the eleven visible 5 mm screws on the back of the laptop.

    • There are some screws underneath the rubber feet. Use a spudger to remove them and gain access.

    • Unscrew the two remaining 2.5mm screws. Keep these screws separate from the first eleven 5mm screws.

  2. HP Stream 13-c002dx Speakers Replacement: étape 2, image 1 de 3 HP Stream 13-c002dx Speakers Replacement: étape 2, image 2 de 3 HP Stream 13-c002dx Speakers Replacement: étape 2, image 3 de 3
    • Flip the laptop back over so it's right side up and open the screen.

    • Using a spudger, separate the keyboard surface from the bottom of the laptop.

    • While lifting the keyboard surface from the bottom, you will notice three cables still attaching them together. Gently unplug each of these cables from the motherboard.

    • Remove the keyboard assembly.

  3. HP Stream 13-c002dx Speakers Replacement, Speakers: étape 3, image 1 de 3 HP Stream 13-c002dx Speakers Replacement, Speakers: étape 3, image 2 de 3 HP Stream 13-c002dx Speakers Replacement, Speakers: étape 3, image 3 de 3
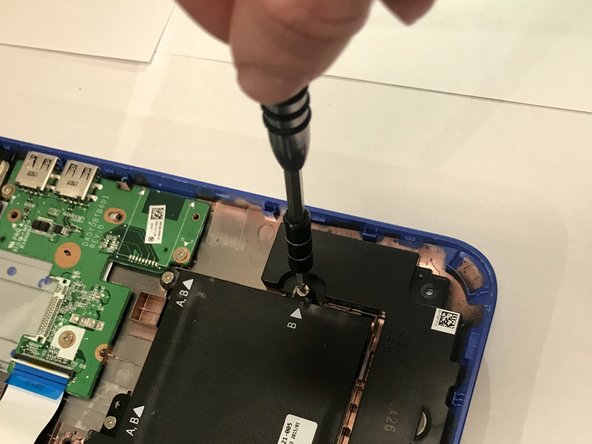
    • You will notice various screws located on the outer edges of the speakers. Using your Philips screwdriver, remove each of these screws.

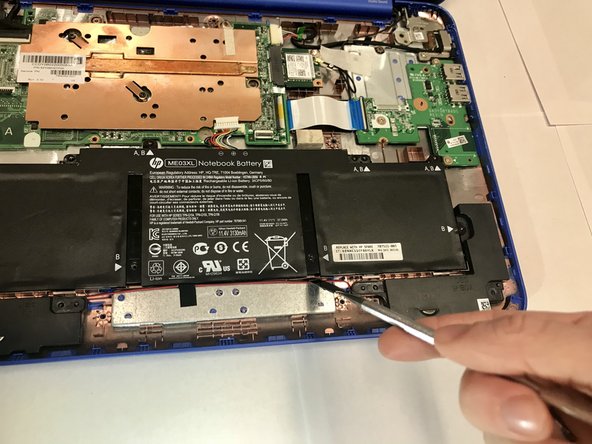
    • Connecting the two speakers is a red and black wire located at the edge of the battery. Using your flathead screwdriver, lift the wire upward.

  4. HP Stream 13-c002dx Speakers Replacement: étape 4, image 1 de 2 HP Stream 13-c002dx Speakers Replacement: étape 4, image 2 de 2
    • Using your iFixit Opener Tool, remove the wires connecting the speakers to the motherboard by lifting the indicated piece upward.'

    • A metal spudger is shown in this picture. Use a plastic opening tool to disconnect the connector instead, to avoid damaging the components and conducting electricity.

  5. HP Stream 13-c002dx Speakers Replacement: étape 5, image 1 de 3 HP Stream 13-c002dx Speakers Replacement: étape 5, image 2 de 3 HP Stream 13-c002dx Speakers Replacement: étape 5, image 3 de 3
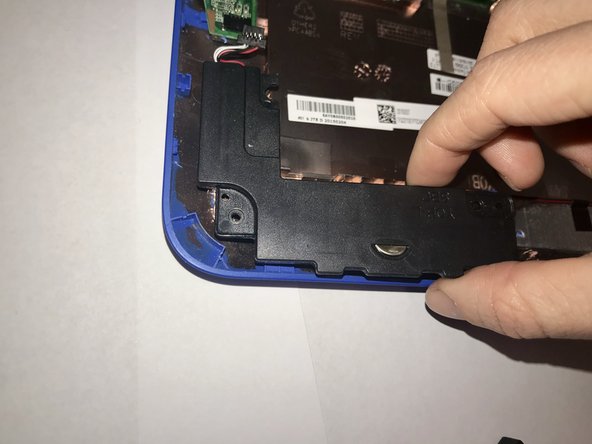
    • Carefully remove the right and left components of the battery out of the device.

    • You have successfully removed the speakers from the device.

Conclusion

To reassemble your device, follow these instructions in reverse order.

Chris Beasley

Membre depuis le 01/23/18

103 Réputation

1 tutoriel rédigé

0 commentaires

Ajouter un commentaire

Nombre de vues :

Dernières 24 heures : 0

7 derniers jours : 0

30 derniers jours : 3

Total : 250