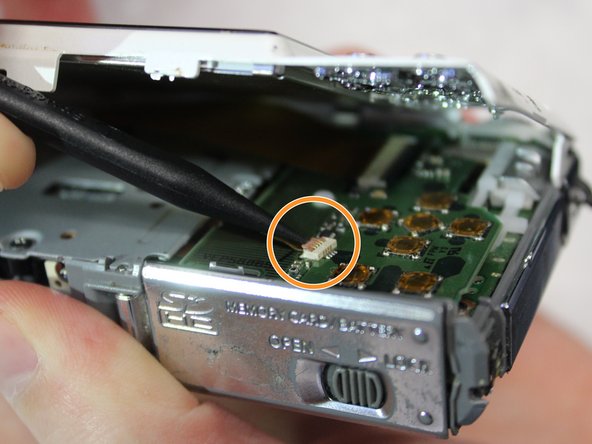
Aller au contenu principal

Panasonic Lumix DMC-FX37 LCD Screen Replacement

Ce dont vous avez besoin

  1. Panasonic Lumix DMC-FX37 LCD Screen Replacement, Panasonic Lumix DMC-FX37 Disassembly: étape 1, image 1 de 2 Panasonic Lumix DMC-FX37 LCD Screen Replacement, Panasonic Lumix DMC-FX37 Disassembly: étape 1, image 2 de 2
    • Remove both of the 3 mm screws on the bottom of the camera connected to the side panel.

  2. Panasonic Lumix DMC-FX37 LCD Screen Replacement: étape 2, image 1 de 2 Panasonic Lumix DMC-FX37 LCD Screen Replacement: étape 2, image 2 de 2
    • Remove the remaining 3 mm screw holding on the side panel and remove the panel entirely.

  3. Panasonic Lumix DMC-FX37 LCD Screen Replacement: étape 3, image 1 de 2 Panasonic Lumix DMC-FX37 LCD Screen Replacement: étape 3, image 2 de 2
    • On the opposite side of the camera, remove the two 3 mm screws.

    • Remove the bottom side panel and place it with its respective 3 mm screw.

  4. Panasonic Lumix DMC-FX37 LCD Screen Replacement: étape 4, image 1 de 3 Panasonic Lumix DMC-FX37 LCD Screen Replacement: étape 4, image 2 de 3 Panasonic Lumix DMC-FX37 LCD Screen Replacement: étape 4, image 3 de 3
    • Remove the front panel (the panel around the lens casing) from the camera.

    • Remove the two ribbon cables connected to the back panel (the panel this the LCD screen) by lifting up on their respective tabs and gently pulling out the cord.

    • Caution: When removing the back panel, the two ribbon cables are relatively delicate and must both be disconnected before the panel can be entirely removed.

    • Remove the back panel from the camera.

  5. Panasonic Lumix DMC-FX37 LCD Screen Replacement: étape 5, image 1 de 1
    • Remove the top control panel (connected to the flash battery) from the camera.

    • The top control panel is connected to the rest of the camera by a delicate multi-pin plug. Be careful as to not bend the pins!

  6. Panasonic Lumix DMC-FX37 LCD Screen Replacement, LCD Screen: étape 6, image 1 de 1
    • Use a plastic opening tool to pry off the LCD screen.

    • There is a small amount of adhesive lining the inside edges of the LCD screen. If you are having trouble prying off the screen, apply a small amount of heat to the front of the screen to melt the adhesive.

Conclusion

To reassemble your device, follow these instructions in reverse order.

Ben DuBose

Membre depuis le 01/30/18

327 Réputation

3 tutoriels rédigés

Équipe

Baylor, Team S2-G3, Johnson Spring 2018 Membre de l'équipe Baylor, Team S2-G3, Johnson Spring 2018

BU-JOHNSON-S18S2G3

3 membres

6 tutoriels rédigés

0 commentaires

Ajouter un commentaire

Nombre de vues :

Dernières 24 heures : 1

7 derniers jours : 1

30 derniers jours : 8

Total : 351