Aller au contenu principal

Toshiba Satellite A65-S126 Keyboard Replacement

Ce dont vous avez besoin

  1. Toshiba Satellite A65-S126 Keyboard Replacement, Battery: étape 1, image 1 de 1
    • Flip the laptop over so the bottom is facing up.

    • Slide each of the three tabs on the bottom half of the assembly into the unlocked position.

  2. Toshiba Satellite A65-S126 Keyboard Replacement: étape 2, image 1 de 1
    • Gently lift the battery out of the computer.

  3. Toshiba Satellite A65-S126 Keyboard Replacement, Upper Assembly: étape 3, image 1 de 1
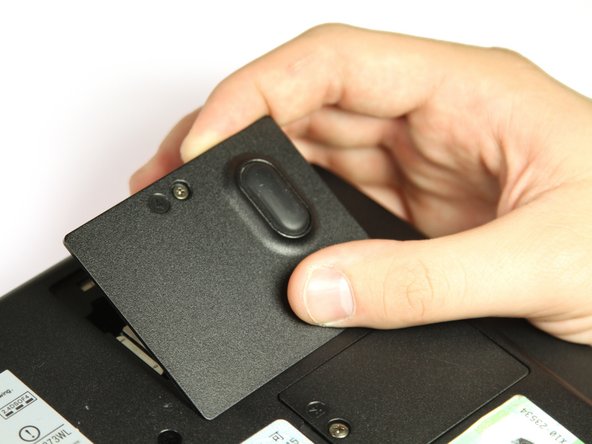
    • Remove the single 3mm Phillips #00 screw that secures the wireless card cover.

  4. Toshiba Satellite A65-S126 Keyboard Replacement: étape 4, image 1 de 1
    • Remove the WIFI module cover. It will pull right off.

  5. Toshiba Satellite A65-S126 Keyboard Replacement: étape 5, image 1 de 2 Toshiba Satellite A65-S126 Keyboard Replacement: étape 5, image 2 de 2
    • Unplug the white and black wires from the WiFi module.

  6. Toshiba Satellite A65-S126 Keyboard Replacement: étape 6, image 1 de 1
    • Remove the twelve 8mm button head Phillips #00 B8 screws.

    • Remove the two 14 mm button head Phillips #00 B14 screws.

    • Remove the two 10 mm Phillips #00 battery compartment screws.

    • Remove the two 8 mm Phillips #00 screws.

  7. Toshiba Satellite A65-S126 Keyboard Replacement: étape 7, image 1 de 1
    • Remove the seven 4mm flat Phillips #00 screws.

    • Remove the seven 20mm button head Phillips #00 screws.

  8. Toshiba Satellite A65-S126 Keyboard Replacement: étape 8, image 1 de 1
    • Use the plastic opening tool to pry the two halves apart.

  9. Toshiba Satellite A65-S126 Keyboard Replacement, Keyboard: étape 9, image 1 de 1
    • Using a screw driver for assistance, pop open the plastic cover and snap it off of the hinges. Repeat on the opposite side.

  10. Toshiba Satellite A65-S126 Keyboard Replacement: étape 10, image 1 de 1
    • Remove the two 3mm Phillips #00 screws.

  11. Toshiba Satellite A65-S126 Keyboard Replacement: étape 11, image 1 de 1
    • Slide keyboard out and away from the upper assembly.

Conclusion

To reassemble your device, follow these instructions in reverse order.

Aditya Varkhedi

Membre depuis le 10/01/13

104 Réputation

1 tutoriel rédigé

Équipe

Cal Poly, Team 14-8, Forte Fall 2013 Membre de l'équipe Cal Poly, Team 14-8, Forte Fall 2013

CPSU-FORTE-F13S14G8

4 membres

8 tutoriels rédigés

0 commentaires

Ajouter un commentaire

Nombre de vues :

Dernières 24 heures : 0

7 derniers jours : 3

30 derniers jours : 7

Total : 773