Aller au contenu principal

Upgrading iMac Intel 21.5" EMC 2544 RAM Memory

Tutoriel Archivé
Ce tutoriel est conservé uniquement à des fins de suivis historiques. Utilisez la version actuelle du tutoriel pour effectuer votre réparation.

Ce dont vous avez besoin

  1. Upgrading iMac Intel 21.5" EMC 2544 RAM Memory, Unglue the screen: étape 1, image 1 de 1
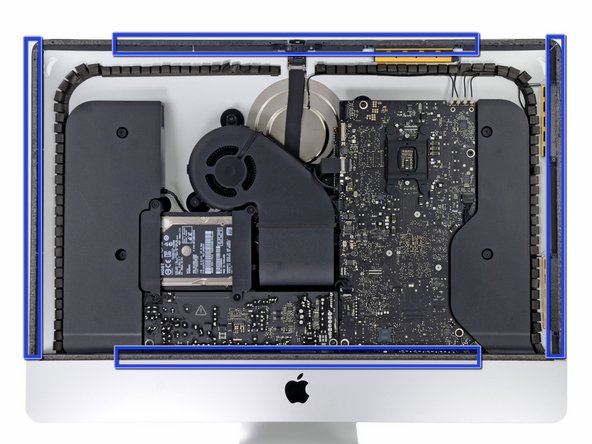
    • First you need to remove the glue from the edge of the iMac

    • Use a Guitar Pick around the screen to remove the glue

    • Be careful not to damage the iSight camera

  2. Upgrading iMac Intel 21.5" EMC 2544 RAM Memory, Screen: étape 2, image 1 de 2 Upgrading iMac Intel 21.5" EMC 2544 RAM Memory, Screen: étape 2, image 2 de 2
    • Once you are sure the adhesive is removed, use two heavy suction cups to lift the screen

    • Unplug these cables:

    • DisplayPort Cable

    • Power Cable

    • Lift the screen from the iMac

  3. Upgrading iMac Intel 21.5" EMC 2544 RAM Memory, Adhesive: étape 3, image 1 de 2 Upgrading iMac Intel 21.5" EMC 2544 RAM Memory, Adhesive: étape 3, image 2 de 2
    • Remove the gray tape from the iMac and the screen itself

    • When reassembling the iMac, put double sided tape on the screen and the iMac

  4. Upgrading iMac Intel 21.5" EMC 2544 RAM Memory, Hard drive: étape 4, image 1 de 2 Upgrading iMac Intel 21.5" EMC 2544 RAM Memory, Hard drive: étape 4, image 2 de 2
    • Remove the four Torx T10 screws

    • Unplug the SATA cables and remove the hard drive

  5. Upgrading iMac Intel 21.5" EMC 2544 RAM Memory, Fan: étape 5, image 1 de 2 Upgrading iMac Intel 21.5" EMC 2544 RAM Memory, Fan: étape 5, image 2 de 2
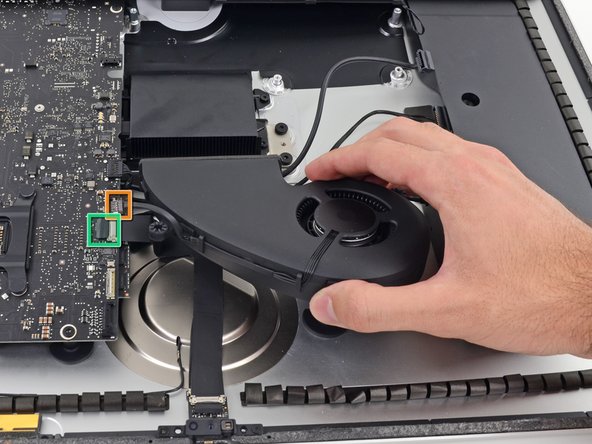
    • Remove these 3 Torx T10 screws

    • After you remove the screws, remove these cables

    • Fan Cable

    • Unstick and unplug the camera cable

    • After you remove the fan, remove the hard drive bay removing a single Torx T10 screw

  6. Upgrading iMac Intel 21.5" EMC 2544 RAM Memory, Power board: étape 6, image 1 de 3 Upgrading iMac Intel 21.5" EMC 2544 RAM Memory, Power board: étape 6, image 2 de 3 Upgrading iMac Intel 21.5" EMC 2544 RAM Memory, Power board: étape 6, image 3 de 3
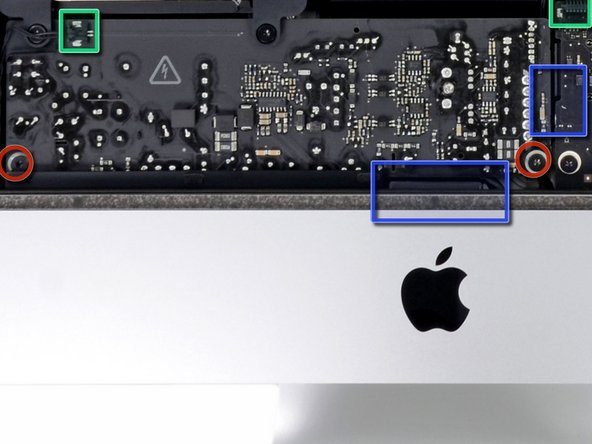
    • Remove these 2 Torx T10 screws

    • Unplug these 2 cables

    • Unplug 2 more cable below the power board by pressing the clip

    • The power board is hard to remove from its place, remove it carefully

  7. Upgrading iMac Intel 21.5" EMC 2544 RAM Memory: étape 7, image 1 de 1
    • Remove the cables out of the clip

  8. Upgrading iMac Intel 21.5" EMC 2544 RAM Memory: étape 8, image 1 de 2 Upgrading iMac Intel 21.5" EMC 2544 RAM Memory: étape 8, image 2 de 2
    • Unplug these 4 antenna connectors

    • When reassembling be sure that the connectors are in the same place

    • After that, remove these two Torx T10 screws

    • Move the speaker and unplug the cable from the logic board

    • Remove these other cables

    • For finish, remove these four Torx T10 screws

  9. Upgrading iMac Intel 21.5" EMC 2544 RAM Memory, Logic Board: étape 9, image 1 de 2 Upgrading iMac Intel 21.5" EMC 2544 RAM Memory, Logic Board: étape 9, image 2 de 2
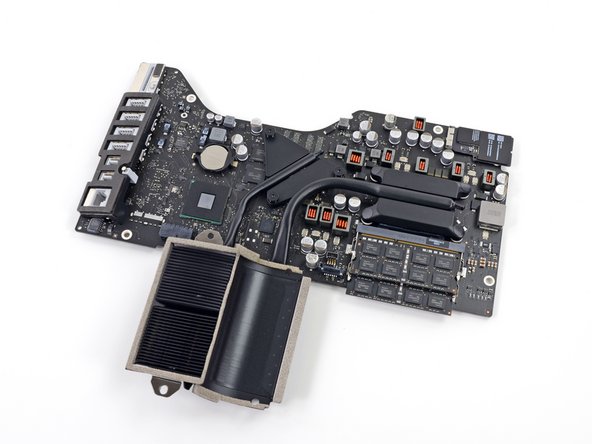
    • Unscrew 3 Torx T8 screws from the heatsink, then remove the logic board from the iMac

    • Be careful not to damage the SD card reader with the screw mount

  10. Upgrading iMac Intel 21.5" EMC 2544 RAM Memory, RAM memory: étape 10, image 1 de 2 Upgrading iMac Intel 21.5" EMC 2544 RAM Memory, RAM memory: étape 10, image 2 de 2
    • Flip the logic board over and release the tabs from each side of the RAM

Conclusion

To reassemble your device, follow these instructions in reverse order remembering to re-glue the screen.

11 autres ont terminé cette réparation.

jimenezser

Membre depuis le 08/29/12

3 848 Réputation

4 tutoriels rédigés

0 commentaires

Ajouter un commentaire

Nombre de vues :

Dernières 24 heures : 0

7 derniers jours : 1

30 derniers jours : 2

Total : 29,630