Aller au contenu principal

Ce dont vous avez besoin

Cette vue éclatée n'est pas un tutoriel de réparation. Pour réparer votre Alcatel One Touch Fierce, utilisez notre manuel de réparation.

  1. Démontage du Alcatel One Touch Fierce, Démontage du Alcatel One Touch Fierce: étape 1, image 1 de 3 Démontage du Alcatel One Touch Fierce, Démontage du Alcatel One Touch Fierce: étape 1, image 2 de 3 Démontage du Alcatel One Touch Fierce, Démontage du Alcatel One Touch Fierce: étape 1, image 3 de 3
    • Phillips # 000 est fortement recommandé. Comme vous pouvez le voir, je suis trop fauché pour l'équivalent iFixIt.

    • L'iSesamo est également toujours à portée de main.

  2. Démontage du Alcatel One Touch Fierce: étape 2, image 1 de 2 Démontage du Alcatel One Touch Fierce: étape 2, image 2 de 2
    • Il s'agit de la variante Metro PCS du téléphone dans une belle couleur argent métallique.

    • L'avant de cet appareil particulier est endommagé par l'eau et les empreintes digitales endommagées.

  3. Démontage du Alcatel One Touch Fierce: étape 3, image 1 de 2 Démontage du Alcatel One Touch Fierce: étape 3, image 2 de 2
    • Avec le dos en plastique enlevé.

    • NE PAS ENLEVE

    • Défi accepté

  4. Démontage du Alcatel One Touch Fierce: étape 4, image 1 de 1
    • Le deuxième couvercle est retiré. Nous avons maintenant un meilleur aperçu des composants.

  5. Démontage du Alcatel One Touch Fierce: étape 5, image 1 de 1
    • La batterie. Ne dure pas très longtemps.

  6. Démontage du Alcatel One Touch Fierce: étape 6, image 1 de 2 Démontage du Alcatel One Touch Fierce: étape 6, image 2 de 2
    • L'appareil photo 5MP situé à l'arrière du téléphone.

  7. Démontage du Alcatel One Touch Fierce: étape 7, image 1 de 2 Démontage du Alcatel One Touch Fierce: étape 7, image 2 de 2
    • La carte fille contient le port Micro USB

  8. Démontage du Alcatel One Touch Fierce: étape 8, image 1 de 2 Démontage du Alcatel One Touch Fierce: étape 8, image 2 de 2
    • Le PCB principal

  9. Démontage du Alcatel One Touch Fierce: étape 9, image 1 de 3 Démontage du Alcatel One Touch Fierce: étape 9, image 2 de 3 Démontage du Alcatel One Touch Fierce: étape 9, image 3 de 3
    • La caméra VGA située à l'avant du téléphone.

  10. Démontage du Alcatel One Touch Fierce: étape 10, image 1 de 2 Démontage du Alcatel One Touch Fierce: étape 10, image 2 de 2
    • Les restes du panneau avant

  11. Démontage du Alcatel One Touch Fierce: étape 11, image 1 de 2 Démontage du Alcatel One Touch Fierce: étape 11, image 2 de 2
    • Essayer de retirer l'assemblage du panneau avant.

    • Il semblait avoir un peu d'adhésif.

    • Heureusement, j'ai une bonne quantité de choix disponibles.

    • Oh non, je crois que j'entends des craquements...

  12. Démontage du Alcatel One Touch Fierce, Tirer ...: étape 12, image 1 de 2 Démontage du Alcatel One Touch Fierce, Tirer ...: étape 12, image 2 de 2
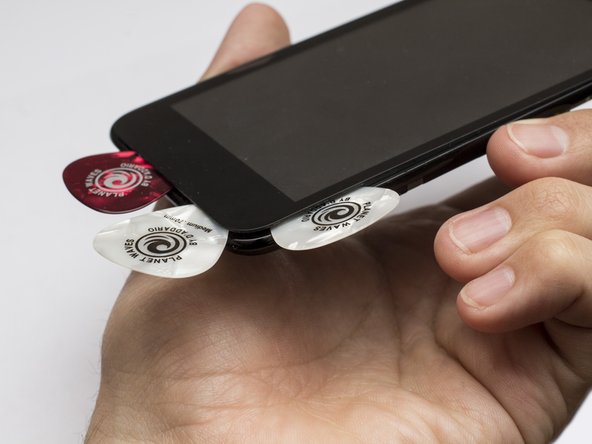
    • Zut! J'ai tout vu venir.

    • Pour éviter cela, utilisez un pistolet thermique pour desserrer la colle...pas trop de chaleur cependant.

  13. Démontage du Alcatel One Touch Fierce: étape 13, image 1 de 2 Démontage du Alcatel One Touch Fierce: étape 13, image 2 de 2
    • J'ai maintenant un téléphone fonctionnel sans écran LCD.

Merci à ces traducteurs :

en fr

100%

[deleted] nous aide à réparer le monde ! Vous voulez contribuer ?
Commencez à traduire ›

Jonathan Ruiz

Membre depuis le 12/13/11

1 322 Réputation

2 tutoriels rédigés

18 commentaires

I'm so glad I found this link!!! I broke the screen on my phone two weeks after I bought it, and refused to pay someone $80 to fix it (I didn't pay that much for the phone!). I have NO experience replacing a cell phone screen and this teardown looked pretty straightforward, so I figured it was worth a try. The step by step was easy, worked perfectly, and I can finally see my screen! YAY! Thank you!

Note: Use patience, and it's a breeze!

Barbara Prather - Réponse

I also successfully repaired my phone although this guide made it seem like you couldn't do it without ruining the LCD. I'm pretty proficient in phone and electronic repair but I think even beginners could do this one. The new glass that I bought had adhesive already applied to it so I could see exactly where it would be adhered from the factory. I heated the front with a heat gun and started at the top left corner. Once I got a pick in there I started going into the gap with a little X-Acto knife, cutting away at the foam like adhesive. I worked my way down the left side, then went back to the right side, cutting as I went. When only the bottom was attached, I held the phone by the top of the glass and let it dangle. Using the heat gun on the bottom of the glass allowed the weight of the phone to separate itself from the glass. Cleaned it up and put the new glass on, works like new again.

Dan - Réponse

I'm about to give this a try Dan. Thanks for your encouragement. Just one question: how did you "clean it up" before putting on the new one? Thanks!!

Janene -

this actually helped! thanks to posted this , my screen broke and ordered it online (ebay) it took a week to get here but man i couldnt see anything with my whole screen cracked! it was cheap as well, 20 bucks with tools! but this really helped!!! just do it calm and slowly , its my first time changing a screen on a phone, this really helped! thanks!

kevin - Réponse

I cracked the camera screen on the back a week after buying the phone. Can you tell me where I can get a new one?

thanks!

Shannon - Réponse

Ajouter un commentaire

Nombre de vues :

Dernières 24 heures : 0

7 derniers jours : 3

30 derniers jours : 9

Total : 62,823