Aller au contenu principal

Ce dont vous avez besoin

Cette vue éclatée n'est pas un tutoriel de réparation. Pour réparer votre HP G61, utilisez notre manuel de réparation.

  1. HP G61-430SB Teardown, HP G61-430SB Teardown: étape 1, image 1 de 1
    • Turn the device over and remove the screws from the battery. Remove the black panels holding the HDD, ram, and wifi.

  2. HP G61-430SB Teardown: étape 2, image 1 de 3 HP G61-430SB Teardown: étape 2, image 2 de 3 HP G61-430SB Teardown: étape 2, image 3 de 3
    • Remove the RAM modules and the HDD as shown in the pictures.

  3. HP G61-430SB Teardown: étape 3, image 1 de 2 HP G61-430SB Teardown: étape 3, image 2 de 2
    • Locate the screw for the DVD player and remove it. Then remove the DVD player with a thin spudger.

  4. HP G61-430SB Teardown: étape 4, image 1 de 2 HP G61-430SB Teardown: étape 4, image 2 de 2
    • Remove the screws to remove the keyboard.

  5. HP G61-430SB Teardown: étape 5, image 1 de 2 HP G61-430SB Teardown: étape 5, image 2 de 2
    • Remove the screws that are circled in the picture. These screws hold the case of the laptop.

  6. HP G61-430SB Teardown: étape 6, image 1 de 1
    • Remove the WIFI antenna cables from WIFI card.

    • Then remove the screws of the WIFI card and remove the card.

  7. HP G61-430SB Teardown: étape 7, image 1 de 2 HP G61-430SB Teardown: étape 7, image 2 de 2
    • Flip the laptop around and gently remove the keyboard with your fingers.

    • Start with the corners of the keyboard.

    • Gently loosen the keyboard with a flat head screwdriver or a thin spudger.

  8. HP G61-430SB Teardown: étape 8, image 1 de 2 HP G61-430SB Teardown: étape 8, image 2 de 2
    • After removing the keyboard, find the other screws located in the grey panel.

    • Remove the black plastic. Be careful with the white flat cable.

  9. HP G61-430SB Teardown: étape 9, image 1 de 1
    • Remove the black flat wire of the LCD screen from the motherboard.

  10. HP G61-430SB Teardown: étape 10, image 1 de 1
    • Remove the hinge screws with the screwdriver from the left side to the right side.

    • Under one of the two hinges, there is a hidden screw (case)

  11. HP G61-430SB Teardown: étape 11, image 1 de 2 HP G61-430SB Teardown: étape 11, image 2 de 2
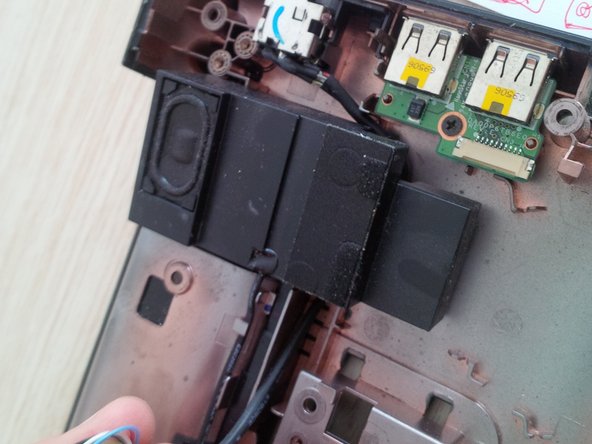
    • Remove the black plastic.

    • Remove the audio boxes.

    • Remove all the other wires and cables.

    • Then gently separate the screen from the case.

  12. HP G61-430SB Teardown: étape 12, image 1 de 2 HP G61-430SB Teardown: étape 12, image 2 de 2
    • Use an iOpener to separate the grey case from the bottom case.

    • Careful: the battery compartment is together with the grey panel.

    • Tip: "slide" the iOpener while opening until you hear clicks. It is easy if you slide.

  13. HP G61-430SB Teardown: étape 13, image 1 de 3 HP G61-430SB Teardown: étape 13, image 2 de 3 HP G61-430SB Teardown: étape 13, image 3 de 3
    • Remove the motherboard by removing the screws first. Be careful with the cables and the wires.

    • Be careful with the connector of the DC power jack. You can replace the USB drivers on that side as well.

  14. HP G61-430SB Teardown: étape 14, image 1 de 3 HP G61-430SB Teardown: étape 14, image 2 de 3 HP G61-430SB Teardown: étape 14, image 3 de 3
    • Remove the cooler.

  15. HP G61-430SB Teardown: étape 15, image 1 de 1
    • To remove the Processor, unlock the processor socket with a flat screwdriver.

    • Then gently remove the Processor.

Kevin D

Membre depuis le 05/02/14

7 276 Réputation

21 tutoriels rédigés

2 commentaires

Thanks a bunch this helped a whole lot!!!!

Teresa halley - Réponse

Thank you very much. Very well explained :)

a.thorne.987 - Réponse

Ajouter un commentaire

Nombre de vues :

Dernières 24 heures : 0

7 derniers jours : 4

30 derniers jours : 21

Total : 8,897