Aller au contenu principal

Ce dont vous avez besoin

Cette vue éclatée n'est pas un tutoriel de réparation. Pour réparer votre Nikon Coolpix 3500, utilisez notre manuel de réparation.

  1. Nikon Coolpix 3500 Teardown, Nikon Coolpix 3500 Teardown: étape 1, image 1 de 1
    • Remove the battery cover.

    • Remove the battery.

  2. Nikon Coolpix 3500 Teardown: étape 2, image 1 de 1
    • Remove two 4.5 mm screws next to the battery slot.

    • Remove one 3 mm screw above the CF memory card slot.

    • Remove one 4.5 mm screw next to the CF memory card slot.

  3. Nikon Coolpix 3500 Teardown: étape 3, image 1 de 1
    • Remove two 4.5 mm screws from inside the battery slot.

  4. Nikon Coolpix 3500 Teardown: étape 4, image 1 de 1
    • Remove two 5 mm screws from the opposite end of the battery slot.

  5. Nikon Coolpix 3500 Teardown: étape 5, image 1 de 1
    • Remove the plastic cap and the 5 mm screw underneath.

  6. Nikon Coolpix 3500 Teardown: étape 6, image 1 de 1
    • Remove the five 3.5 mm screws from the bottom of the camera.

    • Gently pry off the grey faceplate.

    • Do not pull hard; there are two wires connecting the faceplate to the motherboard.

  7. Nikon Coolpix 3500 Teardown: étape 7, image 1 de 3 Nikon Coolpix 3500 Teardown: étape 7, image 2 de 3 Nikon Coolpix 3500 Teardown: étape 7, image 3 de 3
    • Use a spudger to disconnect the white-capped wire at the bottom of the camera.

    • Use a spudger to disconnect the orange-capped wire at the bottom of the camera and set the faceplate aside.

  8. Nikon Coolpix 3500 Teardown: étape 8, image 1 de 1
    • Disconnect the grey-capped wires from the motherboard.

    • Disconnect the blue wire attached to the green chip from the center of the motherboard.

  9. Nikon Coolpix 3500 Teardown: étape 9, image 1 de 2 Nikon Coolpix 3500 Teardown: étape 9, image 2 de 2
    • Remove the 3.5 mm screw from the motherboard next to the rotating lens.

    • Flip the motherboard and lens over to access the three wires on the back that connect to the LED screen.

  10. Nikon Coolpix 3500 Teardown: étape 10, image 1 de 2 Nikon Coolpix 3500 Teardown: étape 10, image 2 de 2
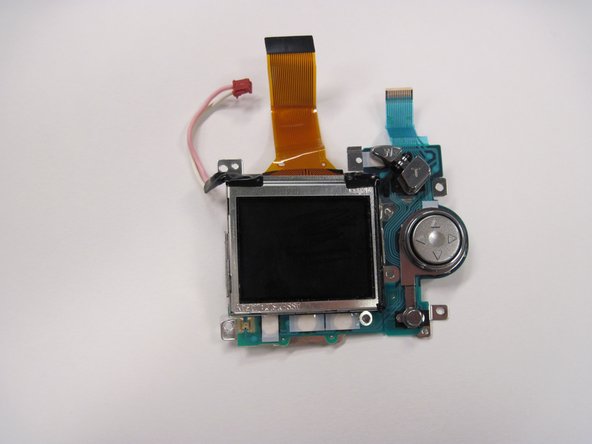
    • Disconnect the blue wire connecting the motherboard to the LED screen.

    • Disconnect the orange wire using a spudger while pushing out horizontally.

    • Disconnect the red capped wire from the motherboard.

    • Lift the motherboard and lens (still connected) out of the back case.

  11. Nikon Coolpix 3500 Teardown: étape 11, image 1 de 1
    • Lift up on the black covering and remove the orange wire connecting the lens to the motherboard.

  12. Nikon Coolpix 3500 Teardown: étape 12, image 1 de 1
    • Remove the 2.5 mm screw next to the red capped wire.

    • Remove the two 3.4 mm screws on the back of the directional buttons.

    • Remove the two 4.4 mm screws in the metal plate across from the orange wire.

  13. Nikon Coolpix 3500 Teardown: étape 13, image 1 de 2 Nikon Coolpix 3500 Teardown: étape 13, image 2 de 2
    • Gently lift the LED screen out of the remaining casing and set it aside.

    • Be careful not to let the rubber backing of the buttons fall out of place.

richard guenther

Membre depuis le 04/19/10

183 Réputation

6 tutoriels rédigés

Équipe

Cal Poly, Team 30-38, Garner Spring 2010 Membre de l'équipe Cal Poly, Team 30-38, Garner Spring 2010

CPSU-GARNER-S10S30G38

5 membres

11 tutoriels rédigés

0 commentaires

Ajouter un commentaire

Nombre de vues :

Dernières 24 heures : 1

7 derniers jours : 2

30 derniers jours : 3

Total : 7,758