Aller au contenu principal

2007-2012 Jeep Wrangler Tail Light Bulb Replacement

Ce dont vous avez besoin

  1. 2007-2012 Jeep Wrangler Tail Light Bulb Replacement, 2007-2012 Jeep Wrangler Tail Light Bulb: étape 1, image 1 de 1
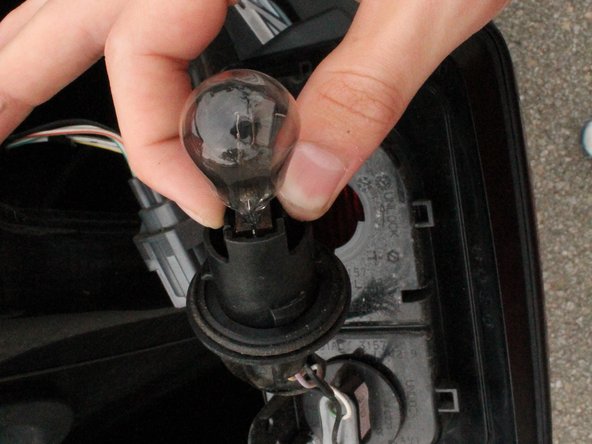
    • Determine which tail light is not working.

    • The tail lights are located within the red rectangles.

    • This can be done by having someone stand outside the vehicle while it is turned on. The driver should turn the vehicle's headlights on. If the person outside the vehicle sees that the tail light does not turn on, then it is malfunctioning.

  2. 2007-2012 Jeep Wrangler Tail Light Bulb Replacement: étape 2, image 1 de 3 2007-2012 Jeep Wrangler Tail Light Bulb Replacement: étape 2, image 2 de 3 2007-2012 Jeep Wrangler Tail Light Bulb Replacement: étape 2, image 3 de 3
    • Use a Phillips No. 2 screwdriver to remove ONLY the two INNER screws by turning in a counterclockwise direction.

    • DO NOT remove the two outer screws, the pictures are incorrect.

  3. 2007-2012 Jeep Wrangler Tail Light Bulb Replacement: étape 3, image 1 de 1
    • Grasp the edges of the tail light and slide 1/2" towards the center of the vehicle, then pull lightly away from the vehicle until the light is 4 inches away from the vehicle.

    • Pulling any further may result in damaged wiring.

  4. 2007-2012 Jeep Wrangler Tail Light Bulb Replacement: étape 4, image 1 de 2 2007-2012 Jeep Wrangler Tail Light Bulb Replacement: étape 4, image 2 de 2
    • Locate the top light bulb on the back of the tail light casing. This is the bulb you are going to replace.

  5. 2007-2012 Jeep Wrangler Tail Light Bulb Replacement: étape 5, image 1 de 2 2007-2012 Jeep Wrangler Tail Light Bulb Replacement: étape 5, image 2 de 2
    • Twist the back of the light bulb counterclockwise until it loosens.

    • Twist and pull carefully until the light bulb and socket are removed together.

  6. 2007-2012 Jeep Wrangler Tail Light Bulb Replacement: étape 6, image 1 de 2 2007-2012 Jeep Wrangler Tail Light Bulb Replacement: étape 6, image 2 de 2
    • Pinch the clips just below the light bulb. These hold the light bulb in place.

    • Pull until the light bulb is released from the socket.

    • If the light bulb is faulty, dispose of it properly.

Conclusion

To reassemble your device, follow these instructions in reverse order.

6 autres ont terminé cette réparation.

Adam Donald

Membre depuis le 09/26/12

299 Réputation

4 tutoriels rédigés

Équipe

Cal Poly, Team 7-51, Forte Fall 2012 Membre de l'équipe Cal Poly, Team 7-51, Forte Fall 2012

CPSU-FORTE-F12S7G51

5 membres

9 tutoriels rédigés

8 commentaires

I got that far but I cant get the bulbs out - they seem to be stuck in the sockets - any ideas? thank you very much - steven

steven - Réponse

On mine the clips actually need to be pushed out and not pinched - can stick a small screwdriver in there to push them out ( maybe one for each)

Maurice D. Alexander -

Try spraying some WD40 where the bulb plugs into the socket. Let it sit a few minutes, then try pilling the bulb out.

ka1axy73 - Réponse

I have successfully replaced these bulbs several times. This time I decided to use an LED replacement bulb (same part number but with an XL suffix). The new bulb went in fine and works BUT the computer has not reset regarding the warning message that the right rear turn signal lamp being out. Any ideas?

Don Sherman - Réponse

I haven't had any luck. In fact, after two weeks the led bulbs always burn out. I was told you bed a diode in between the socket, and the bulb.

Michael Avon -

Ajouter un commentaire

Nombre de vues :

Dernières 24 heures : 1

7 derniers jours : 27

30 derniers jours : 164

Total : 73,634