Aller au contenu principal

2008-2010 Mitsubishi Lancer Radio/CD Player Replacement

Ce dont vous avez besoin

  1. 2008-2010 Mitsubishi Lancer Radio/CD Player Replacement, 2008-2010 Mitsubishi Lancer Radio/CD Player Replacement: étape 1, image 1 de 1
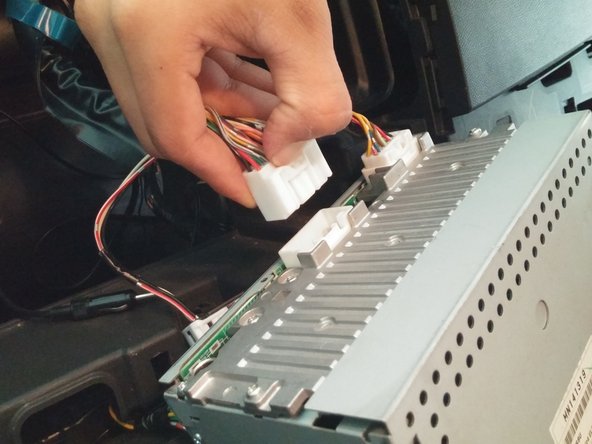
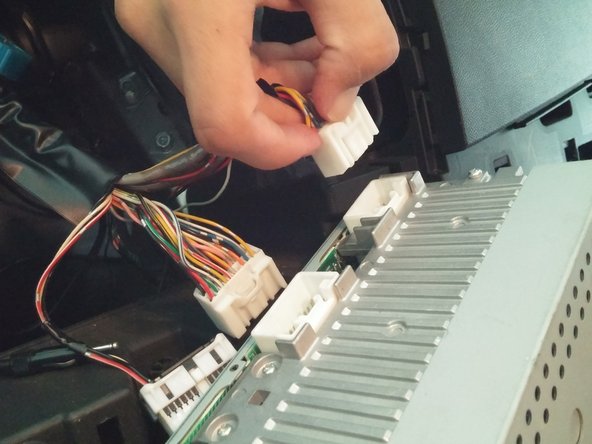
    • The only tool required for this install is a Phillips #2 screwdriver. Of course, you will also need the new replacement radio/CD player unit that you will be installing.

    • Make sure that the car is not on before proceeding since we will be accessing some electrical components. However, you do not need to disconnect the car's battery.

  2. 2008-2010 Mitsubishi Lancer Radio/CD Player Replacement: étape 2, image 1 de 2 2008-2010 Mitsubishi Lancer Radio/CD Player Replacement: étape 2, image 2 de 2
    • Using both hands, apply inward pressure to the sides of the glove compartment until the compartment is free to slide out.

    • The clips on the side of the glove compartment must be freed.

  3. 2008-2010 Mitsubishi Lancer Radio/CD Player Replacement: étape 3, image 1 de 1
    • Remove the attached plastic arm by simply pulling outward so that the arm snaps out of its socket.

  4. 2008-2010 Mitsubishi Lancer Radio/CD Player Replacement: étape 4, image 1 de 2 2008-2010 Mitsubishi Lancer Radio/CD Player Replacement: étape 4, image 2 de 2
    • The glove compartment can now be removed completely by raising it off its hinges.

  5. 2008-2010 Mitsubishi Lancer Radio/CD Player Replacement: étape 5, image 1 de 1
    • Using the Philips #2 screwdriver, remove a 15 mm screw located just above the glove compartment damper piston.

  6. 2008-2010 Mitsubishi Lancer Radio/CD Player Replacement: étape 6, image 1 de 1
    • Carefully remove the plastic trim by pulling outwards.

  7. 2008-2010 Mitsubishi Lancer Radio/CD Player Replacement: étape 7, image 1 de 1
    • Using a Philips #2 screwdriver remove a 15 mm screw from the trim piece.

  8. 2008-2010 Mitsubishi Lancer Radio/CD Player Replacement: étape 8, image 1 de 3 2008-2010 Mitsubishi Lancer Radio/CD Player Replacement: étape 8, image 2 de 3 2008-2010 Mitsubishi Lancer Radio/CD Player Replacement: étape 8, image 3 de 3
    • Using both hands, carefully pull the trim outward section by section.

    • The dashboard and decorative trim are attached to each other, so they will come out as one unit.

    • When pulling out the trim start from the right and work your way toward the center console.

  9. 2008-2010 Mitsubishi Lancer Radio/CD Player Replacement: étape 9, image 1 de 1
    • Optional: If you choose, you can remove the harness shown. (See directions on Step 12 for removing a harness clip.) Otherwise you can simply rest the fixture on top of the shift knob.

  10. 2008-2010 Mitsubishi Lancer Radio/CD Player Replacement: étape 10, image 1 de 1
    • Using a Philips #2 screwdriver remove four 12 mm screws attached to the mounting bracket.

  11. 2008-2010 Mitsubishi Lancer Radio/CD Player Replacement: étape 11, image 1 de 2 2008-2010 Mitsubishi Lancer Radio/CD Player Replacement: étape 11, image 2 de 2
    • Pull out the radio unit to expose the connections behind it.

  12. 2008-2010 Mitsubishi Lancer Radio/CD Player Replacement: étape 12, image 1 de 2 2008-2010 Mitsubishi Lancer Radio/CD Player Replacement: étape 12, image 2 de 2
    • Remove the black antenna connection by simply pulling it out.

  13. 2008-2010 Mitsubishi Lancer Radio/CD Player Replacement: étape 13, image 1 de 3 2008-2010 Mitsubishi Lancer Radio/CD Player Replacement: étape 13, image 2 de 3 2008-2010 Mitsubishi Lancer Radio/CD Player Replacement: étape 13, image 3 de 3
    • Remove both the large and small wire harnesses by firmly pressing in and holding the retaining clip.

    • While continuing to hold down the retaining clip, firmly pull the harnesses out.

    • Do not pull harnesses out by the wires, as you may damage or break the wires. Instead pull out by the white plastic harness.

  14. 2008-2010 Mitsubishi Lancer Radio/CD Player Replacement: étape 14, image 1 de 3 2008-2010 Mitsubishi Lancer Radio/CD Player Replacement: étape 14, image 2 de 3 2008-2010 Mitsubishi Lancer Radio/CD Player Replacement: étape 14, image 3 de 3
    • You are now ready to replace your radio with your new unit.

Conclusion

To reassemble your device, follow these instructions in reverse order.

4 autres ont terminé cette réparation.

Carlos Esquivel

Membre depuis le 02/23/15

236 Réputation

1 tutoriel rédigé

Équipe

Cal Poly, Team 12-1, Green Winter 2015 Membre de l'équipe Cal Poly, Team 12-1, Green Winter 2015

CPSU-GREEN-W15S12G1

6 membres

7 tutoriels rédigés

5 commentaires

Thx. Saved me hrs of wrongful disassembly. Lol

Phil - Réponse

Any Mitsubishi radio code can be recovered for free by online generating tool : https://www.radiocodescalculator.com/mit...

Blaze Angelov - Réponse

Hi I own a 2008 Mitsubishi lancer just brought it CD player doesn't work only radio so wondering where I can buy a new stereo thanks. Or a way to fix mine it's like it's not working at all turn onto CD mode but won't even try read

JAD BLAXLAND - Réponse

Had the same problem with my 08 lancer. Replaced with a refurbished unit.

sanjurjo54 -

If you break some of the white clips like i did, the replacement part number from Mitsubishi is MR402859

gregshep - Réponse

Ajouter un commentaire

Nombre de vues :

Dernières 24 heures : 6

7 derniers jours : 30

30 derniers jours : 101

Total : 19,507