Aller au contenu principal

8BitDo Ultimate Wired Buttons Replacement

Ce dont vous avez besoin

  1. 8BitDo Ultimate Wired Buttons Replacement, Buttons: étape 1, image 1 de 3 8BitDo Ultimate Wired Buttons Replacement, Buttons: étape 1, image 2 de 3 8BitDo Ultimate Wired Buttons Replacement, Buttons: étape 1, image 3 de 3
    • Orient the controller such that the back of the controller is facing you.

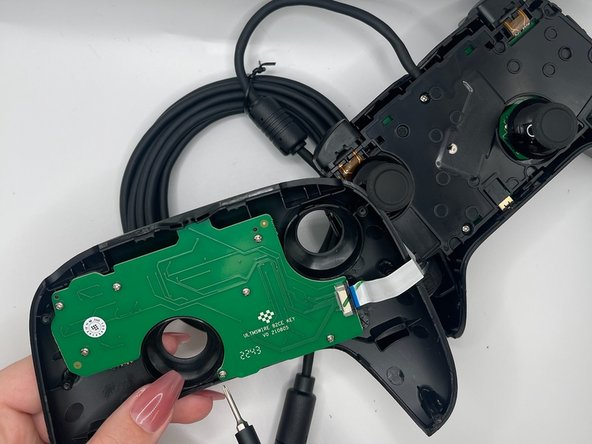
    • Insert an opening tool into the small opening on the back of the grip, and gently pry the grip cover away until it pops free.

  2. 8BitDo Ultimate Wired Buttons Replacement: étape 2, image 1 de 3 8BitDo Ultimate Wired Buttons Replacement: étape 2, image 2 de 3 8BitDo Ultimate Wired Buttons Replacement: étape 2, image 3 de 3
    • Pry the other grip panel off using the same method.

  3. 8BitDo Ultimate Wired Buttons Replacement: étape 3, image 1 de 3 8BitDo Ultimate Wired Buttons Replacement: étape 3, image 2 de 3 8BitDo Ultimate Wired Buttons Replacement: étape 3, image 3 de 3
    • Use the TR6 Torx Security screwdriver to remove the top left 10.44 mm torx screw on the backside.

    • Use tweezers to help remove the screws (optional).

  4. 8BitDo Ultimate Wired Buttons Replacement: étape 4, image 1 de 3 8BitDo Ultimate Wired Buttons Replacement: étape 4, image 2 de 3 8BitDo Ultimate Wired Buttons Replacement: étape 4, image 3 de 3
    • Use the TR6 Torx Security screwdriver to remove the middle left 10.44 mm Torx screw on the backside.

  5. 8BitDo Ultimate Wired Buttons Replacement: étape 5, image 1 de 3 8BitDo Ultimate Wired Buttons Replacement: étape 5, image 2 de 3 8BitDo Ultimate Wired Buttons Replacement: étape 5, image 3 de 3
    • Use the TR6 Torx Security screwdriver to remove the bottom left 10.44 mm Torx screw on the backside.

  6. 8BitDo Ultimate Wired Buttons Replacement: étape 6, image 1 de 3 8BitDo Ultimate Wired Buttons Replacement: étape 6, image 2 de 3 8BitDo Ultimate Wired Buttons Replacement: étape 6, image 3 de 3
    • Use the TR6 Torx Security screwdriver to remove the top right 10.44 mm Torx screw on the backside.

  7. 8BitDo Ultimate Wired Buttons Replacement: étape 7, image 1 de 3 8BitDo Ultimate Wired Buttons Replacement: étape 7, image 2 de 3 8BitDo Ultimate Wired Buttons Replacement: étape 7, image 3 de 3
    • Use the TR6 Torx Security screwdriver to remove the middle right 10.44 mm Torx screw on the backside.

  8. 8BitDo Ultimate Wired Buttons Replacement: étape 8, image 1 de 3 8BitDo Ultimate Wired Buttons Replacement: étape 8, image 2 de 3 8BitDo Ultimate Wired Buttons Replacement: étape 8, image 3 de 3
    • Use the TR6 Torx Security screwdriver to unscrew the bottom right 10.44 mm Torx screw on the backside.

  9. 8BitDo Ultimate Wired Buttons Replacement: étape 9, image 1 de 2 8BitDo Ultimate Wired Buttons Replacement: étape 9, image 2 de 2
    • Orient the controller such that the back of the controller is facing you.

    • Insert an opening tool into the small opening between the front and back panels, and gently pry the back panel away to open the bottom clamps of the top panel of the controller.

  10. 8BitDo Ultimate Wired Buttons Replacement: étape 10, image 1 de 2 8BitDo Ultimate Wired Buttons Replacement: étape 10, image 2 de 2
    • Insert an opening tool into the small opening between the front and back panel (top view) and pry away to remove the top half.

    • A ribbon cable connects the front and back portions of the controller.

  11. 8BitDo Ultimate Wired Buttons Replacement: étape 11, image 1 de 3 8BitDo Ultimate Wired Buttons Replacement: étape 11, image 2 de 3 8BitDo Ultimate Wired Buttons Replacement: étape 11, image 3 de 3
    • Use the Phillips #0 Screwdriver to remove all seven 6.14 mm Phillips screws from the button PCB.

  12. 8BitDo Ultimate Wired Buttons Replacement: étape 12, image 1 de 3 8BitDo Ultimate Wired Buttons Replacement: étape 12, image 2 de 3 8BitDo Ultimate Wired Buttons Replacement: étape 12, image 3 de 3
    • Remove the button PCB.

    • Pinch the silicone cover on the buttons to remove it, such that the buttons are exposed.

  13. 8BitDo Ultimate Wired Buttons Replacement: étape 13, image 1 de 3 8BitDo Ultimate Wired Buttons Replacement: étape 13, image 2 de 3 8BitDo Ultimate Wired Buttons Replacement: étape 13, image 3 de 3
    • Simply using the force from your finger, push the button out of the housing.

    • Pull button out.

Conclusion

To reassemble your device, follow these instructions in reverse order.

3 autres ont terminé cette réparation.

Tanvi Verma

Membre depuis le 02/08/24

639 Réputation

2 tutoriels rédigés

Équipe

0 commentaires

Ajouter un commentaire

Nombre de vues :

Dernières 24 heures : 6

7 derniers jours : 20

30 derniers jours : 111

Total : 213