Aller au contenu principal

ASUS E210MA-TB.CL464BK Wi-Fi Card Replacement

Ce dont vous avez besoin

  1. ASUS E210MA-TB.CL464BK Wi-Fi Card Replacement, Wi-Fi Card: étape 1, image 1 de 3 ASUS E210MA-TB.CL464BK Wi-Fi Card Replacement, Wi-Fi Card: étape 1, image 2 de 3 ASUS E210MA-TB.CL464BK Wi-Fi Card Replacement, Wi-Fi Card: étape 1, image 3 de 3
    • Place the laptop with the bottom side facing up. Have the front (where the touchpad is) facing toward you.

    • Start by removing the ten 7mm screws on the bottom of the laptop using a JIS #00 screwdriver.

  2. ASUS E210MA-TB.CL464BK Wi-Fi Card Replacement: étape 2, image 1 de 1
    • Double-check to make sure all of the screws are removed.

    • If you have a Jimmy or other flat, straight-edge object, slide it in the crack where the halves of the case meet.

    • When the parts are separated, pull them apart to expose the insides of the case.

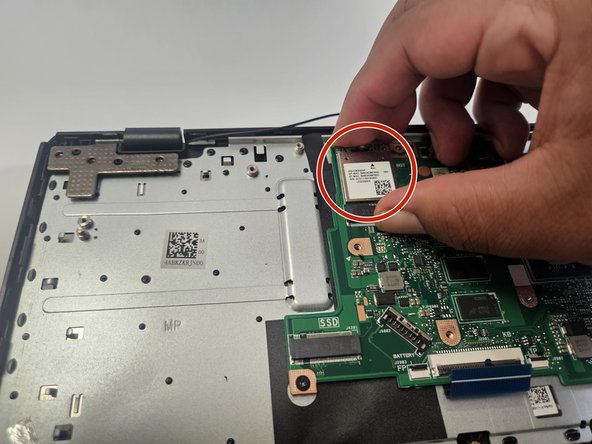
  3. ASUS E210MA-TB.CL464BK Wi-Fi Card Replacement: étape 3, image 1 de 2 ASUS E210MA-TB.CL464BK Wi-Fi Card Replacement: étape 3, image 2 de 2
    • Locate the card and remove it by gently lifting it up and pulling it out.

Conclusion

To reassemble your device, follow these instructions in reverse order.

John Hutchins

Membre depuis le 02/07/23

763 Réputation

5 tutoriels rédigés

Équipe

Gateway, Team 73-6, Gonzalez Spring 2023 Membre de l'équipe Gateway, Team 73-6, Gonzalez Spring 2023

GCC-GONZALEZ-S23S73G6

5 membres

5 tutoriels rédigés

0 commentaires

Ajouter un commentaire

Nombre de vues :

Dernières 24 heures : 0

7 derniers jours : 0

30 derniers jours : 11

Total : 125