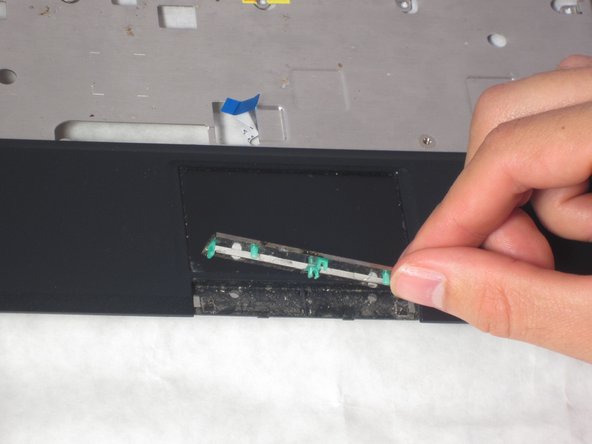
Aller au contenu principal

ASUS Eee PC 900HD Clicker Replacement

Ce dont vous avez besoin

  1. ASUS Eee PC 900HD Clicker Replacement, Clicker: étape 1, image 1 de 3 ASUS Eee PC 900HD Clicker Replacement, Clicker: étape 1, image 2 de 3 ASUS Eee PC 900HD Clicker Replacement, Clicker: étape 1, image 3 de 3
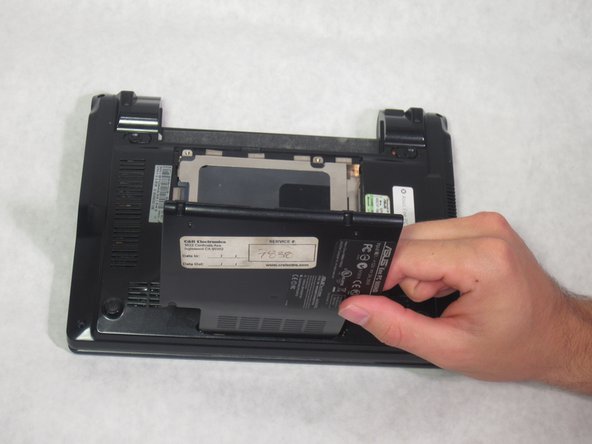
    • Flip the laptop over and locate the battery lock tabs.

    • Slide the right tab to the unlock position (right) so that the red dot is showing. Then, slide and hold the left tab to its unlock position (left).

    • While holding the left tab to the left, pull the battery out.

  2. ASUS Eee PC 900HD Clicker Replacement: étape 2, image 1 de 2 ASUS Eee PC 900HD Clicker Replacement: étape 2, image 2 de 2
    • Remove the four 4.76 mm screws using the Phillips J0 Screwdriver.

  3. ASUS Eee PC 900HD Clicker Replacement: étape 3, image 1 de 2 ASUS Eee PC 900HD Clicker Replacement: étape 3, image 2 de 2
    • Using a plastic opening tool, take off the hard drive cover by lifting it up.

  4. ASUS Eee PC 900HD Clicker Replacement: étape 4, image 1 de 3 ASUS Eee PC 900HD Clicker Replacement: étape 4, image 2 de 3 ASUS Eee PC 900HD Clicker Replacement: étape 4, image 3 de 3
    • Starting from the left, use a plastic opening tool to slide the hard drive all the way to the right.

    • Once the hard drive is all the way to the right, lift it up and pull it out.

  5. ASUS Eee PC 900HD Clicker Replacement: étape 5, image 1 de 2 ASUS Eee PC 900HD Clicker Replacement: étape 5, image 2 de 2
    • Remove the screw under the hard drive using the Phillips J0 Screwdriver.

  6. ASUS Eee PC 900HD Clicker Replacement: étape 6, image 1 de 2 ASUS Eee PC 900HD Clicker Replacement: étape 6, image 2 de 2
    • Flip the laptop back over and unlock the three keyboard tabs at the top of the keyboard by pushing down on the silver tabs with tweezers .

  7. ASUS Eee PC 900HD Clicker Replacement: étape 7, image 1 de 2 ASUS Eee PC 900HD Clicker Replacement: étape 7, image 2 de 2
    • Use the plastic opening tool to lift up the keyboard.

  8. ASUS Eee PC 900HD Clicker Replacement: étape 8, image 1 de 3 ASUS Eee PC 900HD Clicker Replacement: étape 8, image 2 de 3 ASUS Eee PC 900HD Clicker Replacement: étape 8, image 3 de 3
    • Using a pair of tweezers, disconnect the cable at the bottom of the keyboard by flipping the two lock switches up on both sides of the cable.

    • Carefully pull the cable out.

  9. ASUS Eee PC 900HD Clicker Replacement: étape 9, image 1 de 3 ASUS Eee PC 900HD Clicker Replacement: étape 9, image 2 de 3 ASUS Eee PC 900HD Clicker Replacement: étape 9, image 3 de 3
    • Using a pair of tweezers, unlock the touchpad ribbon by pushing the white lock tab to the right.

    • Carefully pull the ribbon to the right.

  10. ASUS Eee PC 900HD Clicker Replacement: étape 10, image 1 de 3 ASUS Eee PC 900HD Clicker Replacement: étape 10, image 2 de 3 ASUS Eee PC 900HD Clicker Replacement: étape 10, image 3 de 3
    • Remove the nine 4.76 mm screws from the top cover of the laptop using the Phillips J0 Screwdriver.

    • Using a plastic opening tool, pry up the edges of the cover.

    • Caution: Be careful around the audio and microphone jacks as they can be easily damaged. Lift the right half of the cover and move it towards the left.

  11. ASUS Eee PC 900HD Clicker Replacement: étape 11, image 1 de 2 ASUS Eee PC 900HD Clicker Replacement: étape 11, image 2 de 2
    • Lift up and remove the top cover of the laptop.

    • Flip this cover over to reveal the back.

  12. ASUS Eee PC 900HD Clicker Replacement: étape 12, image 1 de 3 ASUS Eee PC 900HD Clicker Replacement: étape 12, image 2 de 3 ASUS Eee PC 900HD Clicker Replacement: étape 12, image 3 de 3
    • Using a Spudger, push down on the green tabs found on both sides.

    • Pull the clicker off of the cover plate.

Conclusion

To reassemble your device, follow these instructions in reverse order.

Kendall Marie Mehlhorn

Membre depuis le 10/13/15

557 Réputation

5 tutoriels rédigés

Équipe

Sam Houston State, Team 1-6, Blackburne Fall 2015 Membre de l'équipe Sam Houston State, Team 1-6, Blackburne Fall 2015

SHSU-BLACKBURNE-F15S1G6

4 membres

9 tutoriels rédigés

0 commentaires

Ajouter un commentaire

Nombre de vues :

Dernières 24 heures : 0

7 derniers jours : 1

30 derniers jours : 2

Total : 248