Aller au contenu principal

ASUS Eee Pad Transformer Back Facing Camera Replacement

Ce dont vous avez besoin

  1. ASUS Eee Pad Transformer Back Facing Camera Replacement, Back Panel: étape 1, image 1 de 2 ASUS Eee Pad Transformer Back Facing Camera Replacement, Back Panel: étape 1, image 2 de 2
    • Use T5 Torx Screwdriver to remove two 4.5 millimeter T5 screws on either side of the port on the bottom of the tablet.

  2. ASUS Eee Pad Transformer Back Facing Camera Replacement: étape 2, image 1 de 3 ASUS Eee Pad Transformer Back Facing Camera Replacement: étape 2, image 2 de 3 ASUS Eee Pad Transformer Back Facing Camera Replacement: étape 2, image 3 de 3
    • Use the Plastic Opening Tool to pry between the main tablet body and the outer rim casing. Remove the outer rim casing by prying all the way around the device and pulling the rim upward.

    • The physical buttons are located on the outside of the rim on the right side, proceed with the guide to locate internal buttons.

  3. ASUS Eee Pad Transformer Back Facing Camera Replacement: étape 3, image 1 de 1
    • Remove the four 2 millimeter Phillips #00 screws at the corners of the tablet.

  4. ASUS Eee Pad Transformer Back Facing Camera Replacement: étape 4, image 1 de 1
    • Use a Phillips #00 Screwdriver to remove the three 3 millimeter screws securing the front panel to the back panel found above the camera area, on the top portion of the tablet.

  5. ASUS Eee Pad Transformer Back Facing Camera Replacement: étape 5, image 1 de 1
    • Use a Phillips #00 Screwdriver to remove the three 3 millimeter screws securing the front panel to the back panel found on the bottom portion of the tablet near the port.

  6. ASUS Eee Pad Transformer Back Facing Camera Replacement: étape 6, image 1 de 2 ASUS Eee Pad Transformer Back Facing Camera Replacement: étape 6, image 2 de 2
    • Remove back panel by pulling away from the remaining device.

  7. ASUS Eee Pad Transformer Back Facing Camera Replacement, Pull out flap: étape 7, image 1 de 2 ASUS Eee Pad Transformer Back Facing Camera Replacement, Pull out flap: étape 7, image 2 de 2
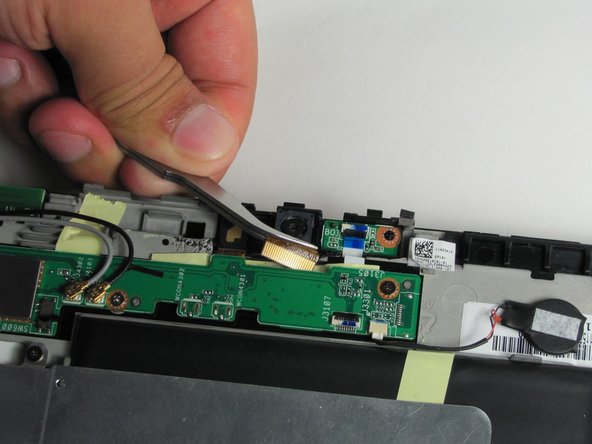
    • Use Tweezers to pull out gold flap connected to bottom of camera.

    • Pull the gold flap to take out the camera.

Conclusion

To reassemble your device, follow these instructions in reverse order.

Une autre personne a terminé cette réparation.

Sandy Babich

Membre depuis le 09/23/14

1 885 Réputation

5 tutoriels rédigés

Équipe

Cal Poly, Team 13-9, Forte Fall 2014 Membre de l'équipe Cal Poly, Team 13-9, Forte Fall 2014

CPSU-FORTE-F14S13G9

5 membres

12 tutoriels rédigés

0 commentaires

Ajouter un commentaire

Nombre de vues :

Dernières 24 heures : 0

7 derniers jours : 0

30 derniers jours : 2

Total : 1,112