Aller au contenu principal

ASUS Q302L Display Replacement

Ce dont vous avez besoin

  1. ASUS Q302L Display Replacement, Back Case: étape 1, image 1 de 1
    • Make sure the laptop is disconnected from a power supply and is TURNED OFF.

    • Use a Phillips #0 screw driver to remove all ten 10 mm screws around the back of the laptop.

  2. ASUS Q302L Display Replacement: étape 2, image 1 de 3 ASUS Q302L Display Replacement: étape 2, image 2 de 3 ASUS Q302L Display Replacement: étape 2, image 3 de 3
    • Wedge a plastic opening tool under the rear case near the hinge.

    • Pry around the outer edge to release the plastic clips holding the rear case to the laptop.

  3. ASUS Q302L Display Replacement: étape 3, image 1 de 1
    • Once the cover is free from all the clips, remove the cover from the laptop.

  4. ASUS Q302L Display Replacement, Battery: étape 4, image 1 de 1
    • Use a Phillips #0 screwdriver and remove all five 5 mm screws securing the battery.

  5. ASUS Q302L Display Replacement: étape 5, image 1 de 3 ASUS Q302L Display Replacement: étape 5, image 2 de 3 ASUS Q302L Display Replacement: étape 5, image 3 de 3
    • Gently wedge a plastic opening tool under the connector.

    • Pry only on the connector not the socket itself or you risk damage to the motherboard.

    • Carefully lift the connector up away from the socket to disconnect it.

  6. ASUS Q302L Display Replacement: étape 6, image 1 de 2 ASUS Q302L Display Replacement: étape 6, image 2 de 2
    • Once the screws and connector are removed, simply pull out the battery from its place.

  7. ASUS Q302L Display Replacement, Display: étape 7, image 1 de 2 ASUS Q302L Display Replacement, Display: étape 7, image 2 de 2
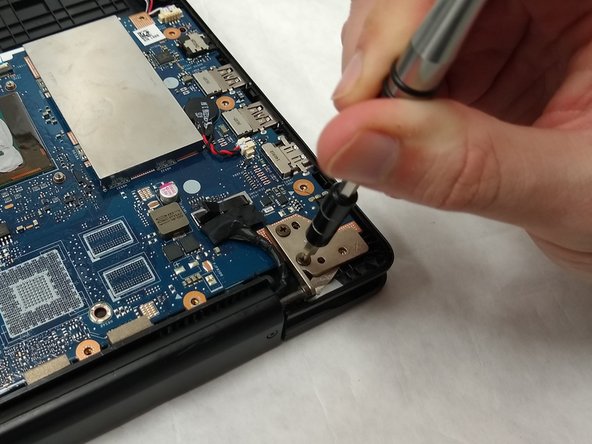
    • Use a Phillips #00 screw driver to remove the five 10mm screws at the hinges.

  8. ASUS Q302L Display Replacement: étape 8, image 1 de 3 ASUS Q302L Display Replacement: étape 8, image 2 de 3 ASUS Q302L Display Replacement: étape 8, image 3 de 3
    • Peel back the tape and remove the two connectors.

  9. ASUS Q302L Display Replacement: étape 9, image 1 de 2 ASUS Q302L Display Replacement: étape 9, image 2 de 2
    • Pull up on the black tab to remove the connector that connects to the motherboard.

    • Unplug the hard drive cable from the hard drive.

    • Carefully remove the cables from the track that they run through.

  10. ASUS Q302L Display Replacement: étape 10, image 1 de 2 ASUS Q302L Display Replacement: étape 10, image 2 de 2
    • Carefully remove the display from the rest of the laptop.

Conclusion

To reassemble your device, follow these instructions in reverse order.

Une autre personne a terminé cette réparation.

Nicholas Lozier

Membre depuis le 04/01/19

290 Réputation

2 tutoriels rédigés

Équipe

IUPUI, Team S2-G4, Harley Spring 2019 Membre de l'équipe IUPUI, Team S2-G4, Harley Spring 2019

IUPUI-HARLEY-S19S2G4

3 membres

2 tutoriels rédigés

0 commentaires

Ajouter un commentaire

Nombre de vues :

Dernières 24 heures : 1

7 derniers jours : 4

30 derniers jours : 6

Total : 1,103