Aller au contenu principal

ASUS Q400A-BHI7N03 RAM Replacement

Ce dont vous avez besoin

  1. ASUS Q400A-BHI7N03 RAM Replacement, Battery: étape 1, image 1 de 1
    • Turn off the laptop.

    • Disconnect the charging cable from the laptop.

    • Failure to unplug the cable could result in electric shock.

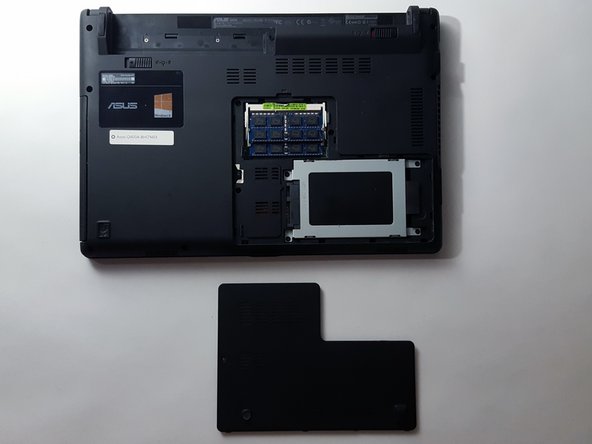
    • Flip the laptop over so that it is upside down.

    • The slightly raised area is the battery.

    • Orient the laptop so that the battery is away from you.

  2. ASUS Q400A-BHI7N03 RAM Replacement: étape 2, image 1 de 1
    • In the top right corner, push the tab to the right to the unlocked position.

  3. ASUS Q400A-BHI7N03 RAM Replacement: étape 3, image 1 de 2 ASUS Q400A-BHI7N03 RAM Replacement: étape 3, image 2 de 2
    • Find the tab in the top left corner. With one finger, pull the tab to the left to the unlocked position.

    • While holding this tab in the unlocked position, gently pull the battery away from you.

  4. ASUS Q400A-BHI7N03 RAM Replacement, RAM: étape 4, image 1 de 1
    • Flip the laptop so that it is upside down and locate a screw near the middle of the laptop. Remove the 8 mm PH0 screw.

  5. ASUS Q400A-BHI7N03 RAM Replacement: étape 5, image 1 de 2 ASUS Q400A-BHI7N03 RAM Replacement: étape 5, image 2 de 2
    • Use a spudger or opening tool to remove the L shaped section of the back cover.

    • To avoid breaking the plastic, alternate the sides where you pry.

  6. ASUS Q400A-BHI7N03 RAM Replacement: étape 6, image 1 de 3 ASUS Q400A-BHI7N03 RAM Replacement: étape 6, image 2 de 3 ASUS Q400A-BHI7N03 RAM Replacement: étape 6, image 3 de 3
    • The RAM is located in the top of the section you uncovered.

    • Identify the two metal tabs on both sides of the RAM.

    • Gently push both tabs outwards at the same time. The RAM will pop up.

    • Carefully pull the RAM out.

  7. ASUS Q400A-BHI7N03 RAM Replacement: étape 7, image 1 de 2 ASUS Q400A-BHI7N03 RAM Replacement: étape 7, image 2 de 2
    • To put RAM back in, lineup the RAM with the plastic holder.

    • Slide it into the slot at a 30 degree angle and push down until it clicks into place.

Conclusion

To reassemble your device, follow these instructions in reverse order.

Matthew Gold

Membre depuis le 01/19/17

401 Réputation

4 tutoriels rédigés

Équipe

UC Davis, Team 1-4, Rodger Winter 2017 Membre de l'équipe UC Davis, Team 1-4, Rodger Winter 2017

UCD-RODGER-W17S1G4

5 membres

4 tutoriels rédigés

2 commentaires

Hello there ! I got a question. What type of ram should I buy to replace my Asus ? I trying to upgrade to 16 gb

rockygc1985 - Réponse

If I only have 1 stick of 4gb, and assuming I won't be getting more, does it matter which slot I place it? Top or bottom (closer to the motherboard) ? Thanks ahead of time!

John H - Réponse

Ajouter un commentaire

Nombre de vues :

Dernières 24 heures : 0

7 derniers jours : 3

30 derniers jours : 10

Total : 686