Aller au contenu principal

ASUS Transformer Book Flip TP500LA Battery Replacement

Ce dont vous avez besoin

  1. ASUS Transformer Book Flip TP500LA Battery Replacement, Back Case: étape 1, image 1 de 3 ASUS Transformer Book Flip TP500LA Battery Replacement, Back Case: étape 1, image 2 de 3 ASUS Transformer Book Flip TP500LA Battery Replacement, Back Case: étape 1, image 3 de 3
    • Remove the ten 10 mm Phillips #0 screws found on the computer's back case.

  2. ASUS Transformer Book Flip TP500LA Battery Replacement: étape 2, image 1 de 2 ASUS Transformer Book Flip TP500LA Battery Replacement: étape 2, image 2 de 2
    • Slide a heavy-duty spudger between the back case and the computer.

    • Slowly work around the edges to undo the clips to fully separate the back case from the computer.

    • Gently lift off the back case.

  3. ASUS Transformer Book Flip TP500LA Battery Replacement, Battery: étape 3, image 1 de 2 ASUS Transformer Book Flip TP500LA Battery Replacement, Battery: étape 3, image 2 de 2
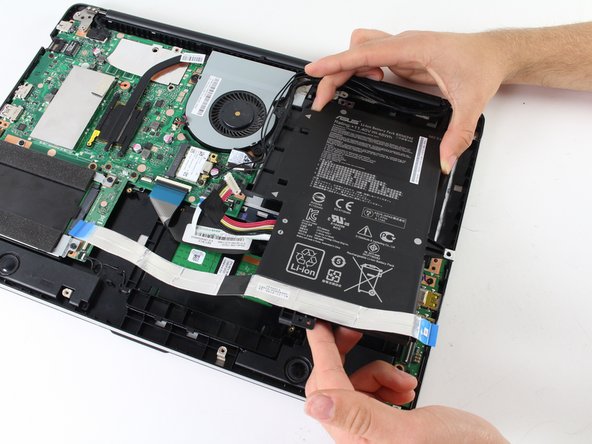
    • Slide a heavy-duty spudger into the ZIF connector and gently flip up the retaining flap to open the connector.

    • Pull the blue tab to remove the ribbon.

  4. ASUS Transformer Book Flip TP500LA Battery Replacement: étape 4, image 1 de 2 ASUS Transformer Book Flip TP500LA Battery Replacement: étape 4, image 2 de 2
    • Remove the three 5 mm Phillips #0 screws.

    • Remove the single 6 mm Phillips #0 screw.

  5. ASUS Transformer Book Flip TP500LA Battery Replacement: étape 5, image 1 de 2 ASUS Transformer Book Flip TP500LA Battery Replacement: étape 5, image 2 de 2
    • Use the heavy-duty spudger to pry the white 8-pin connector away from the motherboard.

    • Gently pull the connector away from the motherboard.

    • The black 8-pin connector on the motherboard is very fragile, so be careful when removing the white 8-pin connector.

  6. ASUS Transformer Book Flip TP500LA Battery Replacement: étape 6, image 1 de 2 ASUS Transformer Book Flip TP500LA Battery Replacement: étape 6, image 2 de 2
    • Use the blue plastic opening tool to loosen and remove the three black wires from the battery.

    • Slide the battery out from the computer to remove.

Conclusion

To reassemble your device, follow these instructions in reverse order.

14 autres ont terminé cette réparation.

Garrett Fitzpatrick

Membre depuis le 04/10/17

822 Réputation

2 tutoriels rédigés

Équipe

Cal Poly, Team S13-G5, Forte Spring 2017 Membre de l'équipe Cal Poly, Team S13-G5, Forte Spring 2017

CPSU-FORTE-S17S13G5

4 membres

6 tutoriels rédigés

0 commentaires

Ajouter un commentaire

Nombre de vues :

Dernières 24 heures : 2

7 derniers jours : 14

30 derniers jours : 50

Total : 11,143