Aller au contenu principal

ASUS U57A-BBL4 Display Assembly Replacement

Ce dont vous avez besoin

  1. ASUS U57A-BBL4 Display Assembly Replacement, Display Assembly: étape 1, image 1 de 2 ASUS U57A-BBL4 Display Assembly Replacement, Display Assembly: étape 1, image 2 de 2
    • Carefully pry the two rubber covers at the bottom of the screen off with a metal sprudger.

  2. ASUS U57A-BBL4 Display Assembly Replacement: étape 2, image 1 de 1
    • Remove the two 1.84 mm Phillips head screws at the bottom of the screen using PH00 screw driver.

  3. ASUS U57A-BBL4 Display Assembly Replacement: étape 3, image 1 de 1
    • Starting from one of the corners, use your fingers to pry the bezel from the screen.

    • There is a popping sound when the bezel is loosened from the screen.

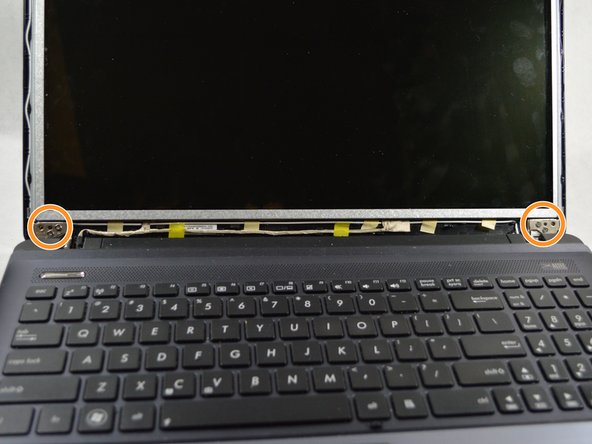
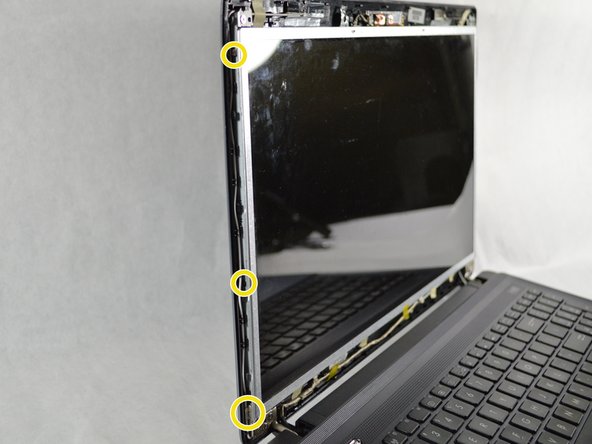
  4. ASUS U57A-BBL4 Display Assembly Replacement: étape 4, image 1 de 3 ASUS U57A-BBL4 Display Assembly Replacement: étape 4, image 2 de 3 ASUS U57A-BBL4 Display Assembly Replacement: étape 4, image 3 de 3
    • Remove the top two 2 mm Phillips head screws.

    • Remove the four 2 mm Phillips head screws on the bottom.

    • Remove the eight 2 mm Phillips head screws on the sides of the screen. There are four on each side.

    • There are 14 screws in total: two on the top, four on the bottom, and four on each side. Use PH00 screw-driver for removing all 14 screws.

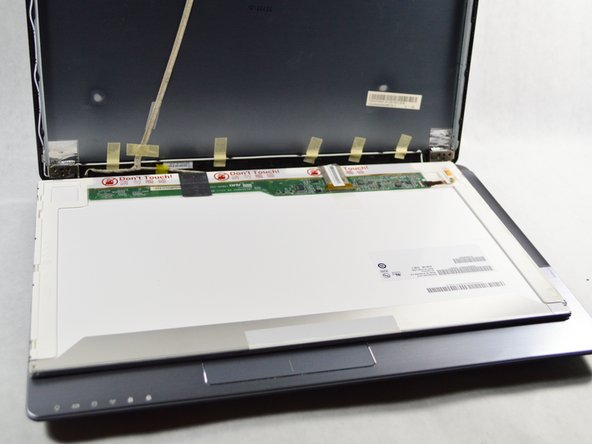
  5. ASUS U57A-BBL4 Display Assembly Replacement: étape 5, image 1 de 2 ASUS U57A-BBL4 Display Assembly Replacement: étape 5, image 2 de 2
    • Don't tear off the bottom of the screen or you might damage the connector cable.

    • Carefully lower the screen from the casing with your fingers, making sure to keep the bottom intact and lay it face down on the keyboard.

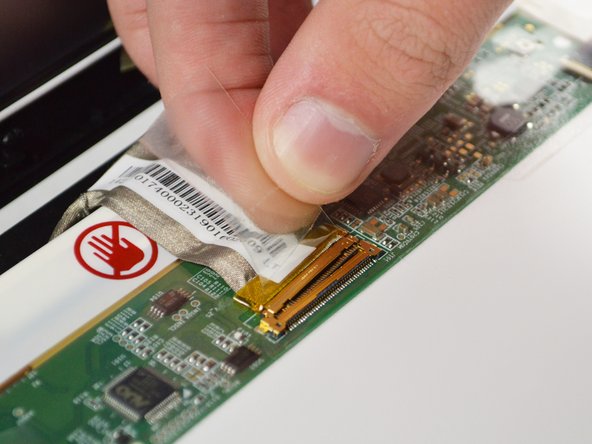
  6. ASUS U57A-BBL4 Display Assembly Replacement: étape 6, image 1 de 2 ASUS U57A-BBL4 Display Assembly Replacement: étape 6, image 2 de 2
    • Disconnect the connector cable at the bottom by loosening the adhesive tape and lifting up.

    • Gently slide the cable out of the ridges to free the screen from the casing.

Conclusion

To reassemble your device, follow these instructions in reverse order.

Une autre personne a terminé cette réparation.

Isabella Bernardi

Membre depuis le 10/18/17

671 Réputation

6 tutoriels rédigés

Équipe

UMass Dartmouth, Team S2-G4, Julie Fall 2017 Membre de l'équipe UMass Dartmouth, Team S2-G4, Julie Fall 2017

UMASSD-JULIE-F17S2G4

3 membres

6 tutoriels rédigés

0 commentaires

Ajouter un commentaire

Nombre de vues :

Dernières 24 heures : 1

7 derniers jours : 5

30 derniers jours : 10

Total : 259