Aller au contenu principal

ASUS X533SA-BHCLN10 Wi-Fi Card Replacement

Ce dont vous avez besoin

  1. ASUS X533SA-BHCLN10 Wi-Fi Card Replacement, Battery: étape 1, image 1 de 2 ASUS X533SA-BHCLN10 Wi-Fi Card Replacement, Battery: étape 1, image 2 de 2
    • Turn over the laptop on the back panel.

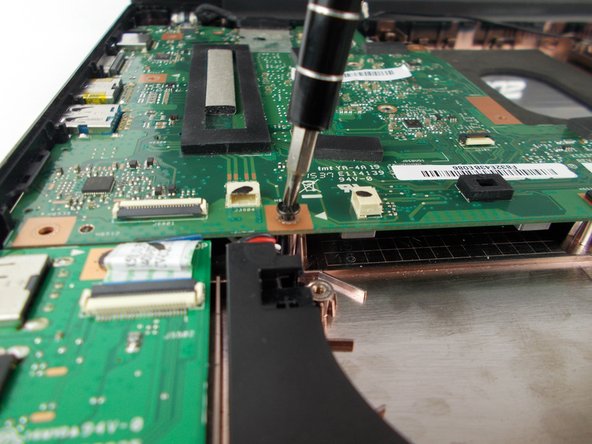
    • Use the Phillips #0 screwdriver to unscrew all ten screws visible on the back panel. There should be a total of ten screws: (4) four 5.5mm screws and (6) six 10.5mm screws.

  2. ASUS X533SA-BHCLN10 Wi-Fi Card Replacement: étape 2, image 1 de 2 ASUS X533SA-BHCLN10 Wi-Fi Card Replacement: étape 2, image 2 de 2
    • Turn over the laptop with the keyboard facing upwards.

    • Using a small prying or opening tool, stick the prying tool under the edge of the laptop.

  3. ASUS X533SA-BHCLN10 Wi-Fi Card Replacement: étape 3, image 1 de 2 ASUS X533SA-BHCLN10 Wi-Fi Card Replacement: étape 3, image 2 de 2
    • After the laptop is completely pried open carefully remove the keyboard from the laptop.

    • There are two small keyboard cables connecting the keyboard to the laptop. Carefully remove these by popping up the white clips holding them in place and slide the connector out.

  4. ASUS X533SA-BHCLN10 Wi-Fi Card Replacement, Wi-Fi Card: étape 4, image 1 de 2 ASUS X533SA-BHCLN10 Wi-Fi Card Replacement, Wi-Fi Card: étape 4, image 2 de 2
    • Remove the Phillips #0 screws securing the motherboard to laptop.

  5. ASUS X533SA-BHCLN10 Wi-Fi Card Replacement: étape 5, image 1 de 2 ASUS X533SA-BHCLN10 Wi-Fi Card Replacement: étape 5, image 2 de 2
    • Remove the wire that's attached to the motherboard on top with a pop up motion.

  6. ASUS X533SA-BHCLN10 Wi-Fi Card Replacement: étape 6, image 1 de 3 ASUS X533SA-BHCLN10 Wi-Fi Card Replacement: étape 6, image 2 de 3 ASUS X533SA-BHCLN10 Wi-Fi Card Replacement: étape 6, image 3 de 3
    • Push on the VGA port and wiggle the motherboard out.

  7. ASUS X533SA-BHCLN10 Wi-Fi Card Replacement: étape 7, image 1 de 3 ASUS X533SA-BHCLN10 Wi-Fi Card Replacement: étape 7, image 2 de 3 ASUS X533SA-BHCLN10 Wi-Fi Card Replacement: étape 7, image 3 de 3
    • Lift the motherboard up carefully.

    • There is another wire securing the motherboard to the monitor from the bottom (DO NOT remove the wire) denoted by the red circle.

  8. ASUS X533SA-BHCLN10 Wi-Fi Card Replacement: étape 8, image 1 de 2 ASUS X533SA-BHCLN10 Wi-Fi Card Replacement: étape 8, image 2 de 2
    • Remove the Wi-Fi card from the motherboard.

Conclusion

To reassemble your device, follow these instructions in reverse order.

Une autre personne a terminé cette réparation.

Edmund Lee

Membre depuis le 09/26/17

473 Réputation

4 tutoriels rédigés

Équipe

USF Tampa, Team S13-G3, Boczar Fall 2017 Membre de l'équipe USF Tampa, Team S13-G3, Boczar Fall 2017

USFT-BOCZAR-F17S13G3

5 membres

5 tutoriels rédigés

0 commentaires

Ajouter un commentaire

Nombre de vues :

Dernières 24 heures : 0

7 derniers jours : 0

30 derniers jours : 2

Total : 465