Aller au contenu principal

Acer Aspire 5336-2524 Motherboard Replacement

Ce dont vous avez besoin

Document vedette

  1. Acer Aspire 5336-2524 Motherboard Replacement, Battery: étape 1, image 1 de 3 Acer Aspire 5336-2524 Motherboard Replacement, Battery: étape 1, image 2 de 3 Acer Aspire 5336-2524 Motherboard Replacement, Battery: étape 1, image 3 de 3
    • Flip over the laptop.

    • Make sure the battery lock is pushed down so the red part is exposed.

    • Push the switch all the way to the side and that will push the battery up.

    • Remove the battery.

  2. Acer Aspire 5336-2524 Motherboard Replacement, DVD/CD Drive: étape 2, image 1 de 1
    • Remove the M2.5x8 screw using a Phillips #0 screwdriver.

  3. Acer Aspire 5336-2524 Motherboard Replacement: étape 3, image 1 de 2 Acer Aspire 5336-2524 Motherboard Replacement: étape 3, image 2 de 2
    • Slide the DVD/CD drive out of the laptop.

  4. Acer Aspire 5336-2524 Motherboard Replacement, Motherboard: étape 4, image 1 de 1
    • Flip over the laptop and remove all eleven of the M2.5x8 screws on the bottom of the laptop with a Phillips #0 screwdriver.

    • Remove all four of the M2x3 screws with a Phillips #0 screwdriver.

  5. Acer Aspire 5336-2524 Motherboard Replacement: étape 5, image 1 de 1
    • Pry open the lower door on the bottom of the laptop using the iFixit opening tool.

  6. Acer Aspire 5336-2524 Motherboard Replacement: étape 6, image 1 de 3 Acer Aspire 5336-2524 Motherboard Replacement: étape 6, image 2 de 3 Acer Aspire 5336-2524 Motherboard Replacement: étape 6, image 3 de 3
    • Put slight pressure on the hard drive and slide it to the left.

    • Now pull the hard drive out.

  7. Acer Aspire 5336-2524 Motherboard Replacement: étape 7, image 1 de 3 Acer Aspire 5336-2524 Motherboard Replacement: étape 7, image 2 de 3 Acer Aspire 5336-2524 Motherboard Replacement: étape 7, image 3 de 3
    • Remove the M2x3 screw on the wireless card with a Phillips #0 screwdriver.

    • Remove the wireless card antennas by lifting straight up on the base of the connection.

    • Remove the battery underneath the wireless card.

    • Remove the RAM modules by pushing the springs on the side and lifting up.

  8. Acer Aspire 5336-2524 Motherboard Replacement: étape 8, image 1 de 3 Acer Aspire 5336-2524 Motherboard Replacement: étape 8, image 2 de 3 Acer Aspire 5336-2524 Motherboard Replacement: étape 8, image 3 de 3
    • Open the laptop.

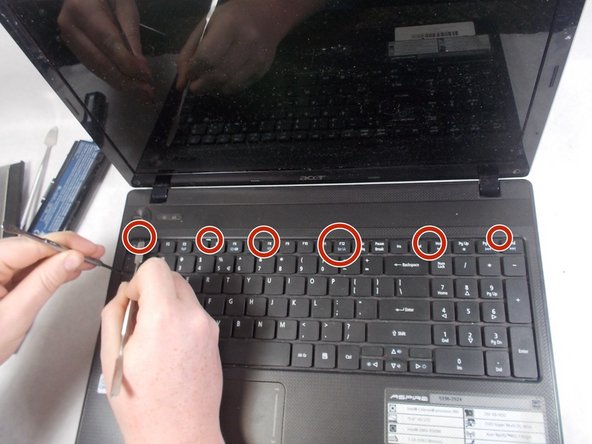
    • Wedge the spudger or iFixit opening tool between the side of the keyboard and the laptop and apply a slight amount of upward pressure.

    • Push in the latches at the top of the keyboard using the spudger to release that part of the keyboard, and start to lift up the keyboard more and more as you push in the latches.

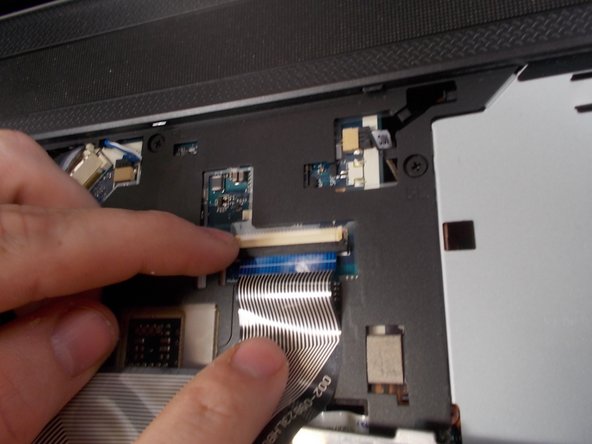
    • Remove the ribbon cable that connects the keyboard to the motherboard by pushing the black latch downward and then pulling the cable out.

  9. Acer Aspire 5336-2524 Motherboard Replacement: étape 9, image 1 de 1
    • Remove the eight M2.5x8 screws with a Phillips #0 screwdriver.

    • Remove the cables indicated by simply pulling them out.

    • Remove the cables by lifting up on the black latch and pulling the ribbon out.

  10. Acer Aspire 5336-2524 Motherboard Replacement: étape 10, image 1 de 2 Acer Aspire 5336-2524 Motherboard Replacement: étape 10, image 2 de 2
    • Use the iFixit opening tool to start to pry open the laptop case.

    • Flip over the laptop and open the screen.

    • Finish opening up the case.

  11. Acer Aspire 5336-2524 Motherboard Replacement: étape 11, image 1 de 1
    • Remove the cable by lifting the black latch and pull the ribbon out.

    • Verify that the other cables are fully unplugged.

  12. Acer Aspire 5336-2524 Motherboard Replacement: étape 12, image 1 de 2 Acer Aspire 5336-2524 Motherboard Replacement: étape 12, image 2 de 2
    • Remove M2.5x8 screw with a Phillips #0 screwdriver.

  13. Acer Aspire 5336-2524 Motherboard Replacement: étape 13, image 1 de 2 Acer Aspire 5336-2524 Motherboard Replacement: étape 13, image 2 de 2
    • Lift the motherboard up and unplug the fan.

  14. Acer Aspire 5336-2524 Motherboard Replacement: étape 14, image 1 de 3 Acer Aspire 5336-2524 Motherboard Replacement: étape 14, image 2 de 3 Acer Aspire 5336-2524 Motherboard Replacement: étape 14, image 3 de 3
    • Now replace the motherboard with a new one and follow the steps in reverse to assemble the laptop with the new motherboard.

Conclusion

To reassemble your device, follow these instructions in reverse order.

Une autre personne a terminé cette réparation.

Carlin Sullivan

Membre depuis le 10/30/19

695 Réputation

4 tutoriels rédigés

Équipe

UMass Dartmouth, Team S1-G4, Valliere Fall 2019 Membre de l'équipe UMass Dartmouth, Team S1-G4, Valliere Fall 2019

UMASSD-VALLIERE-F19S1G4

3 membres

4 tutoriels rédigés

0 commentaires

Ajouter un commentaire

Nombre de vues :

Dernières 24 heures : 0

7 derniers jours : 2

30 derniers jours : 20

Total : 2,324