Aller au contenu principal

Acer Aspire ES1-711-P1UV RAM Replacement

Ce dont vous avez besoin

  1. Acer Aspire ES1-711-P1UV RAM Replacement, Battery: étape 1, image 1 de 1
    • Place the laptop face down on a flat, clean surface.

    • Remove all twenty-seven 7 mm screws on the back cover of the laptop with a Phillips #0 screwdriver. Screws are circled in red on the diagram.

  2. Acer Aspire ES1-711-P1UV RAM Replacement: étape 2, image 1 de 1
    • Use the iFixit opening tool to pry open the four corners of the back cover of the laptop. You may need to use your hands to fully remove the cover.

    • Be sure to evenly apply pressure when removing the back cover.

  3. Acer Aspire ES1-711-P1UV RAM Replacement: étape 3, image 1 de 1
    • Remove the two 5 mm screws located on either side of the battery.

  4. Acer Aspire ES1-711-P1UV RAM Replacement: étape 4, image 1 de 1
    • Disconnect the colored bundled cable connectors from the motherboard. To do this, pull on the wires to disconnect the cable and remove the battery.

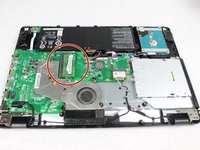
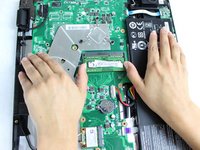
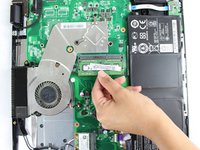
  5. Acer Aspire ES1-711-P1UV RAM Replacement, RAM: étape 5, image 1 de 3 Acer Aspire ES1-711-P1UV RAM Replacement, RAM: étape 5, image 2 de 3 Acer Aspire ES1-711-P1UV RAM Replacement, RAM: étape 5, image 3 de 3
    • Locate RAM and push metal clips outwards to release RAM. The RAM will eject at a 30 degree angle.

    • Slide the RAM out of the clips to remove.

Conclusion

To reassemble your device, follow these instructions in reverse order.

Une autre personne a terminé cette réparation.

Camille Ingham

Membre depuis le 03/22/18

418 Réputation

2 tutoriels rédigés

Équipe

Sam Houston State, Team S17-G3, Blackburne Winter 2018 Membre de l'équipe Sam Houston State, Team S17-G3, Blackburne Winter 2018

SHSU-BLACKBURNE-W18S17G3

1 membre

2 tutoriels rédigés

0 commentaires

Ajouter un commentaire

Nombre de vues :

Dernières 24 heures : 2

7 derniers jours : 6

30 derniers jours : 13

Total : 1,118