Cette version peut contenir des modifications incorrectes. Passez au dernier aperçu vérifié.
Ce dont vous avez besoin
-
-
Retirez les treize vis de 6,0 mm sur le panneau arrière à l’aide de votre tournevis cruciforme n ° 1.
-
-
-
Retirez les deux vis de 6,0 mm fixant la batterie avec votre tournevis Phillips n ° 1.
-
-
-
Cette étape n’est pas traduite. Aidez à la traduire
-
Carefully pull out the speakers from each side of the Chromebook.
-
-
Cette étape n’est pas traduite. Aidez à la traduire
-
Remove the three 6.0mm screws using the Phillips #1 screwdriver.
-
Remove the two 3.0mm screws using the Phillips #1 screwdriver.
-
-
Cette étape n’est pas traduite. Aidez à la traduire
-
Position the spudger under the switch that connects the ribbon cable to the motherboard.
-
Flick the spudger up to flip the switch up.
-
-
Cette étape n’est pas traduite. Aidez à la traduire
-
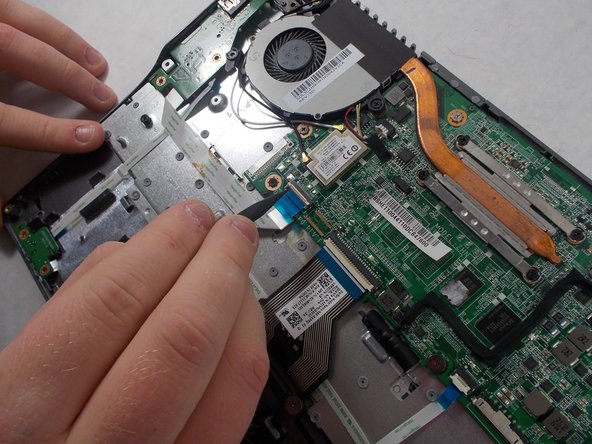
Pull the blue tab on the ribbon cable to remove it.
-
-
Cette étape n’est pas traduite. Aidez à la traduire
-
Grab the edges of each piece of circuitry that is included with the SD Card Reader and USB Port.
-
Pull each piece of circuitry out of the Chromebook and remove it from the device.
-
-
Cette étape n’est pas traduite. Aidez à la traduire
-
Position the spudger under the switch.
-
Flick the spudger up to flip the switch up.
-
-
Cette étape n’est pas traduite. Aidez à la traduire
-
Pull on the blue tab of the ribbon cable to remove the ribbon cable.
-
Repeat the previous step and this step with the other ribbon cable that is attached to the SD Card Reader/USB Port.
-


Annulation : je n'ai pas terminé ce tutoriel.
Une autre personne a terminé cette réparation.
Équipe

UMass Dartmouth, Team S4-G7, Julie Fall 2017 Membre de l'équipe UMass Dartmouth, Team S4-G7, Julie Fall 2017
UMASSD-JULIE-F17S4G7
1 membre
7 tutoriels rédigés