Aller au contenu principal

Acer Iconia A1-830 Rear Facing Camera Replacement

Ce dont vous avez besoin

  1. Acer Iconia A1-830 Rear Facing Camera Replacement, Disassembling Acer Iconia A1-830 Back Panel: étape 1, image 1 de 2 Acer Iconia A1-830 Rear Facing Camera Replacement, Disassembling Acer Iconia A1-830 Back Panel: étape 1, image 2 de 2
    • Prepare your working space. The ideal work space has a flat, level surface that is clean and well lit.

    • Shut down your Acer Iconia A1-830.

    • Remove any cables or exterior covers from your tablet.

    • Place it on your work space, with the screen facing up.

  2. Acer Iconia A1-830 Rear Facing Camera Replacement: étape 2, image 1 de 2 Acer Iconia A1-830 Rear Facing Camera Replacement: étape 2, image 2 de 2
    • Wedge the plastic opening tool into the tiny gap between the white plastic front bezel and the aluminum rear panel.

    • Do not try to pry apart the top edge on the front side near the front-facing camera.

  3. Acer Iconia A1-830 Rear Facing Camera Replacement, Battery: étape 3, image 1 de 2 Acer Iconia A1-830 Rear Facing Camera Replacement, Battery: étape 3, image 2 de 2
    • Remove the small clear plastic cover on top of the battery cable with the nylon or metal spudger.

  4. Acer Iconia A1-830 Rear Facing Camera Replacement: étape 4, image 1 de 1
    • Remove the battery cable by lifting it up with the pointy end of the black nylon spudger.

  5. Acer Iconia A1-830 Rear Facing Camera Replacement: étape 5, image 1 de 2 Acer Iconia A1-830 Rear Facing Camera Replacement: étape 5, image 2 de 2
    • Un-stick the battery from the metal plate using the black nylon spudger.

    • Be careful not to puncture the battery while removing it.

  6. Acer Iconia A1-830 Rear Facing Camera Replacement, Rear Facing Camera: étape 6, image 1 de 1
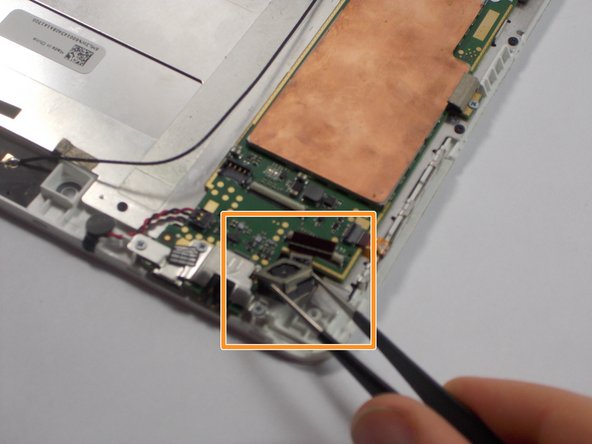
    • Remove the piece of black tape covering the rear facing camera ribbon cable connector.

  7. Acer Iconia A1-830 Rear Facing Camera Replacement: étape 7, image 1 de 2 Acer Iconia A1-830 Rear Facing Camera Replacement: étape 7, image 2 de 2
    • Lift up the small white lever on the the ribbon cable connector with the metal tweezers to remove the ribbon cable.

    • Lift out the rear facing camera from the plastic frame with the metal tweezers.

Conclusion

To reassemble your device, follow these instructions in reverse order.

Brendan Coveney

Membre depuis le 10/18/15

593 Réputation

3 tutoriels rédigés

Équipe

UMass Dartmouth, Team 4-6, Catania Fall 2015 Membre de l'équipe UMass Dartmouth, Team 4-6, Catania Fall 2015

UMASSD-CATANIA-F15S4G6

3 membres

5 tutoriels rédigés

0 commentaires

Ajouter un commentaire

Nombre de vues :

Dernières 24 heures : 0

7 derniers jours : 3

30 derniers jours : 6

Total : 404