Aller au contenu principal

Acer Iconia Tab A501 USB-A/Micro-USB Port Replacement

Ce dont vous avez besoin

  1. Acer Iconia Tab A501 USB-A/Micro-USB Port Replacement, Back Cover: étape 1, image 1 de 3 Acer Iconia Tab A501 USB-A/Micro-USB Port Replacement, Back Cover: étape 1, image 2 de 3 Acer Iconia Tab A501 USB-A/Micro-USB Port Replacement, Back Cover: étape 1, image 3 de 3
    • Turn off your device before opening it.

    • Use a plastic opening tool to carefully separate the back cover, starting at the volume buttons.

    • Continue separating the back cover along the short side closest to the camera and around the device.

  2. Acer Iconia Tab A501 USB-A/Micro-USB Port Replacement: étape 2, image 1 de 1
    • When separated enough, a little more than halfway around the device, the back cover will be easy to take off.

  3. Acer Iconia Tab A501 USB-A/Micro-USB Port Replacement, USB-A/Micro-USB Port: étape 3, image 1 de 3 Acer Iconia Tab A501 USB-A/Micro-USB Port Replacement, USB-A/Micro-USB Port: étape 3, image 2 de 3 Acer Iconia Tab A501 USB-A/Micro-USB Port Replacement, USB-A/Micro-USB Port: étape 3, image 3 de 3
    Outil utilisé dans cette étape :
    Tweezers
    $3.99
    J'achète
    • In the next step, be careful not to squeeze too hard or scratch the motherboard.

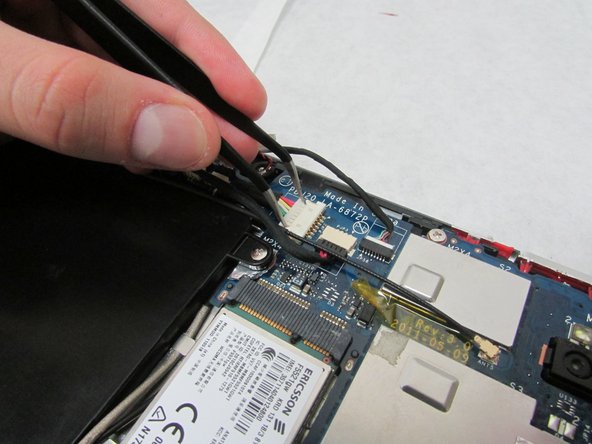
    • Use the angled tweezers to disconnect the white motherboard-battery connector in the middle of the side opposite the docking port.

  4. Acer Iconia Tab A501 USB-A/Micro-USB Port Replacement: étape 4, image 1 de 3 Acer Iconia Tab A501 USB-A/Micro-USB Port Replacement: étape 4, image 2 de 3 Acer Iconia Tab A501 USB-A/Micro-USB Port Replacement: étape 4, image 3 de 3
    • Use the plastic opening tool to flip up the locking mechanism for the flat, white ribbon cable connecting to the USB ports' board.

    • Remove the flat, white ribbon cable.

  5. Acer Iconia Tab A501 USB-A/Micro-USB Port Replacement: étape 5, image 1 de 3 Acer Iconia Tab A501 USB-A/Micro-USB Port Replacement: étape 5, image 2 de 3 Acer Iconia Tab A501 USB-A/Micro-USB Port Replacement: étape 5, image 3 de 3
    • Use a Phillips #1 screwdriver to remove the two 4.0 mm Philips screws attaching the metal plate, USB board, and device.

  6. Acer Iconia Tab A501 USB-A/Micro-USB Port Replacement: étape 6, image 1 de 3 Acer Iconia Tab A501 USB-A/Micro-USB Port Replacement: étape 6, image 2 de 3 Acer Iconia Tab A501 USB-A/Micro-USB Port Replacement: étape 6, image 3 de 3
    • Use the Halberd Spudger to carefully pop up and take out the ports.

Conclusion

To reassemble your device, follow these instructions in reverse order.

0 commentaires

Ajouter un commentaire

Nombre de vues :

Dernières 24 heures : 0

7 derniers jours : 1

30 derniers jours : 6

Total : 270