Aller au contenu principal

Acer Nitro 5 AN515-53-55G9 SSD Replacement

Ce dont vous avez besoin

  1. Acer Nitro 5 AN515-53-55G9 SSD Replacement, Battery: étape 1, image 1 de 3 Acer Nitro 5 AN515-53-55G9 SSD Replacement, Battery: étape 1, image 2 de 3 Acer Nitro 5 AN515-53-55G9 SSD Replacement, Battery: étape 1, image 3 de 3
    • Make sure laptop is off and unplugged before beginning replacement.

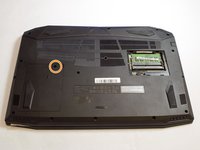
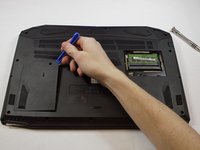
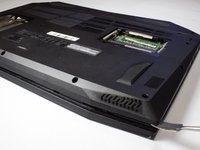
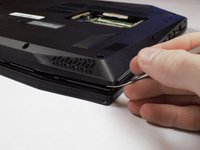
    • Flip the laptop upside down so that the bottom is facing up.

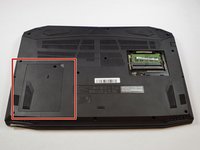
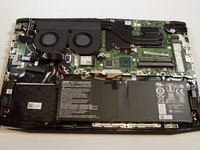
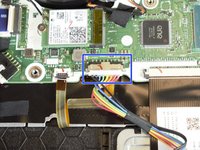
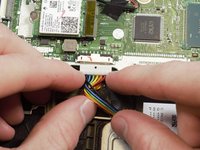
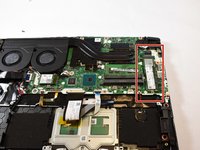
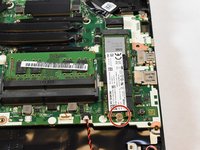
    • Identify the RAM tray on the bottom of the laptop.

  2. Acer Nitro 5 AN515-53-55G9 SSD Replacement: étape 2, image 1 de 3 Acer Nitro 5 AN515-53-55G9 SSD Replacement: étape 2, image 2 de 3 Acer Nitro 5 AN515-53-55G9 SSD Replacement: étape 2, image 3 de 3
    • Use the Phillips #0 screwdriver to remove the 9mm screw in the bottom left corner of the RAM tray covering.

    • Remove the RAM tray cover by prying up with a spudger.

  3. Acer Nitro 5 AN515-53-55G9 SSD Replacement: étape 3, image 1 de 3 Acer Nitro 5 AN515-53-55G9 SSD Replacement: étape 3, image 2 de 3 Acer Nitro 5 AN515-53-55G9 SSD Replacement: étape 3, image 3 de 3
    • Identify the Hard Drive tray to the left side of the laptop.

    • Remove screw with a #0 Philips screwdriver.

    • Lift up the Slot covering using a spunger.

  4. Acer Nitro 5 AN515-53-55G9 SSD Replacement: étape 4, image 1 de 1
    • Use the Phillips #0 screwdriver to remove the 9mm screws holding the back cover in place.

    • Remove the screws from the hard drive and remove it from the device.

  5. Acer Nitro 5 AN515-53-55G9 SSD Replacement: étape 5, image 1 de 3 Acer Nitro 5 AN515-53-55G9 SSD Replacement: étape 5, image 2 de 3 Acer Nitro 5 AN515-53-55G9 SSD Replacement: étape 5, image 3 de 3
    • Be sure you removed the hard drive. when you open the back shell and hard drive is built in this may cause damage to cable and other components.

    • Carefully remove the back shell from the device working your way around all the edges.

    • Do not forcefully try to separate the shell as you may cause harm to the shell.

  6. Acer Nitro 5 AN515-53-55G9 SSD Replacement: étape 6, image 1 de 2 Acer Nitro 5 AN515-53-55G9 SSD Replacement: étape 6, image 2 de 2
    • Removing the back shell of the computer and it will look like this.

    • The battery for the device is located at the bottom middle of the laptop at this orientation.

  7. Acer Nitro 5 AN515-53-55G9 SSD Replacement: étape 7, image 1 de 3 Acer Nitro 5 AN515-53-55G9 SSD Replacement: étape 7, image 2 de 3 Acer Nitro 5 AN515-53-55G9 SSD Replacement: étape 7, image 3 de 3
    • Locate the connector of the battery to the motherboard.

    • Using your fingers, slide out the connector.

  8. Acer Nitro 5 AN515-53-55G9 SSD Replacement: étape 8, image 1 de 1
    • Remove battery from device.

  9. Acer Nitro 5 AN515-53-55G9 SSD Replacement, SSD: étape 9, image 1 de 2 Acer Nitro 5 AN515-53-55G9 SSD Replacement, SSD: étape 9, image 2 de 2
    • Locate the SSD in the top right corner of the laptop.

  10. Acer Nitro 5 AN515-53-55G9 SSD Replacement: étape 10, image 1 de 3 Acer Nitro 5 AN515-53-55G9 SSD Replacement: étape 10, image 2 de 3 Acer Nitro 5 AN515-53-55G9 SSD Replacement: étape 10, image 3 de 3
    • Use the Phillips #0 screwdriver to remove the 3mm screw holding the SSD card in place.

    • The SSD will pop up at an angle when the screw is removed.

  11. Acer Nitro 5 AN515-53-55G9 SSD Replacement: étape 11, image 1 de 1
    • Slide the SSD out of its slot.

Conclusion

To reassemble your device, follow these instructions in reverse order.

9 autres ont terminé cette réparation.

Rheo Bruer

Membre depuis le 02/05/19

973 Réputation

4 tutoriels rédigés

0 commentaires

Ajouter un commentaire

Nombre de vues :

Dernières 24 heures : 1

7 derniers jours : 32

30 derniers jours : 190

Total : 22,403