Aller au contenu principal

Acer Predator 17 G9-791 Battery Replacement

Ce dont vous avez besoin

  1. Acer Predator 17 G9-791 Battery Replacement, Service Panel: étape 1, image 1 de 1
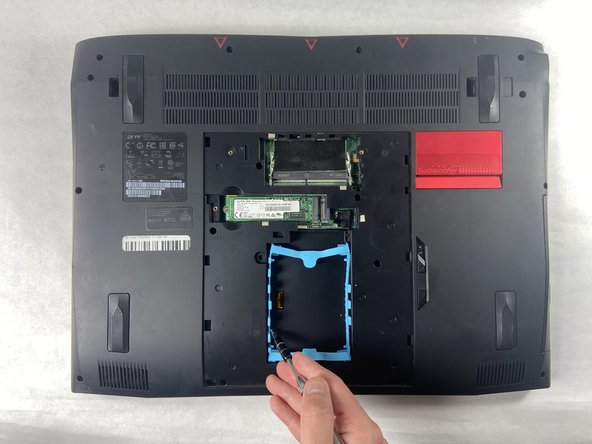
    • The service panel can be located on the bottom of the device. It is shown here as the panel located in the middle of the device, going from the upper vents to the bottom of the device.

  2. Acer Predator 17 G9-791 Battery Replacement: étape 2, image 1 de 2 Acer Predator 17 G9-791 Battery Replacement: étape 2, image 2 de 2
    • Loosen the two Phillips #0 screws.

    • Pull up slightly on the top of the panel to help fully separate the screws from the rest of the device.

  3. Acer Predator 17 G9-791 Battery Replacement: étape 3, image 1 de 1
    • Continue pulling up on the panel to separate it from the laptop and remove it.

  4. Acer Predator 17 G9-791 Battery Replacement, Bottom Case: étape 4, image 1 de 3 Acer Predator 17 G9-791 Battery Replacement, Bottom Case: étape 4, image 2 de 3 Acer Predator 17 G9-791 Battery Replacement, Bottom Case: étape 4, image 3 de 3
    • Remove the nine 4.5 mm Phillips #0 screws from the panel.

    • Remove four 14 mm Phillips #0 screws.

    • Remove six 7 mm Phillips #0 screws.

  5. Acer Predator 17 G9-791 Battery Replacement: étape 5, image 1 de 1
    • Slide the "unlock" slider up located to the right of the service panel and pull the disc tray out.

  6. Acer Predator 17 G9-791 Battery Replacement: étape 6, image 1 de 1
    • Remove the two 4.5 mm Phillips #0 screws located underneath the removed optical drive.

  7. Acer Predator 17 G9-791 Battery Replacement: étape 7, image 1 de 2 Acer Predator 17 G9-791 Battery Replacement: étape 7, image 2 de 2
    • Pry up on the edges of the bottom cover and lift the bottom case off of the device.

  8. Acer Predator 17 G9-791 Battery Replacement, Battery: étape 8, image 1 de 1
    • Remove the six 4 mm Phillips #0 screws from the battery.

  9. Acer Predator 17 G9-791 Battery Replacement: étape 9, image 1 de 2 Acer Predator 17 G9-791 Battery Replacement: étape 9, image 2 de 2
    • Disconnect the battery connector from the motherboard.

  10. Acer Predator 17 G9-791 Battery Replacement: étape 10, image 1 de 1
    • Gently lift the battery and remove it from the device.

Conclusion

To reassemble your device, follow these instructions in reverse order.

3 autres ont terminé cette réparation.

Matthew Shane

Membre depuis le 10/25/22

361 Réputation

3 tutoriels rédigés

Équipe

UMass Dartmouth, Team 5-1, Sinclaire Fall 2022 Membre de l'équipe UMass Dartmouth, Team 5-1, Sinclaire Fall 2022

UMASSD-SINCLAIRE-F22S5G1

5 membres

7 tutoriels rédigés

0 commentaires

Ajouter un commentaire

Nombre de vues :

Dernières 24 heures : 0

7 derniers jours : 11

30 derniers jours : 58

Total : 1,051