Aller au contenu principal
Pour réparer ensemble - Je crée un compte

AeraMax Pro AM III Air Filter Replacement

Document vedette

Aperçu de la première page de ce document
AeraMaxPRO AMIII Manual

Connectez-vous pour voir le document complet

Connexion
    1. AeraMax Pro AM III Air Filter Replacement, Air Filter: étape 1, image 1 de 3 AeraMax Pro AM III Air Filter Replacement, Air Filter: étape 1, image 2 de 3 AeraMax Pro AM III Air Filter Replacement, Air Filter: étape 1, image 3 de 3
      • If the access panel is locked, use the key to unlock it and open it by pressing the levers on both sides.

      • The appliance can open only if both levers are pressed simultaneously.

      • Use your hands to remove the old filter.

      Demander à FixBot

      Ajouter un commentaire

    2. AeraMax Pro AM III Air Filter Replacement: étape 2, image 1 de 3 AeraMax Pro AM III Air Filter Replacement: étape 2, image 2 de 3 AeraMax Pro AM III Air Filter Replacement: étape 2, image 3 de 3
      • When removing the old filter, do not throw away the filter cage. Wipe it down and prepare to use it for the new filter.

      • If you have not already wiped down your appliance, give it a thorough wipe-down with your preferred cleaning product.

      Demander à FixBot

      Ajouter un commentaire

    3. AeraMax Pro AM III Air Filter Replacement: étape 3, image 1 de 3 AeraMax Pro AM III Air Filter Replacement: étape 3, image 2 de 3 AeraMax Pro AM III Air Filter Replacement: étape 3, image 3 de 3
      • Remove the plastic from the new HEPA filter and place it into the filter cage.

      Demander à FixBot

      Ajouter un commentaire

    4. AeraMax Pro AM III Air Filter Replacement: étape 4, image 1 de 3 AeraMax Pro AM III Air Filter Replacement: étape 4, image 2 de 3 AeraMax Pro AM III Air Filter Replacement: étape 4, image 3 de 3
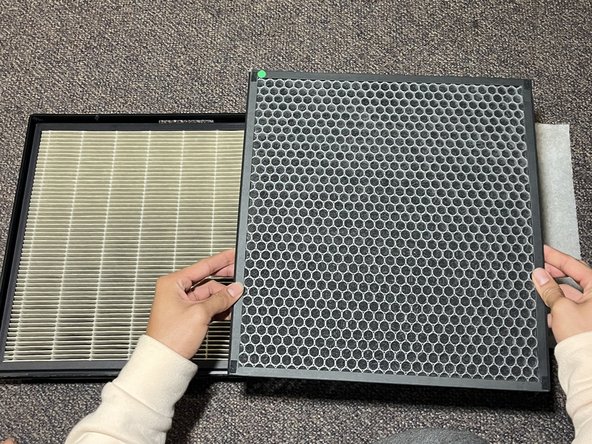
      • Insert the carbon filter into the filter cage that you wiped down and make sure the corners are aligned with the filter cage.

      • Take your new HEPA filter and make sure the stickers are aligned and the corners of the pre-filter are fleshed down until it sticks to the carbon filter.

      Demander à FixBot

      Ajouter un commentaire

    5. AeraMax Pro AM III Air Filter Replacement: étape 5, image 1 de 3 AeraMax Pro AM III Air Filter Replacement: étape 5, image 2 de 3 AeraMax Pro AM III Air Filter Replacement: étape 5, image 3 de 3
      • Insert your filter cage back into the access panel and make sure that the filter label is visible and facing upwards.

      • You can give your appliance one more wipe-down to ensure cleanliness.

      Demander à FixBot

      Ajouter un commentaire

    6. AeraMax Pro AM III Air Filter Replacement: étape 6, image 1 de 3 AeraMax Pro AM III Air Filter Replacement: étape 6, image 2 de 3 AeraMax Pro AM III Air Filter Replacement: étape 6, image 3 de 3
      • Press the HEPA Setting for three seconds until the icon turns green.

      • The green icon indicates that the filter has been replaced and is ready to be used.

      • Close the access panel.

      Demander à FixBot

      Ajouter un commentaire

Ligne d'arrivée

Annulation : je n'ai pas terminé ce tutoriel.

Une autre personne a terminé cette réparation.

Pièces jointes

Pita Vaouli

Membre depuis le 08/22/22

157 Réputation

1 tutoriel rédigé

Équipe

CSU Los Angeles, Team P-2, Briggs Fall 2022 Membre de l'équipe CSU Los Angeles, Team P-2, Briggs Fall 2022

CSULA-BRIGGS-F22SPG2

1 membre

12 tutoriels rédigés

1 commentaire de tutoriel

I have a brand new Air purifier just like the one in your demonstration I would like to sell, it's still in the box. I don't know how much to ask for it or where I can sell it. Can you help me?

Danette Dinot - Réponse Partager

Ajouter un commentaire

Nombre de vues :

Dernières 24 heures : 1

7 derniers jours : 10

30 derniers jours : 38

Total : 777