Introduction
This guide shows how to replace the Apple EarPods headphone jack plug. This guide will require the user to have ample soldering skills. As with any projects involving soldering, please be wary of the fumes and heat that may be produced while completing this project. Apple EarPods are very good quality headphones, but they are quite expensive and can be fixed with relative ease. This guide will help users save money and prevent the waste associated with the disposal of these headphones. Please move forward through this guide to learn how to repair your Apple EarPods.
Ce dont vous avez besoin
-
-
Cut the wire at a length comfortable for the headphone user (preferable close to the old jack plug).
-
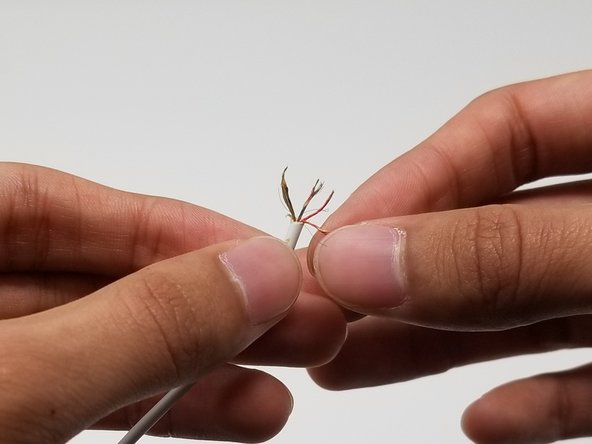
Using a wire stripper, remove about 1-2 cm of insulation from the end of the wire.
-
-
-
-
Solder the wires to poles on the jack as outlined in the steps below. Poles are shown in the first picture segmented by the color boxes. For proper soldering technique please use: iFixit Soldering Guide
-
The first pole (Marked with the red box) is grounded. Solder on the green-gold, red-gold, and red-green wires. The third picture refers to this step.
-
The second pole (Marked with the orange box) is for the right earbud. Solder on the red wire.
-
The third pole (Marked with the yellow box) is for the left earbud. Solder on the green wire.
-
Finally, the fourth pole (Marked with the green box) that is not connected to the rest is for the mic. Solder on the gold wire.
-


Annulation : je n'ai pas terminé ce tutoriel.
5 autres ont terminé cette réparation.
Équipe

University of Memphis, Team S2-G4, Baddour Spring 2019 Membre de l'équipe University of Memphis, Team S2-G4, Baddour Spring 2019
UM-BADDOUR-S19S2G4
2 membres
5 tutoriels rédigés
6 commentaires
Step 5 wrong! The Mic is the red&green cable and the gold cable doesn't exist in my earpods. There is a 6th cord however which is a nylon like support cord.
The gold wire is hidden inside the red-green wire. Unwind the red-green to find it. The gold is the mic, the red-green is the mic ground. If you use the original jack (cut away the moulded on white plastic) you can use a multimeter to find the mic connection which is on the other side of the ground connection. Thanks for the page. Good luck
Jonathan -
I recycled the same factory jack and identified the poles with a multimeter. I followed the same instructions. Their volume is lower than usual. Thanks for the page.
This article was pretty useful for me. Great thanks to the author and also people who commented here.