Introduction
Le ventilateur de cet appareil n’est fixé que par quelques vis, mais il faut reconnaître que lors de son retrait, quelques fils sont enroulés derrière d’autres composants. Veillez à ne pas tirer ou tirer trop fort sur les fils et à les écarter plutôt que derrière les autres composants avant de retirer complètement le ventilateur. Aussi, gardez une trace de vos vis et de l'endroit où elles ont été placées dans l'appareil car il y a une vis qui est différente des autres. Cela permettra un processus inversé beaucoup moins frustrant!
Ce dont vous avez besoin
-
-
Couchez l'écran avec l'écran vers le haut.
-
Placez les deux ventouses des deux côtés du haut de l’écran et assurez-vous de les verrouiller.
-
L'écran en verre à relier au reste de l'affichage par de petits aimants. Soulevez lentement et l'écran va se détacher.
-
-
-
-
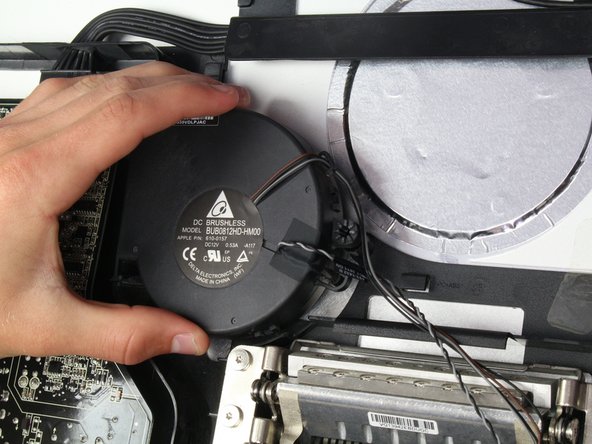
Vous devriez maintenant avoir accès au reste de l'écran. De là, localisez le ventilateur.
-
-
-
Le ventilateur est connecté à la carte logique principale par deux connecteurs. Assurez-vous que lorsque vous les déconnectez, saisissez le fil au point le plus proche de la carte et tirez-le doucement pour éviter d'endommager les connecteurs.
-
Retirez le morceau de ruban adhésif qui maintient les fils au boîtier.
-


Pour remonter votre appareil, suivez ces instructions dans l’ordre inverse.
Pour remonter votre appareil, suivez ces instructions dans l’ordre inverse.
Annulation : je n'ai pas terminé ce tutoriel.
27 autres ont terminé cette réparation.
Merci à ces traducteurs :
100%
[deleted] nous aide à réparer le monde ! Vous voulez contribuer ?
Commencez à traduire ›
Équipe

Cal Poly, Team 5-11, Maness Spring 2015 Membre de l'équipe Cal Poly, Team 5-11, Maness Spring 2015
CPSU-MANESS-S15S5G11
4 membres
19 tutoriels rédigés
10 commentaires
I have been having trouble with fan noise -- a noisy, rapid thumping sound, especially on startup but getting worse over a few weeks and lately persisting all day. Following this excellent guide, I removed the fan and examined it. I could see nothing wrong except perhaps a fine layer of dust on the blades, no worse than could be expected. I did not manage to disassemble the fan itself, as its two-part housing is very firmly clipped together, but applied a vacuum cleaner hose to both the entry and exit sides to clean it up as much as possible. I put it back and reassembled the whole display, and am pleased to report that the noise has completely disappeared. This may be good news to anyone dismayed by the apparent non-availability of replacement fans.
This guide made the power supply replacement quick and easy.
I had the rumbling fan cleaned by a pro. but the rattling didn't go. I just finished replacing the fan on my 27'' Thunderbolt Display using these instructions, and so far so good after 3 hours. It usually started the rattling after 30mn!
I purchased the fan on eBay. There were a couple available then.
I got the fan for $18 and spent 30mn on the job. At the Apple certified spot in town, they were going to charge me $250! I bought this Apple Display second hand for $250! and now it is back to its old self, working like a charm :)
Thank you very much for this web page which walked me through the process.
By the way, for a succion cup I used the two small ones that are attached to my soap holder, from the bathroom tiled wall; worked just fine and I didn't have to spend $20 to buy one.
cheers
Many thanks to Mr. Laverty and the other contributors. I followed this guide to install a new power supply in my darkened 27” Thunderbolt Display to bring it back from the dead. While the instructions were specifically for replacing the fan, I found that after following them to remove the LCD panel, it was easy to replace the power supply as well. For anyone else who may suspect a failed power supply (loud buzzing and then black), I ordered mine directly from China, supposedly a brand new one. It looks identical to the original in every way and does have a 2018 sticker affixed to it. It took a month to arrive but did the trick. I paid $70.50 for it from wwon_one off eBay (https://www.ebay.com/itm/273134311780). Thanks again for the extremely helpful guide!
Many thanks to Mr. Laverty and the other contributors. I followed this guide to install a new power supply in my darkened 27” Thunderbolt Display to bring it back from the dead. While the instructions were specifically for replacing the fan, I found that after following them to remove the LCD panel, it was easy to replace the power supply as well. For anyone else who may suspect a failed power supply (loud buzzing and then black), I ordered mine directly from China, supposedly a brand new one. It looks identical to the original in every way and does have a 2018 sticker affixed to it. It took a month to arrive but did the trick. I paid $70.50 for it from wwon_one off eBay. Thanks again for the extremely helpful guide!