Introduction
Ce guide vous explique comment remplacer le câble tout-en-un écran et le câble MagSafe de votre écran Apple Thunderbolt.
Ce dont vous avez besoin
-
-
Couchez l'écran avec l'écran vers le haut.
-
Placez les deux ventouses des deux côtés du haut de l’écran et assurez-vous de les verrouiller.
-
L'écran en verre à relier au reste de l'affichage par de petits aimants. Soulevez lentement et l'écran va se détacher.
-
-
-
Dévissez les 12 vis autour des bords latéraux et du haut de l’écran LCD avec le tournevis TR 10.
The screws marked in orange don't need to be removed, all they do is hold the magnets on the LCD.
Yes “orange screws” does not need to be removed.
You do not need a TR10 screwdriver as written in the text a T10 will suffice (more common and also correctly mentioned in the list of tools).
A TR10 screwdriver is compatible with the T10, but not the other way around
Any info on if an older 2011 imac screen could just be plugged into this to replace the current lcd?
-
-
-
Soulevez lentement l’écran LCD de son emplacement et inclinez-le vers le haut.
Add the note that it should be lifted from the bottom edge. It is also important not to twist the display by levering up from one corner.
Before lifting the monitor, you should be prepared to start collecting screws and have your TR 10 ready.
-
-
-
Pour le premier des quatre fils (le plus éloigné du fil retenu par une vis), saisissez le connecteur et tirez doucement.
Note: be sure to pull away but not hard. Wiggle and pull slowly. These are delicate especially due to age.
Overall this is a moderate repair. Follow step by step and you are good.
Also, use tape and/or labels to mark which cables go where per the MLB and other parts. Resulting in easier reassembly.
-
-
-
Pour le connecteur suivant, juste à côté du fil précédent, un morceau de ruban adhésif est attaché à une barre de métal.
-
Retournez la barre de métal en utilisant le ruban comme poignée.
-
Ensuite, saisissez le connecteur et retirez-le lentement de la prise de la carte mère.
What is this connector for?
I imagine this connector is going to be for display data (i.e. LCD data).
I pretty much mangled this cable trying to put it back into the slot. Is this something I can order a replacement for?
Thunderbolt Display 27" LVDS Cable
As other’s have said, this cable is super delicate.
When you replace it, make sure that the small metal handle it firmly reattached to the other side of the port. I thought I’d got it right first time, but had no video signal (thunderbolt detected display, and power was fed to the Macbook Pro).
I had to reinsert this one again, and one in, firmly press the connector home, then latch the handle over the other side. I also gave it a test pull to ensure it was secure. Then all was well!
Can anyone provide a photo of this connector so as to give a better understanding of its mechanics? see this cringe worthy effort at guidance; https://youtu.be/A96CUSm_Xhs?t=1050
-
-
-
Pour le connecteur situé de l’autre côté de la carte mère, saisissez-le par le dessous et retirez-le délicatement de la carte.
This cable was also taped for me, so remove the tape first
-
-
-
-
L'écran LCD est maintenant complètement déconnecté du boîtier et peut être réparé / remplacé!
-
-
-
Vous devriez maintenant voir l'entrée d'alimentation secteur au centre de l'appareil (bien que retenu par quelques autres composants).
-
Suivez les fils qui sortent du bas de l’adaptateur secteur vers la gauche.
-
Prenez la pince à épiler et retirez le morceau de ruban adhésif qui maintient les fils au boîtier.
-
Un seul connecteur doit être débranché (même s’il y en a deux juste à côté!).
-
Saisissez le connecteur par le bas et tirez-le délicatement de la prise correspondante.
Yes - pictures and last bullet point are misleading and confusing respectively. I suggest fixit should remove the second picture and replace it with a picture of the connector that should be removed and amend the last bullet point o read something like 'depress the clip that holds the left connector in place and carefully etc ...'
Avoid the verb 'grab'
Yes, grab has no finesse at all. Grabbing and ripping are what makes the whole process a potential nightmare :)
-
-
-
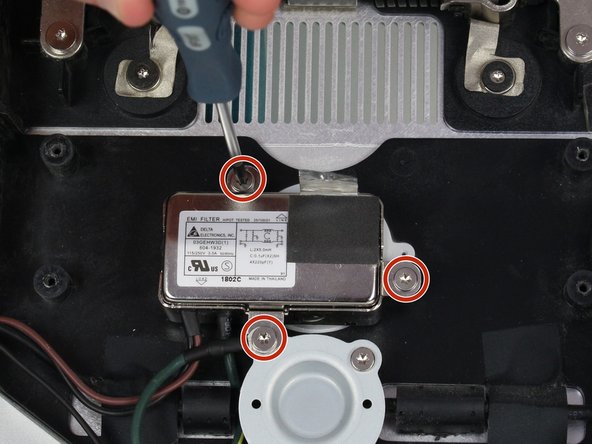
Le composant de haut-parleur environnant (la boîte noire) autour de la prise d'alimentation doit être retiré.
-
Utilisez le tournevis TR 10 pour retirer les quatre vis.
-
Déconnectez l'enceinte de derrière la carte mère en tirant doucement sur l'extrémité en plastique du câble.
-
Retirez le haut-parleur.
If you are only replacing the Thunderbolt and MagSafe cable, steps 11-13 do not need to be performed ie speaker and EMI filter do not need to be removed, only the screw holding the grounding cable on the EMI filter (top left of round disk).
I concurr with M Baynes.
-
-
-
Maintenant que l'enceinte centrale est à l'écart, l'adaptateur secteur est facilement accessible.
-
À l'aide d'une pincette, retirez le ruban argenté situé en haut de l'adaptateur.
I can’t help but notice that this assembly that is called an EMI (Electromagnetic Interference) Filter is in the exact position that my monitor has been displaying a band of disrupted color bands once it heats up. I am changing the Thunderbolt cable assembly in hopes that is fixes the problem. If it doesn’t then I will make changing the Filter my next quest. It is also noteworthy that the Filter is grounded to the case by the metal tape which must be peeled back for this procedure. Hmmm.
-
-
-
L'adaptateur d'alimentation est connecté par trois vis. Utilisez le tournevis T10 pour les supprimer.
-
Le fil vert et jaune retenu par la vis différente est dissimulé derrière un autre composant. Pour le sortir, pincez-le derrière le fil noir pour pouvoir débrancher l'adaptateur secteur du boîtier.
Nothing about the power cable itself here. That has to be unplugged first, or when you get to this point, you’ll have to carefully unplug the main power cable from the back of the AC adapter you just removed in Step 13, and feed it through the hole in the back of the case.
-
-
-
Retirez les deux vis T10 de la plaque métallique maintenant le câble en place.
-
Retirez la plaque de métal.
-
-
-
Retirez délicatement trois connecteurs de câble de la carte logique en les sortant en les tenant par l'extrémité en plastique.
-
Câble de contrôle du ventilateur
-
Câble de capteur de température
-
Câble d'alimentation du ventilateur
I dont see any Temp sensor cable, just the top and bottom ones
Same Here. Could that be why it’s been cutting out all the time?
I opened up my TB Display because it kept cutting out. I intended to replace the MagSafe/TB cable (as suggested on several threads) but now I see there is no Temperature Sensor Cable (middle) and the Fan Control Cable (Top) just leads to an end that is tapped next to the fan. Could this be an issue in the display intermittently going black and the desktop switching back to the MacBook?
According to the Fan Replacement page there are only 2 cables.
No need to undo these cables. Proceed to next step and just flip on edge the logic board to get to the tb cable.
I also did not have a temp sensor cable. Nothing to be found.
As Jerod Moore noted, steps 15 and 17 are optional, provided you are gentle with the logic board cables and only stand on edge, not flip over, for step 18
I just finished the removal and replacement of the Magsafe/TB cable. I can confirm what Jerod Moore and Martin Baynes stated. No need to undo these cables and steps 15 and 17 are indeed optional as long as you are gentle with the logic board cables and only stand the logic board on edge.
-
-
-
Basculez avec précaution la carte logique vers la gauche en utilisant les câbles restants comme charnière pour accéder au port d'affichage.
-
Retirez les deux vis Torx T6 de la plaque métallique qui fixe le connecteur du port d'écran.
-
Retirez la plaque de métal.
i removed both the top and bottom metal plates in order to fit a 3rd party thunderbolt cable
-
-
-
Débranchez le câble Thunderbolt de la carte logique.
-
Faites passer le câble Thunderbolt & MagSafe restant dans la découpe du boîtier arrière.
Nothing here about the two pieces of black fabric tape you have to undo to release the Thunderbolt and Magsafe cables; also see Isaac’s comment on Step 9 about having to unplug the Magsafe adapter. You can wait until this step to do that, but it still has to be done to remove the Magsafe cable.
Also, you have to pull the cable up through, you can’t feed it down through the hole.
There are two blocks , visible in the photo above under the thumb and by the index finder, each were holding a black cable (power or Thunderbolt). These are VHB tapped to the metal chassis. Gently push on the block and they will detach. Remove fragments of VHB tase with tweezers. The new cable blocks already has VHB tape, you only need to remove the protective tape and hold firmly in place for a few seconds, for each block.
Do you know what these black blocks are for? What ist their function/role on the cable assembly?
Can confirm martin baynes' comment. The two plastic blocks (visible in the second photo above under the thumb and by the index finger) need to be attached to the metal chassis/case with the VHB under the blocks. Otherwise, the cables would be too loose. To do this, the black plastic rings on the gray cable connector (visible just above the thumb knuckle) need to be pushed down first. Then the black plastic blocks are held in place. Then they're ready for the metal plate to be screwed back on.
ciao, puoi indicarmi dove posso acquistare il cavo di ricambio
grazie
-


Pour remonter votre appareil, suivez ces instructions dans l’ordre inverse.
Pour remonter votre appareil, suivez ces instructions dans l’ordre inverse.
Annulation : je n'ai pas terminé ce tutoriel.
83 autres ont terminé cette réparation.
Merci à ces traducteurs :
100%

Ces traducteurs nous aident réparer le monde ! Vous voulez contribuer ?
Commencez à traduire ›

Équipe

64 commentaires
Unbelievable amount of very detailed and careful work to replace a Thunderbolt cable which is attached on the inside to a standard Thunderbolt socket! Why not just have the socket on the back of the unit?????
You can actually use the socket on the back of the unit as an input if your octopus cable is dying, as long as you are connecting directly to a Thunderbolt 1 or 2 Mac. If you are using the Thunderbolt-3-to-Thunderbolt-2 adapter, you have to use the built-in cable.
Tim -
In reply to Tim - This is not true - I am running a 2018 Mac Mini using the Thunderbolt 3 to Thunderbolt 2 adaptor and a standard Thunderbolt 2 cable connected to the external thunderbolt connector on the Thunderbolt Display - It works fine.
Me as well. Was dreading the repair until I plugged a spare Thunderbolt 2 cable from a Thunderbolt 3 (to 2) adapter to the back of the display. Thanks!
Jim Hoyt -
Thank you for the tip. I actually went to Apple store and they said they will not repair it. I was about to open it up until I see this note. Big save of the day!!!
Nice one Tim! Saves me opening the screen! Thanks!
Me too! I was just about to start dismantling my display when I noticed this tip - I’d even bought some suction cups. Thanks Tim!
Oh, my, yes! What a useful comment. It makes sense that this would work but I would not have thought of it. @timgostony Thank you very much indeed!!!!!
At the top of this guide for the Apple Thunderbolt Display Thunderbolt & MagSafe Cable Replacement, it says that there are “No Parts Required” I beg to differ. I need this guide because I need to Replace my Apple Thunderbolt Display Thunderbolt & MagSafe Cable because the connector at the computer end is sketchy and if touched causes the image to glitch and go out. I know its the cable because this issue is not present with any other display or projector I plug into the same port on my computer. So, I ask, do you have a reliable source for an Apple Thunderbolt Display Thunderbolt & MagSafe Replacement Cable so I can use this guide and fix my monitor once and for all?
Answered my own question. http://a.co/d/bOlf4s0
Hi Stephen, You’re right, the wording is somewhat confusing. Of course you need a replacement part to replace something ;) This has been forwarded and we’ll hopefully change it soon to provide proper information. Thanks for the parts link; i’ll put this into the “parts” section for the time being.
Hello, I desperately need help! I have followed the step by step instructions here & everything went perfectly! But now it won't turn on at all??? I have checked that I have plugged in every cable but still no response? Any help would be greatly appreciated. Thank you.
Nicholas, any luck with fixing your display? Same problem here. Replaced the all-in-one cable without incident. Reassembled, and now it won’t power on using different:
• macs
• plugged and unplugged
• from on already and starting up
• outlets
• power cords
Help.
About to start the process over, suspecting to find a disconnected cable.
Good luck, and thanks for any input.
Chris Leeds
Independent Apple Specialist
Well Connected Life
Also experience some hickups with different cables. No picture but charging, not charging but picture, slow recognition of display (~8 sec). There are different cables for the different display (size and year). Some cables may also be used and malfunctioning. Maybe connect to the seller and request a replacement to check.
Hi Chris, I never had any luck with my repair. I came back to this forum hoping someone had replied with a solution, did you happen to get yours working at all? I have also tried all of what you stated with no success. Mine was working fine originally but the connection on the thunderbolt cable was intermittent so I decided to replace it but was unsuccessful despite everything being done perfectly. I also switched back to the original cable but still no response at all. Any help would be greatly appreciated. Thank you.
I use 2 thunderbolt displays with Mac Mini, daisy chaining the second one from the first display. I have been using these displays since 2011 and last month in a gap of 15 days both the cables started exhibiting unreliable connectivity. I ordered a pair of new cables and eventually after a month of waiting, I finally got them yesterday.
Opened display #1 using this guide (which is a life saver) and that roughly took me over an hour to tear it down. I additionally opened out each of the 3 speakers and brushed off the 8 years of dust accumulated on them. Blow cleaned the fan which had tons of dust caught inside.
This guide is quite well drafted with each step very illustratively put together. Not just my display is back in action, but also the audio volume of the display has doubled up :) I also cleaned off the soot developed behind the front glass and now its like a entire refreshed display.
Kudos to the author for this article!
Will work on the display #2 sometime soon.
Great guide, thanks for thorough step by step teardown. I replaced both the cable assembly and the glass. I didn’t have the nice foam block to prop up the display from the work surface and provide space between the stand and the housing, but found that a rolled up hand towel worked well. If you’re doing the job yourself, find something to hold open the panel while you disconnect cables. There’s plenty of safe areas to do this without crushing or damaging internals. Similar to a automobile hood. Propping it open close to center provides the best balance. I used a large plastic bottle, it’s what I had available?!? You’re gonna need both hands for the job. And, though suction cups would have been nice, the magnets are weak enough that, working from the bottom, I found the glass separates easily without stressing the glass.
Hi Tim, can you give me a few more details on this?
“You can actually use the socket on the back of the unit as an input if your octopus cable is dying, as long as you are connecting directly to a Thunderbolt 1 or 2 Mac. If you are using the Thunderbolt-3-to-Thunderbolt-2 adapter, you have to use the built-in cable.”
How and in which cases can I replace the cable without opening the screen?
What more do you need to know @v_roy? Just buy a Thunderbolt to Thunderbolt cable (Apple sell them in 0.5m or 2.0m lengths). Then plug one into the rear of the display (there’s just one TB socket). Then plug the other end into your Mac, and voila! No need to dismantle the display at all.
Hi Tim, are you sure about using “Thunderbolt-3-to-Thunderbolt-2 adapter” with an external thunderbolt cable?
Hi andremacola! I was thinking the same and wondering if you had made any progress with this? I don’t understand why it would be different to use a “Thunderbolt-3-to-Thunderbolt-2 adapter”? I’m hoping I can use an external thunderbolt cable to connect to my adapter and MacMini. My display keeps blacking out randomly and it’s driving me crazy! And I can no way afford that new Apple display!
Any recommended brand for the replacement cable?
And tips on checking if it’s the cable or the port on my 2013 Macbook Air?
I’m currently using my 27inch Apple Thunderbolt Display with a 2014 MBP which is obviously how it was meant to be. I expect to upgrade my laptop to a new model in the next year and dreading having to deal with tons of dongles. Has anyone provided, looked at possibly modifying this model so that it has a USB-C connector?
Hi, thx fot the manual!
The resolution of the display is no longer scalable. only a 1200* resolution is possible. With the new and old cable this is now. Everything is plugged in like in the manual.
I have been having problems after plugging in a cheap LED light to one of the USB ports in the back of my Thunderbolt Display. I just tried connecting the thunderbolt port to a thunderbolt 2 to 3 converter and then my 2019 MacBook Pro. The Thunderbolt Display screen came on fine but the brightness controls and built in camera were unavailable. Therefore I need to do this work or get a new display or find a tech to do it because I want to keep using the camera and brightness adjustments.
Overall, these instructions were great! I appreciated the comments, as I did have to disconnect the OTHER connector rather than the one highlighted in step 9. I would have never done this job on my own, but these instructions made it quite do-able. thank you!
Hi ifixit.com,
I just fixed my Apple Thunderbolt Display Monitor, today! Thank you so much for the steps to changing my thunderbolt cable! I also purchased the tool kit from your website.
Thank you so much!
MoNique H.
Replaced the cable meticulously thanks to these great instructions. Still no power to mag safe, no power to USB and other ports. Connecting directly via Thunderbolt did not work. Tried multiple Mac computers. AC power cable does have power. What troubleshooting steps are next? Should I replace the power supply board? The logic board? I have a lot of good years in this investment, would like to get a few more. Thank you.
I think my display needs this fix at some stage, does anyone know why this cable does need replacing?
I am currently using it with the external port and Thunderbolt 3 to 2 adapter on my iMac 5K 2017, but its the only way I can reliably use it.
If the built-in cable is used, the display is not stable and stops being connected to my iMac.
Excellent guide! I didn’t need the suction cups. Pull w/ fingers.
Long story short, I have 2 Thunderbolt Displays. TD1 flickers after 10-15 minutes then gives out. TD2 around 20-30 minutes will black out but kick back on right away, and I lose sound output to it, and for sound output to show back up in the settings, I have to disconnect then reconnect.
Tried daisy-chaining MacBook Pro<—TD2<—TD1 and works, but then flickering symptoms again.
Tried daisy-chaining MacBook Pro<—TD1<—TD2 and found out that TD1’s TB port on the back doesn’t work.
I bought one new TB/MagSafe cable from Amazon, used this guide, and finished the job on TD1 in an hour. Again, excellent guide. BUT, I’m still having flickering problems on TD1 when running itself or by daisy-chaining MacBook Pro<—TD2<—TD1
BUT! MacBook Pro<—TD1<—TD2, TD1’s TB port on the back works now, and haven’t seen any flickers about an hour in on TD1. However, TD2 gave up once, but kicked back faster than before.
Will order another replacement and do the same job on TD2.
As others have mentioned, I was able to bypass the original fixed thunderbolt cable, though bypassing it with an official Apple Branded TB2 cable from the socket in the back of the screen to a MacMini. It worked fine.
Awesome job Tobias, very helpful
After completing the repair, you may need to reset your NVRAM/PRAM and SMC - recommended debugging for a Thunderbolt display, see https://www.macrumors.com/how-to/reset-t...
It is a wild guess that a damaged Thunderbolt cable may cause corruption of these critical settings.
2nd time fixing the TBD. Power Supply, now the TB2 & Mag-Safe cable, nine years old and it is not in the landfill. Maybe nine more. Thanks
Display works but the laptop is not charging. Anyone with the same problem?
Had a similar case with an internal test repair. Turned out the cable was defective—returned it and the replacement part worked just fine.
Do you think it is possible to integrate the Thunderbolt Display’s Mag-safe power cable and the Thunderbolt 2 connector into one thunderbolt 3 connector? (Like soldering couple of wires that Apple’s TB2 to TB3 adapter is lack of?)
So I can use my Thunderbolt Display with my newer Type-C ported Macbooks with just one single cable just like LG’s Ultrafine Monitor. (External Display & Charging my mac laptop at the same time?)
I know it would require 2 adapters at this moment(Apple’s Thunderbolt 2 to Thunderbolt 3 Type-C Adapter && $20 Magsafe to USB Type-C Converter) However, my $20 magsafe converter got burnt and melted after a few months of usage so, NO. I won’t use that again. (And also I hated the fact that the two fat adapters hanging & dangling around.)
Or is it a bad idea modifying it like that? (catch fire or something? I am still curious why my converter got melted and no longer functioning..)
I bet you COULD do some dodgy hacks like that, but … my recommendation would be to get a Thunderbolt dock like the Brydge Stone Pro and then hooking THAT up to the thunderbolt cable and adapter. It’s not cheap AT ALL, but with the dock I have ONE cable like that to plug in and get power and data all at once. The MagSafe part just kinda dangles off uselessly in that case, so it’s not the most aesthetically pleasing thing in the world, but the end result’s functionality is pretty darn sweet.
(And yeah, those MagSafe-to-USB-C adapters looked nice, and I used mine for all of a week before I asked “is there ANY more elegant way?”)
Bibulb -
Wow… this is my second experience upgrading or fixing apple products. My cable’s shielding had frayed and the display finally stopped working, so I bought an aftermarket replacement and found this vid. I spent the $35 to buy the tools: suction cups, torx kit, and foam wedge, and I have to say that this tutorial was really on point. No issues replacing it and it works great now. Thanks!!!
Hi - I need help. I followed these instructions. It was very easy. But now that my Thunderbolt Display is back together, the screen flickers and moves windows around like crazy and turns black randomly. However, the camera, USB ports, and sound work as expected. Any idea what could cause this? I know I didn’t damage the logic board as when I plug in a separate Thunderbolt cable to the back the screen is fine (but I don’t get sound, camera, or USB). Any advise before I take this all part again? Thanks, Lindsay
After a lot of frustrating trial and error, it's definitely the replacement cable!
Lindsay -
I don’t know if this will help anyone, but cleaning the glass and led screen was impossible after this replacement. I tried everything (microfiber, cotton cloths, water only [glass only], vinegar & water solution [glass only], electronic wipes [glass only], compressed air, etc.), but the glass kept getting worse and the led screen had lot of dust on it. In my frustration I used a long piece of cheap scotch tape the length of the monitor (the kind that’s not completely clear) to clean both sides of the glass, which removed any accidental finger prints, streaks from my unsuccessful cleaning attempts, and dust particles. After both sides were clean again, I used the same process on the led screen, but much more carefully with a smaller piece of tape. It removed all marks and dust on the led screen as well, I was so happy. I went through a lot of tape, but I’m finally happy with the screen. I just hope this second cord actually works as a permanent solution so I don’t need to take it apart again.
Lindsay -
Thank you so much for publishing this guide. Many of the photos, and tips on how to remove each cable were invaluable. My monitor is working like new now. I really appreciate your work!
It really is a detailed explanation. I have a question. Can I use the use the socket on the back of the unit as an input to connect a new 2020 13 inch M1 MacBook Pro. Using this cable https://www.apple.com/shop/product/HN8B2...?
Not with that cable specifically - it’s USB-C to Mini-Displayport, which won’t work to drive a Thunderbolt display. That said, you could use these two (https://www.apple.com/shop/product/MMEL2... AND https://www.apple.com/shop/product/MD862...) in conjunction to connect that Thunderbolt Display to the MBP.(It’s not gonna handle power for the computer, obviously, but that’ll drive the display.)
Bibulb -
My display is starting to show signs of an issue with the cable so I’m going to potentially do this. However, my question is this.
My current MacBook only has USB-C plugs on it which means dongles…lots of them. Has anyone made a replacement Thunderbolt display cable that is natively USB-C as opposed to the original MagSafe/Thunderbolt?
@carlospacheco Did you end up doing that? My cables are wearing out also and was thinking of doing the same thing if the cable exists.
Thanks
Jeff
Weird timing Jeff, I finally tried replacing the cable with a new one this past weekend (standard thunderbolt cable) but unfortunately, it didn’t take. Still had the same issues if not worse… Just last night I gave up and sold it for parts.
Thanks everyone. Could anyone confirm whether using the display’s peripheral thunderbolt port & cable & 3-2 thunderbolt adapter really works with a newer 2019 macbook pro?
I can’t confirm with a 2019 MBP, but I can say definitely that <port on the back> → <TB1 cable> → <TB1 to TB3 adapter> → <TB3 port on 2017 MBP > OR <TB4 port on 2021 MBP> both work. So while I don’t have DEFINITE proof that it’ll work with a 2019 MBP, I can’t imagine any reason why that one specific model year wouldn’t work.
(The one caveat is that I’m using another company’s TB1 to TB3 adapter - but given what everyone else has said, I again can’t picture that using actual Apple parts in that daisy chain instead of my off-brand stuff would work WORSE than my success.)
Bibulb -
My A1407 stopped working for my laptop (macbook pro 2014 and mini mac). I reset the SMC on the laptop and it was working for a minute or less then black again. I did the instructions above to see if I could see any issue with the cable but all looks good. Is the cable the likely issue?
Any way to replace this cable with a USB-C version that plugs straight into a new MacBook Air (M1)?
That would be rad. If anyone succeeds, please let the community know :D
Did this entire procedure, replacing the cable ganglion AND the power supply, but there is no change to my completely black Thunderbolt monitor. Only thing left to replace now would be the logic board, I suppose, but then it's also a case of declining returns. Reckon I'll just buy a cheap monitor instead.
Almost perfect instructions, although my new Cable does not connect up the Thunderbolt to my Mac. ( the Thunderbolt adaptor on the exterior does - just using a thunderbolt to thunderbolt cable ).
The Magsafe works though.
So eBay code word 'untested' does mean 'faulty' ( unless it's the monitor's fault )
Thanks
Can confirm that a $30 Thunderbolt to Thunderbolt cable attached to the Thunderbolt port on the back of the monitor works perfectly as a replacement for a failing built-in Thunderbolt cable. Wonder how many people scrapped their display over the bad cable :(
Please help! After replacing the thunderbolt / Magsafe cable I am having a problem with USB hub/ thunderbolt. When I use the new cable - the screen is working, but USB ports are not. If I connect using a separate thunderbolt cable - USB ports on the display are working. But the main thunderbolt cable is not working then - my issue is that I need to run my thunderbolt audio interface along the display.
Connecting to MacBook Air 2015.
Many thanks!
either the new cable is defective or the motherboard has issues. More likely it's the new cable since connecting directly with a separate thunderbolt cable works fine.
"Hello everyone and thanks for the wonderful guide. Can someone indicate where I can order the replacement cable online? There are many with conflicting reviews, so if someone has a verified website, could you please kindly indicate it to me? Thank you."
HI! Thanks for support! I hve this dispay and it seems the wire is broken. I see I cannot buy a replacemetne. So, can I connect a simple Mini DisplayPort to Mini DisplayPort wire to solve ? SOmebody knows about the internal display connector wiring? thanks a lot in advance!
Instead of $14 foam block, I used a full roll of paper towel and two pillows. While it worked, if I ever did this again, I would buy the block of foam. Since you’re removing a power cable, you need to be able thread it through and I think the foam block would make that easier.
Josh Miller - Réponse
You can also use a single handle, double cup floor lifting suction cup. Just place it in the centre of the screen near the camera and lift slowly.
Steve A - Réponse
I just used a toilet plunger to remove the screen and it worked like a charm!
Philip Jacob - Réponse
That’s what I call resourceful—made my day. I hope your repair was successful.
Tobias Isakeit -
Great idea, thanks a lot!
Yvan Sandoz -
The glass lifted off the magnets quite easily after just using my fingernails. No suction cups or toilet accessories needed.
Adrian Gropper - Réponse
I had the same problem and after removal of the fan and a bit of work with the vacuum, the fan is quiet. Thanks to ifixit for the great instructions that made this easy.
John Perser - Réponse
To keep the screen up, other soft objects might work, but it's important that the hole in the back isn't covered because you will need to thread the new Thunderbolt/MagSafe cable through it and it would be a hassle to do it after everything's been set up.
Thomas - Réponse
Anybody got any links to glass screen replacement supplier for the A1407 Thunderbolt Display? Im finding it impossible to find a replacement without it being crazy money.
Michael McMillan - Réponse
Instead of a wedge, I used 4 rolls of toiletpaper, one under each corner.
jnbruin - Réponse