Aller au contenu principal

Asus Chromebook C300MA-BBCLN12 Battery Replacement

Ce dont vous avez besoin

  1. Asus Chromebook C300MA-BBCLN12 Battery Replacement, Battery: étape 1, image 1 de 2 Asus Chromebook C300MA-BBCLN12 Battery Replacement, Battery: étape 1, image 2 de 2
    • Remove the eight 9.0mm Phillips #00 screws.

    • Remove the three 6.0mm Phillips #00 screws.

  2. Asus Chromebook C300MA-BBCLN12 Battery Replacement: étape 2, image 1 de 3 Asus Chromebook C300MA-BBCLN12 Battery Replacement: étape 2, image 2 de 3 Asus Chromebook C300MA-BBCLN12 Battery Replacement: étape 2, image 3 de 3
    • Separate the palm rest assembly from the bottom housing using the plastic opening tool.

    • It is recommended that you start from a corner and run the plastic opening tool along the edge of the housing.

    • Lift the palm rest assembly slowly to prevent damaging the two cables that connect it to the motherboard.

  3. Asus Chromebook C300MA-BBCLN12 Battery Replacement: étape 3, image 1 de 3 Asus Chromebook C300MA-BBCLN12 Battery Replacement: étape 3, image 2 de 3 Asus Chromebook C300MA-BBCLN12 Battery Replacement: étape 3, image 3 de 3
    Outil utilisé dans cette étape :
    Tweezers
    $4.99
    J'achète
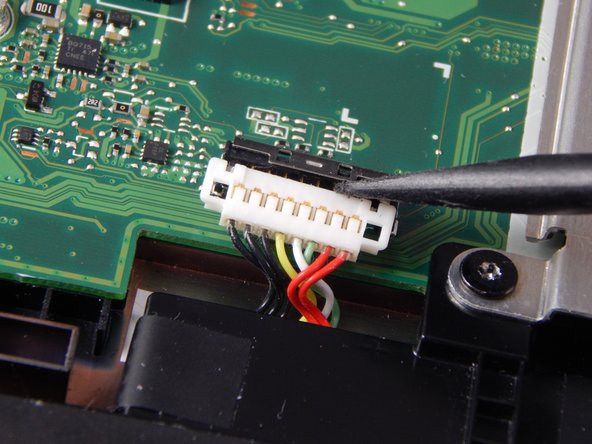
    • Flip back the hinges on the connectors that secure the wide black cable and the narrow white cable using the tweezers.

    • Disconnect the wide black cable from the motherboard by pulling the blue cable tab away from the connector.

    • Disconnect the white ribbon cable from the motherboard by pulling the blue cable tab away from the connector.

  4. Asus Chromebook C300MA-BBCLN12 Battery Replacement: étape 4, image 1 de 1
    • Remove the six 6.0mm Phillips #00 screws that secure the battery to the bottom housing.

  5. Asus Chromebook C300MA-BBCLN12 Battery Replacement: étape 5, image 1 de 2 Asus Chromebook C300MA-BBCLN12 Battery Replacement: étape 5, image 2 de 2
    • Disconnect the bundled cable connector that attaches the battery to the motherboard using the small plastic spudger.

  6. Asus Chromebook C300MA-BBCLN12 Battery Replacement: étape 6, image 1 de 1
    • Remove the battery from the bottom housing.

Conclusion

To reassemble your device, follow these instructions in reverse order.

Brooke Austin

Membre depuis le 10/05/17

419 Réputation

4 tutoriels rédigés

Équipe

0 commentaires

Ajouter un commentaire

Nombre de vues :

Dernières 24 heures : 2

7 derniers jours : 11

30 derniers jours : 17

Total : 387