Aller au contenu principal

Asus Transformer Book T100TAM-C1 Headphone Jack Replacement

Ce dont vous avez besoin

  1. Asus Transformer Book T100TAM-C1 Headphone Jack Replacement, Back Panel: étape 1, image 1 de 2 Asus Transformer Book T100TAM-C1 Headphone Jack Replacement, Back Panel: étape 1, image 2 de 2
    • Remove the tablet portion of the device from the keyboard by pushing the large silver button near the base of the tablet. Pull up on the tablet to remove from the keyboard.

  2. Asus Transformer Book T100TAM-C1 Headphone Jack Replacement: étape 2, image 1 de 2 Asus Transformer Book T100TAM-C1 Headphone Jack Replacement: étape 2, image 2 de 2
    • Insert the iFixit Opening Tool into the seam of the back tablet casing and gently pry upwards. With enough force the clips will release on the back tablet casing.

    • Make sure to insert the tool in the seam between the black and gray portions of the backing. If the tool is inserted between the screen and the black portion then the screen may crack.

    • Move the iFixit Opening Tool along the seam until the entire backing is removed.

    • Be careful and try not to use too much force while taking off the backing because you may damage the clips. If you damage the clips the backing will not fit properly back onto the tablet.

  3. Asus Transformer Book T100TAM-C1 Headphone Jack Replacement, Battery: étape 3, image 1 de 1
    • Carefully remove the copper tape at the top of the battery.

    • Save this piece of copper tape as you will need it for when you replace the battery.

  4. Asus Transformer Book T100TAM-C1 Headphone Jack Replacement: étape 4, image 1 de 1
    • Gently pull back on the yellow transparent plastic covering on top of the battery connection port.

    • The plastic covering is located at the top right of the battery, next to where the copper tape had been.

  5. Asus Transformer Book T100TAM-C1 Headphone Jack Replacement: étape 5, image 1 de 1
    • Insert the iFixit Opening Tool underneath the top of the battery and gently lift upwards to remove the battery.

  6. Asus Transformer Book T100TAM-C1 Headphone Jack Replacement: étape 6, image 1 de 1
    • Remove the battery from the tablet by slowly pulling it from the connected side.

    • The adhesive on the back will pull away from the battery.

    • The battery wire harness will come out as the battery is pulled up.

  7. Asus Transformer Book T100TAM-C1 Headphone Jack Replacement, Motherboard: étape 7, image 1 de 2 Asus Transformer Book T100TAM-C1 Headphone Jack Replacement, Motherboard: étape 7, image 2 de 2
    • Turn the tablet so that motherboard will be in the top right corner of the tablet and will be the largest of the green pieces.

    • Remove six 5mm Phillips #0 screws around the edge of the motherboard.

    • Remove three 3mm screws on the inner side of the motherboard.

  8. Asus Transformer Book T100TAM-C1 Headphone Jack Replacement: étape 8, image 1 de 3 Asus Transformer Book T100TAM-C1 Headphone Jack Replacement: étape 8, image 2 de 3 Asus Transformer Book T100TAM-C1 Headphone Jack Replacement: étape 8, image 3 de 3
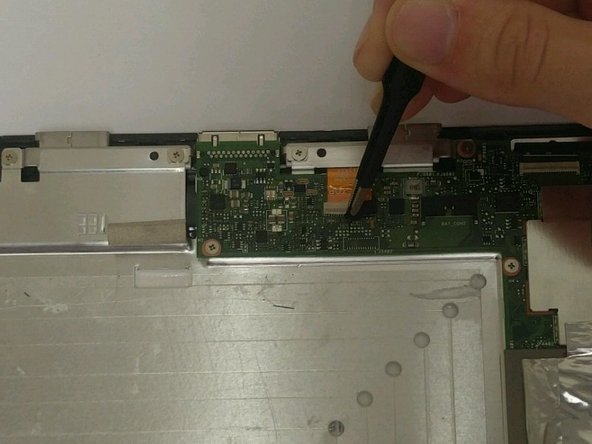
    • Locate the 5 different clips around the edges of the motherboard.

    • The clips will be covered by either tape or a foam piece. You will need to remove this before unlatching the clips.

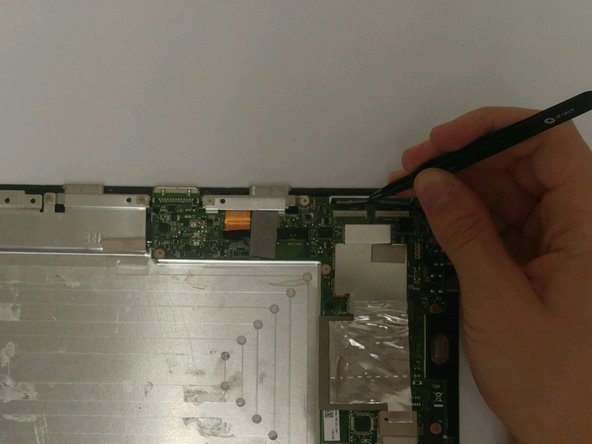
    • Unlatch the connections and use tweezers to remove the cables from the connections.

    • The two remaining connections are slightly different.

  9. Asus Transformer Book T100TAM-C1 Headphone Jack Replacement: étape 9, image 1 de 1
    • Pull the connection on the left directly upwards to remove it.

    • Remove the connection on the right by pulling it towards you.

    • The motherboard should now be completely free and able to be removed.

  10. Asus Transformer Book T100TAM-C1 Headphone Jack Replacement, Headphone Jack: étape 10, image 1 de 2 Asus Transformer Book T100TAM-C1 Headphone Jack Replacement, Headphone Jack: étape 10, image 2 de 2
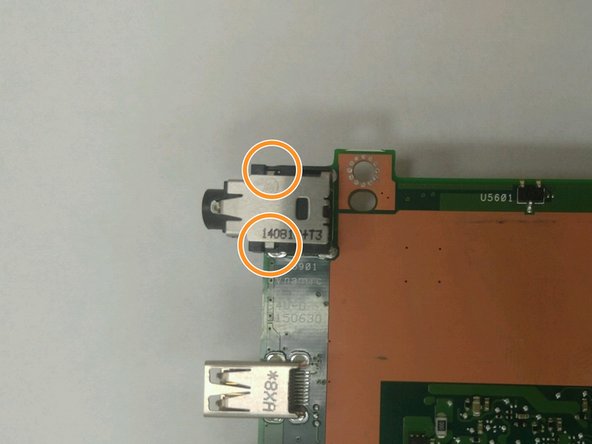
    • Lay the motherboard down so that the slimmer section is horizontal and the wider section sticks down from the right side and locate the headphone jack.

    • Locate the two silver tabs on the underside of the jack.

  11. Asus Transformer Book T100TAM-C1 Headphone Jack Replacement: étape 11, image 1 de 1
    • Use the screwdriver to bend in the silver tabs on either side of the headphone jack.

    • Be careful while bending the tabs. It is better to not bend them enough then too much. If you bend them too far you risk not being able to insert your headphones and could potentially break the tabs.

  12. Asus Transformer Book T100TAM-C1 Headphone Jack Replacement: étape 12, image 1 de 1
    • Check to make sure that the tabs are in good position by inserting a pair of headphones.

    • If the headphones are loose try bending the tabs slightly more.

    • Repeat this step until the headphones fit snugly within the jack.

Conclusion

To reassemble your device, follow these instructions in reverse order.

Brody Moore

Membre depuis le 09/06/18

807 Réputation

7 tutoriels rédigés

Équipe

Ohio State, Team S1-G2, Whitney Fall 2018 Membre de l'équipe Ohio State, Team S1-G2, Whitney Fall 2018

OSU-WHITNEY-F18S1G2

2 membres

7 tutoriels rédigés

0 commentaires

Ajouter un commentaire

Nombre de vues :

Dernières 24 heures : 0

7 derniers jours : 2

30 derniers jours : 3

Total : 271