Aller au contenu principal

Asus Transformer Pad TF103C Rear-Facing Camera Replacement

Ce dont vous avez besoin

  1. Asus Transformer Pad TF103C Rear-Facing Camera Replacement, Battery: étape 1, image 1 de 1
    • Make sure the power is off.

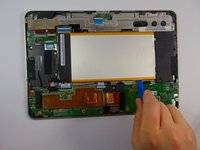
    • Insert the plastic opening tool into a crack on side of the tablet.

    • You can use a thin screwdriver if you don't have the opening tool.

    • Carefully pull the tool upwards to and pry open the Transformer pad.

    • Make sure the SD card slot is empty first.

  2. Asus Transformer Pad TF103C Rear-Facing Camera Replacement: étape 2, image 1 de 1
    • Slide the tool in the gap along all four sides, continually pulling the tool upwards.

  3. Asus Transformer Pad TF103C Rear-Facing Camera Replacement: étape 3, image 1 de 1
    • Remove the back cover once it is loose and set it aside.

    • Rotate the tablet so it matches the picture.

  4. Asus Transformer Pad TF103C Rear-Facing Camera Replacement: étape 4, image 1 de 1
    • Carefully unplug the battery cable from the motherboard by grabbing the wires close to the black piece and pulling it out of the housing.

  5. Asus Transformer Pad TF103C Rear-Facing Camera Replacement: étape 5, image 1 de 2 Asus Transformer Pad TF103C Rear-Facing Camera Replacement: étape 5, image 2 de 2
    • Carefully pry the battery out of the tablet with the opening tool.

    • Replace battery with a new +3.7V=19Wh Li-polymer Battery Pack C11P1328.

    • There may be some tape on the battery, so you may hear pulling as you pry.

  6. Asus Transformer Pad TF103C Rear-Facing Camera Replacement, Rear Facing Camera: étape 6, image 1 de 1
    • Carefully unplug rainbow cable from motherboard.

  7. Asus Transformer Pad TF103C Rear-Facing Camera Replacement: étape 7, image 1 de 1
    • Use plastic opening tool to carefully pry the battery out from frame.

  8. Asus Transformer Pad TF103C Rear-Facing Camera Replacement: étape 8, image 1 de 1
    • Use the +J000 screwdriver to remove screws (2) from speakers.

    • Keep the screws together and organized. (Label, if necessary).

  9. Asus Transformer Pad TF103C Rear-Facing Camera Replacement: étape 9, image 1 de 1
    • Take ground wire out from the top of TF103C-L(Left) speaker.

    • If you pull on the wire to much it will break off.

    • If you break the wire off you can solder it back on

  10. Asus Transformer Pad TF103C Rear-Facing Camera Replacement: étape 10, image 1 de 1
    • Remove the Left speaker from the frame.

  11. Asus Transformer Pad TF103C Rear-Facing Camera Replacement: étape 11, image 1 de 1
    • Use the +J000 screwdriver to unscrew and remove the M2 plastic holder.

  12. Asus Transformer Pad TF103C Rear-Facing Camera Replacement: étape 12, image 1 de 1
    • Remove black tape from ribbon cable and separate the cable from the soundboard.

  13. Asus Transformer Pad TF103C Rear-Facing Camera Replacement: étape 13, image 1 de 1
    • Remove black tape.

    • Unplug ribbon cable using small tweezers from volume and power button.

  14. Asus Transformer Pad TF103C Rear-Facing Camera Replacement: étape 14, image 1 de 1
    • Use the +J000 screwdriver to remove screws (3) from motherboard.

  15. Asus Transformer Pad TF103C Rear-Facing Camera Replacement: étape 15, image 1 de 1
    • Unplug all three ribbon cables.

    • Two from motherboard. One from USB charging port.

  16. Asus Transformer Pad TF103C Rear-Facing Camera Replacement: étape 16, image 1 de 1
    • Lift up the motherboard.

    • Pull out ribbon cable from the underside of the motherboard then remove it.

  17. Asus Transformer Pad TF103C Rear-Facing Camera Replacement: étape 17, image 1 de 2 Asus Transformer Pad TF103C Rear-Facing Camera Replacement: étape 17, image 2 de 2
    • Remove camera.

    • The camera is glued down so it might take some strength to remove

Conclusion

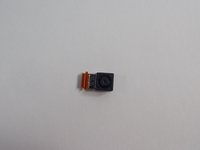
To reassemble your device, attach the new camera to the motherboard then follow these instructions in reverse order.

Tyler Ellis

Membre depuis le 10/28/15

668 Réputation

4 tutoriels rédigés

Équipe

UMass Dartmouth, Team 3-6, Shastany Fall 2015 Membre de l'équipe UMass Dartmouth, Team 3-6, Shastany Fall 2015

UMASSD-SHASTANY-F15S3G6

4 membres

5 tutoriels rédigés

0 commentaires

Ajouter un commentaire

Nombre de vues :

Dernières 24 heures : 0

7 derniers jours : 0

30 derniers jours : 0

Total : 269