Aller au contenu principal

Asus U56E Laptop Screen Replacement

Ce dont vous avez besoin

  1. Asus U56E Laptop Screen Replacement, Screen: étape 1, image 1 de 2 Asus U56E Laptop Screen Replacement, Screen: étape 1, image 2 de 2
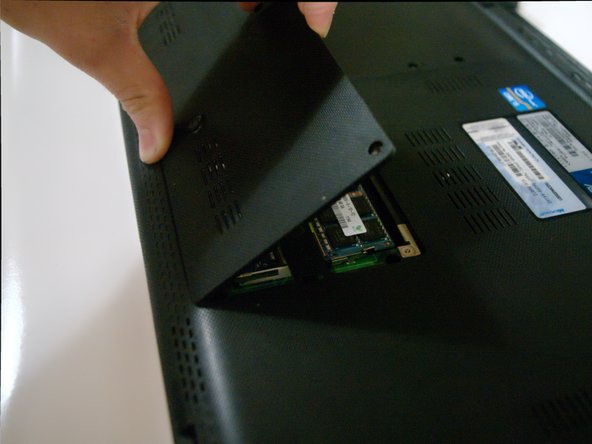
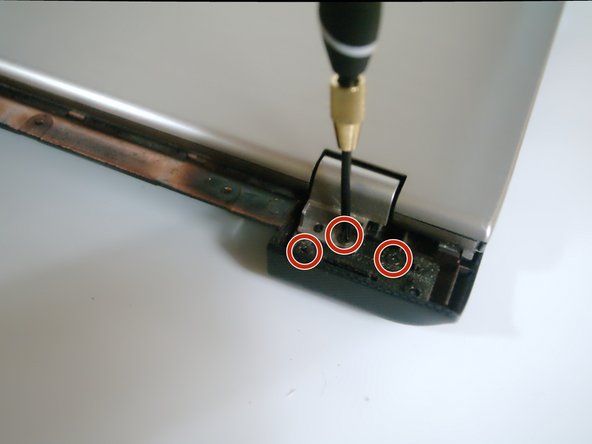
    • Position the laptop on a flat, stable surface, with the underside facing upward.

  2. Asus U56E Laptop Screen Replacement: étape 2, image 1 de 3 Asus U56E Laptop Screen Replacement: étape 2, image 2 de 3 Asus U56E Laptop Screen Replacement: étape 2, image 3 de 3
    • Make sure the laptop is unplugged before removing the battery to avoid risk of electric shock.

    • Slide the two battery lock switches toward each other.

    • Lift the battery to remove it from the laptop.

  3. Asus U56E Laptop Screen Replacement: étape 3, image 1 de 3 Asus U56E Laptop Screen Replacement: étape 3, image 2 de 3 Asus U56E Laptop Screen Replacement: étape 3, image 3 de 3
    • Remove the 3 Phillips #00 screws holding on the back cover of the laptop.

    • Lift the cover, exposing the laptop hard drive and RAM.

  4. Asus U56E Laptop Screen Replacement: étape 4, image 1 de 2 Asus U56E Laptop Screen Replacement: étape 4, image 2 de 2
    • Remove the eight small screws holding the hard drive in.

    • The hard drive cover can now be removed by lifting the tab on the left.

  5. Asus U56E Laptop Screen Replacement: étape 5, image 1 de 1
    • Gently slide the hard drive left toward the edge of the laptop, then lift up to remove it.

  6. Asus U56E Laptop Screen Replacement: étape 6, image 1 de 2 Asus U56E Laptop Screen Replacement: étape 6, image 2 de 2
    • Remove the 4 Phillips #00 screws around the RAM.

  7. Asus U56E Laptop Screen Replacement: étape 7, image 1 de 2 Asus U56E Laptop Screen Replacement: étape 7, image 2 de 2
    • Remove the 10 Phillips #00 screws from the bottom of the laptop.

    • Remove 10 Phillips #000 screws from under the battery.

  8. Asus U56E Laptop Screen Replacement: étape 8, image 1 de 2 Asus U56E Laptop Screen Replacement: étape 8, image 2 de 2
    • Slide the optical drive out of the laptop.

    • Gently lift the rear plastic hinge cover to separate it from the laptop.

  9. Asus U56E Laptop Screen Replacement: étape 9, image 1 de 3 Asus U56E Laptop Screen Replacement: étape 9, image 2 de 3 Asus U56E Laptop Screen Replacement: étape 9, image 3 de 3
    • Remove the 3 Phillips #000 screws from each side of the hinge (six screws in total).

    • Gently lift the thin plastic cover from each side, exposing the laptop hinge.

    • Be aware of the thin cables still connected to the screen.

  10. Asus U56E Laptop Screen Replacement: étape 10, image 1 de 2 Asus U56E Laptop Screen Replacement: étape 10, image 2 de 2
    • Gently lift around the perimeter of keyboard to separate it from the laptop body.

    • It may help to use a Plastic Opening Tool.

    • Be careful not to pull too hard on the keyboard - It's connected to the motherboard with a thin ribbon cable!

  11. Asus U56E Laptop Screen Replacement: étape 11, image 1 de 3 Asus U56E Laptop Screen Replacement: étape 11, image 2 de 3 Asus U56E Laptop Screen Replacement: étape 11, image 3 de 3
    • Pull the display connector straight up to remove it from the motherboard.

    • Carefully detach the white and black WiFi antennas from the wireless adapter.

  12. Asus U56E Laptop Screen Replacement: étape 12, image 1 de 1
    • The screen can now be safely removed from the laptop.

Conclusion

To reassemble your device, follow these instructions in reverse order.

Une autre personne a terminé cette réparation.

David Zilar

Membre depuis le 09/29/15

167 Réputation

1 tutoriel rédigé

Équipe

Cal Poly, Team 14-5, Green Fall 2015 Membre de l'équipe Cal Poly, Team 14-5, Green Fall 2015

CPSU-GREEN-F15S14G5

4 membres

5 tutoriels rédigés

0 commentaires

Ajouter un commentaire

Nombre de vues :

Dernières 24 heures : 2

7 derniers jours : 11

30 derniers jours : 18

Total : 1,352