Aller au contenu principal

Asus VivoBook E203MA-TBCL432B Power Button Replacement

Ce dont vous avez besoin

  1. Asus VivoBook E203MA-TBCL432B Power Button Replacement, Back Panel: étape 1, image 1 de 1
    • Position the laptop so that the bottom panel is facing upwards, the hinge is away from you, and the ASUS logo is against the table.

    • It will be easier to replace the battery if the laptop is closed.

  2. Asus VivoBook E203MA-TBCL432B Power Button Replacement: étape 2, image 1 de 3 Asus VivoBook E203MA-TBCL432B Power Button Replacement: étape 2, image 2 de 3 Asus VivoBook E203MA-TBCL432B Power Button Replacement: étape 2, image 3 de 3
    • Use a Phillips #0 screwdriver to remove the eight 5 mm screws on the back panel.

    • Remove the two 7 mm Phillips #0 screws.

    • The 8 screws marked in red are all of the same length, 5 mm, and should not be interchanged with the two longer 7 mm screws marked in orange.

  3. Asus VivoBook E203MA-TBCL432B Power Button Replacement: étape 3, image 1 de 3 Asus VivoBook E203MA-TBCL432B Power Button Replacement: étape 3, image 2 de 3 Asus VivoBook E203MA-TBCL432B Power Button Replacement: étape 3, image 3 de 3
    • Insert the iFixit opening tool in between the back panel and the rest of the laptop.

    • With the iFixit opening tool, lift the panel from the laptop body. Work your way around the device creating separation with the tool.

    • Once there is enough separation between the back panel and the device, gently pull off the back panel with your hands and completely remove it.

    • Make sure to use a plastic tool, not a metal one, so that you don't scratch the panel.

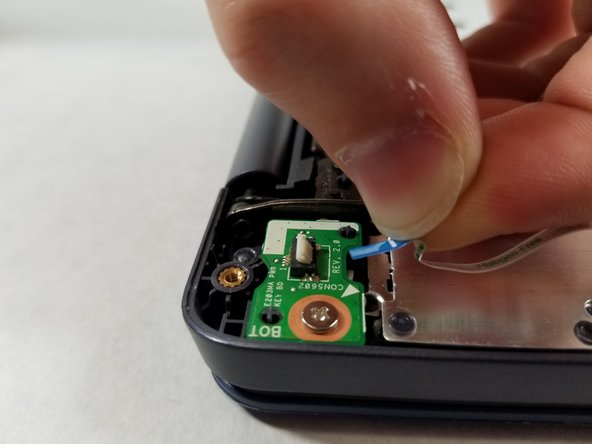
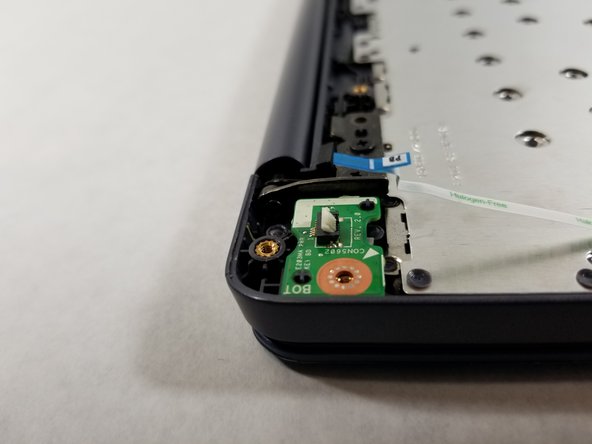
  4. Asus VivoBook E203MA-TBCL432B Power Button Replacement, Power Button: étape 4, image 1 de 2 Asus VivoBook E203MA-TBCL432B Power Button Replacement, Power Button: étape 4, image 2 de 2
    • Remove the single connector by first pulling back the white tab and then pulling the connector out with the blue tab.

  5. Asus VivoBook E203MA-TBCL432B Power Button Replacement: étape 5, image 1 de 2 Asus VivoBook E203MA-TBCL432B Power Button Replacement: étape 5, image 2 de 2
    • Remove the single 2 mm screw with a Phillips #0 screwdriver.

  6. Asus VivoBook E203MA-TBCL432B Power Button Replacement: étape 6, image 1 de 1
    • Now that the power button component is free, lift it up and out of the laptop.

Conclusion

To reassemble your device, follow these instructions in reverse order.

Jacob Aubertine

Membre depuis le 03/21/19

470 Réputation

3 tutoriels rédigés

Équipe

UMass Dartmouth, Team S8-G1, Bailey Spring 2019 Membre de l'équipe UMass Dartmouth, Team S8-G1, Bailey Spring 2019

UMASSD-BAILEY-S19S8G1

3 membres

6 tutoriels rédigés

0 commentaires

Ajouter un commentaire

Nombre de vues :

Dernières 24 heures : 2

7 derniers jours : 6

30 derniers jours : 13

Total : 891