Aller au contenu principal

Asus Zen AiO Pro Z240IC Heat Sink Replacement

Ce dont vous avez besoin

  1. Asus Zen AiO Pro Z240IC Heat Sink Replacement, Screen: étape 1, image 1 de 2 Asus Zen AiO Pro Z240IC Heat Sink Replacement, Screen: étape 1, image 2 de 2
    • Use the plastic opening tool to pry off the black plastic strip at the bottom of the screen by wiggling the tool between the strip and the screen.

    • The strip is held in place with adhesive. You may hear a crackling sound as the strip is peeled off.

    • Run the opening tool slowly along the base of the screen, peeling the black strip back, until the opposite end of the screen is reached.

  2. Asus Zen AiO Pro Z240IC Heat Sink Replacement: étape 2, image 1 de 2 Asus Zen AiO Pro Z240IC Heat Sink Replacement: étape 2, image 2 de 2
    • Use a Phillips #1 screwdriver to remove the seven (7) 4.8 mm screws from the base of the screen.

  3. Asus Zen AiO Pro Z240IC Heat Sink Replacement: étape 3, image 1 de 3 Asus Zen AiO Pro Z240IC Heat Sink Replacement: étape 3, image 2 de 3 Asus Zen AiO Pro Z240IC Heat Sink Replacement: étape 3, image 3 de 3
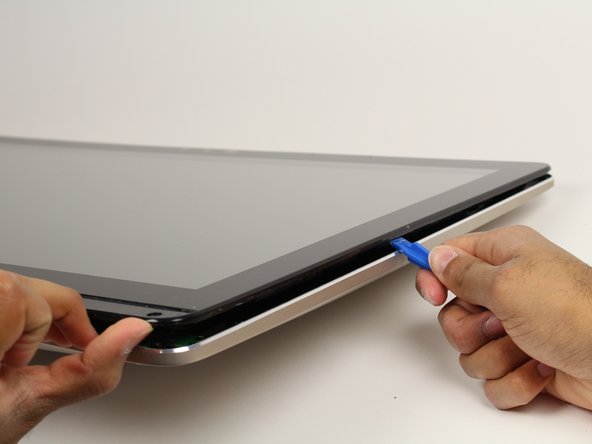
    • Place the computer on its back, facing up.

    • Wedge the plastic opening tool in between the screen and the bezel of the aluminum computer casing.

    • Move the tool along the entire edge of the screen with an up-and-down prying motion to loosen the screen from the casing. Do not lift the entire screen away from the computer yet.

    • The screen is held in place by plastic tabs. These will create a popping sound when loosened.

    • The screen assembly will flex as it is pried off. Do not bend the screen too far or the glass screen could shatter.

  4. Asus Zen AiO Pro Z240IC Heat Sink Replacement: étape 4, image 1 de 1
    • Lift the screen from the bottom edge by about 6 inches. Prop it open with one hand.

    • Look inside the computer and locate five (5) cables that connect the embedded components of the screen (camera, microphone, etc.) to the rest of the computer.

  5. Asus Zen AiO Pro Z240IC Heat Sink Replacement: étape 5, image 1 de 3 Asus Zen AiO Pro Z240IC Heat Sink Replacement: étape 5, image 2 de 3 Asus Zen AiO Pro Z240IC Heat Sink Replacement: étape 5, image 3 de 3
    • Remove the two (2) cables that are connected to the computer by white, rectangular terminal blocks by pulling straight out on the plug.

    • The cables and wires in these steps are delicate; do not tug on the individual wires that make up each cable.

  6. Asus Zen AiO Pro Z240IC Heat Sink Replacement: étape 6, image 1 de 3 Asus Zen AiO Pro Z240IC Heat Sink Replacement: étape 6, image 2 de 3 Asus Zen AiO Pro Z240IC Heat Sink Replacement: étape 6, image 3 de 3
    • Use a finger to lift the plastic locking flaps that hold the remaining three (3) ribbon cables in place.

    • Remove the cables from their terminals by slipping them away from their connectors.

    • The black line on the ribbon cables mark the connecting region. When reinstalling, insert the cable up to this line so the locking flap covers it.

  7. Asus Zen AiO Pro Z240IC Heat Sink Replacement, WiFi (WLAN) Card: étape 7, image 1 de 3 Asus Zen AiO Pro Z240IC Heat Sink Replacement, WiFi (WLAN) Card: étape 7, image 2 de 3 Asus Zen AiO Pro Z240IC Heat Sink Replacement, WiFi (WLAN) Card: étape 7, image 3 de 3
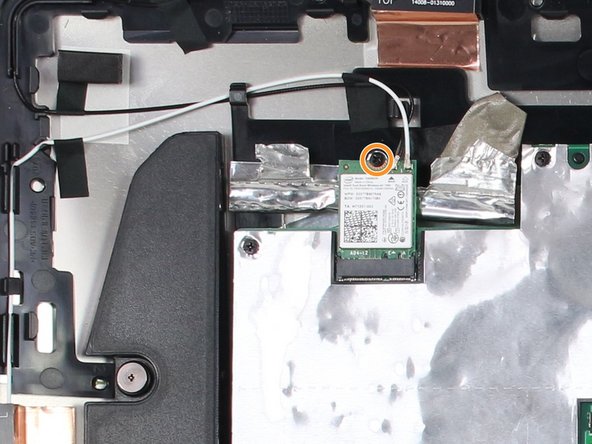
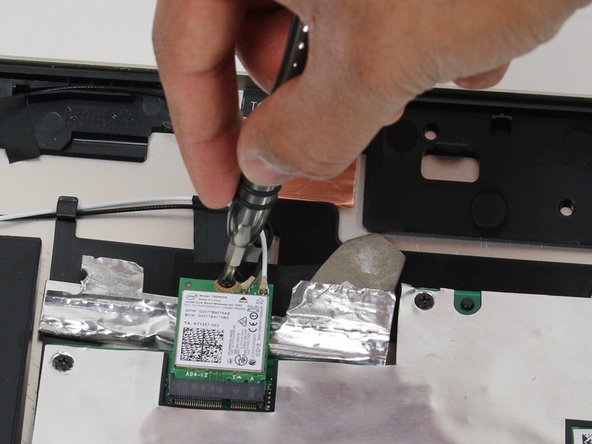
    • Locate the WLAN card in the upper left hand corner of the computer.

    • Use a Phillips #1 screwdriver to remove the 3.2 mm screw on the top of the WLAN card.

  8. Asus Zen AiO Pro Z240IC Heat Sink Replacement: étape 8, image 1 de 3 Asus Zen AiO Pro Z240IC Heat Sink Replacement: étape 8, image 2 de 3 Asus Zen AiO Pro Z240IC Heat Sink Replacement: étape 8, image 3 de 3
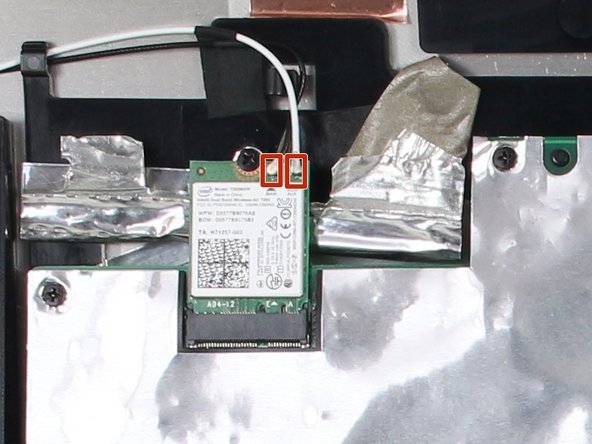
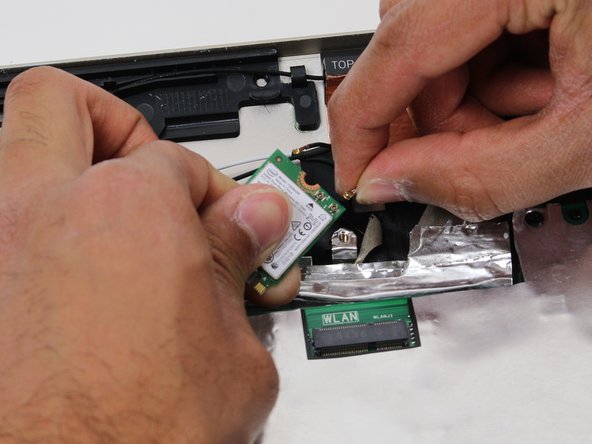
    • Pull out the WLAN card from its socket.

    • Remove the two antennae wires from the WLAN card by pulling up on the coaxial connectors.

  9. Asus Zen AiO Pro Z240IC Heat Sink Replacement, Fan: étape 9, image 1 de 2 Asus Zen AiO Pro Z240IC Heat Sink Replacement, Fan: étape 9, image 2 de 2
    • Use a Phillips #0 screwdriver to remove the three (3) 4.8 mm screws from the fan unit.

    • Remove the cable connecting the fan to the motherboard by pulling the cable out of its socket.

  10. Asus Zen AiO Pro Z240IC Heat Sink Replacement: étape 10, image 1 de 1
    • Remove the fan by peeling off the black electrical tape holding it against the heat sink vents.

  11. Asus Zen AiO Pro Z240IC Heat Sink Replacement, Motherboard: étape 11, image 1 de 1
    • Remove the six (6) ribbon cables by lifting up on the plastic locking tabs and then slipping the cables out of their sockets.

    • Remove the other two (2) cables by pulling straight out on the white connectors.

    • One ribbon cable is hidden beneath black tape.

    • The motherboard is ESD sensitive. Limit your contact with the green circuit board surface and electrical components. When handling the board, hold it by the edges.

    • The black lines on the ribbon cables mark the connecting region. When reinstalling, insert the cables up to this line so the locking flap covers it.

  12. Asus Zen AiO Pro Z240IC Heat Sink Replacement: étape 12, image 1 de 2 Asus Zen AiO Pro Z240IC Heat Sink Replacement: étape 12, image 2 de 2
    • Use a Phillips #1 screwdriver to remove nine (9) 3.2 mm screws from the motherboard.

    • Two of the screws near the middle of the board are hidden beneath padding.

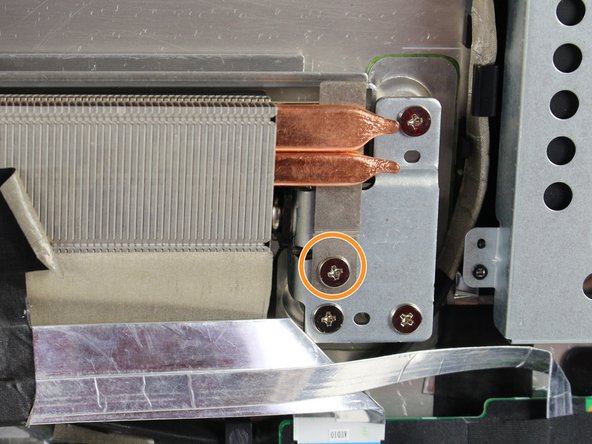
    • Use a Phillips #1 screwdriver to remove the one (1) 4.8 mm screw directly below the copper heat sink channel.

  13. Asus Zen AiO Pro Z240IC Heat Sink Replacement: étape 13, image 1 de 2 Asus Zen AiO Pro Z240IC Heat Sink Replacement: étape 13, image 2 de 2
    • Lift the motherboard just enough to dismount it from the plastic pegs that hold it in place.

    • Rotate the motherboard towards yourself while supporting the heat sink by pivoting on its bottom edge.

  14. Asus Zen AiO Pro Z240IC Heat Sink Replacement: étape 14, image 1 de 2 Asus Zen AiO Pro Z240IC Heat Sink Replacement: étape 14, image 2 de 2
    • Remove the SATA cable on the opposite side of the motherboard by pulling directly up from the board.

  15. Asus Zen AiO Pro Z240IC Heat Sink Replacement, Heat Sink: étape 15, image 1 de 2 Asus Zen AiO Pro Z240IC Heat Sink Replacement, Heat Sink: étape 15, image 2 de 2
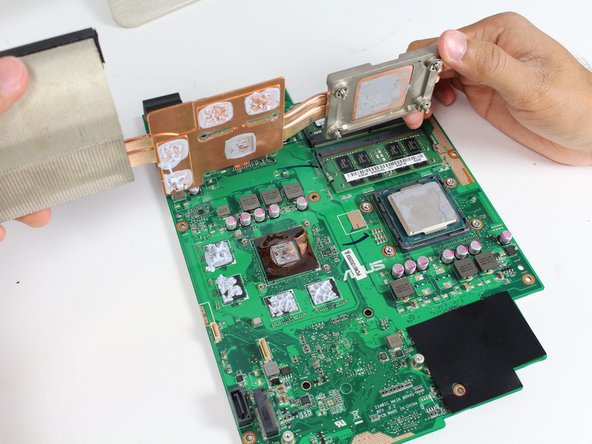
    • Use a Phillips #1 screwdriver to loosen the four (4) large silver screws evenly in the order of the numbers engraved next to each screw.

    • Use a Phillips # 0 to loosen the other four (4) 2.4 mm screws evenly in the order engraved on the copper next to each screw.

    • Repeat the last two bullets until all the larger silver screws make a clicking sound and the 2mm screws are removed.

    • The silver screws cannot be completely removed.

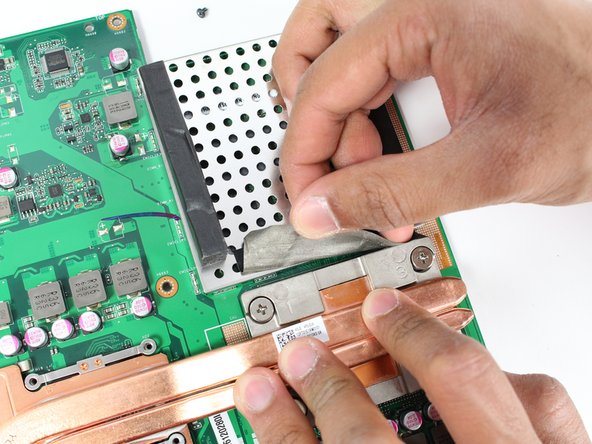
    • Peel away the black tape between the RAM shield and the heat sink.

    • When reattaching the heat sink to the motherboard, make sure to tighten the screws a little bit at a time, in the same order as before, until they are all snug.

  16. Asus Zen AiO Pro Z240IC Heat Sink Replacement: étape 16, image 1 de 2 Asus Zen AiO Pro Z240IC Heat Sink Replacement: étape 16, image 2 de 2
Conclusion

To reassemble your device, follow these instructions in reverse order.

Une autre personne a terminé cette réparation.

Jessica Lerena

Membre depuis le 10/02/17

630 Réputation

4 tutoriels rédigés

Équipe

Cal Poly, Team S4-G1, Livingston Fall 2017 Membre de l'équipe Cal Poly, Team S4-G1, Livingston Fall 2017

CPSU-LIVINGSTON-F17S4G1

5 membres

25 tutoriels rédigés

0 commentaires

Ajouter un commentaire

Nombre de vues :

Dernières 24 heures : 0

7 derniers jours : 0

30 derniers jours : 9

Total : 2,079