Aller au contenu principal

Asus ZenBook UX303U Motherboard Fan Replacement

Ce dont vous avez besoin

  1. Asus ZenBook UX303U Motherboard Fan Replacement, Back Panel: étape 1, image 1 de 1
    • Remove the two round rubber feet at the hinge-edge of the laptop.

  2. Asus ZenBook UX303U Motherboard Fan Replacement: étape 2, image 1 de 1
    • Remove the eleven 4 mm Phillips #00 screws from the back panel.

  3. Asus ZenBook UX303U Motherboard Fan Replacement: étape 3, image 1 de 2 Asus ZenBook UX303U Motherboard Fan Replacement: étape 3, image 2 de 2
    • Using a plastic opening tool pry the back panel off of the laptop.

  4. Asus ZenBook UX303U Motherboard Fan Replacement, Battery: étape 4, image 1 de 2 Asus ZenBook UX303U Motherboard Fan Replacement, Battery: étape 4, image 2 de 2
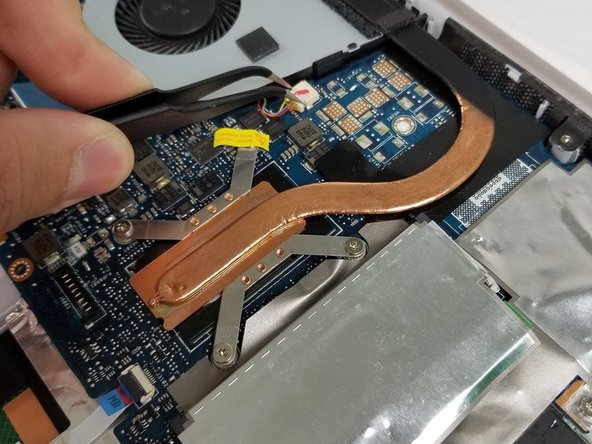
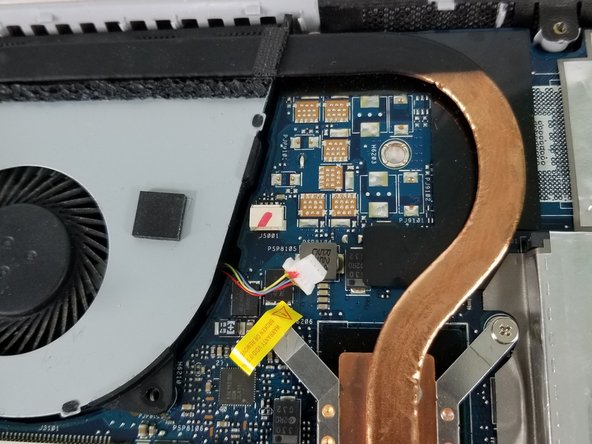
    • Pull the speaker cable out of its four retaining clips with either your fingers, or a plastic opening tool.

  5. Asus ZenBook UX303U Motherboard Fan Replacement: étape 5, image 1 de 2 Asus ZenBook UX303U Motherboard Fan Replacement: étape 5, image 2 de 2
    • Remove all seven 2 mm Phillips #00 screws from the battery.

  6. Asus ZenBook UX303U Motherboard Fan Replacement: étape 6, image 1 de 2 Asus ZenBook UX303U Motherboard Fan Replacement: étape 6, image 2 de 2
    • Pull the speaker connector toward the edge of the laptop to disconnect it from its socket.

  7. Asus ZenBook UX303U Motherboard Fan Replacement: étape 7, image 1 de 2 Asus ZenBook UX303U Motherboard Fan Replacement: étape 7, image 2 de 2
    • Lift the battery connector straight up off its socket to disconnect it from the motherboard.

    • Do not pry on the socket itself or you risk damaging the motherboard.

  8. Asus ZenBook UX303U Motherboard Fan Replacement: étape 8, image 1 de 2 Asus ZenBook UX303U Motherboard Fan Replacement: étape 8, image 2 de 2
    • Lift the battery and speakers up and pull out to remove.

    • Check underneath the battery for the wire assembly connecting the touchpad to the motherboard. This connection may stick to the underside of the battery. Be careful not to damage it when removing the battery.

  9. Asus ZenBook UX303U Motherboard Fan Replacement: étape 9, image 1 de 1
    • Remove the speakers from the old battery.

  10. Asus ZenBook UX303U Motherboard Fan Replacement, Motherboard fan: étape 10, image 1 de 2 Asus ZenBook UX303U Motherboard Fan Replacement, Motherboard fan: étape 10, image 2 de 2
    • Disconnect the display cable from the motherboard with a plastic opening tool.

  11. Asus ZenBook UX303U Motherboard Fan Replacement: étape 11, image 1 de 2 Asus ZenBook UX303U Motherboard Fan Replacement: étape 11, image 2 de 2
    • Remove the three 6mm Phillips #00 screws from the hinge.

    • Remove the 2mm Phillips #00 screw from the plastic housing securing the fan into place.

  12. Asus ZenBook UX303U Motherboard Fan Replacement: étape 12, image 1 de 2 Asus ZenBook UX303U Motherboard Fan Replacement: étape 12, image 2 de 2
    • Lift the bottom of the laptop up slightly in order to unhinge the laptop.

    • Lift the screen assembly hinge up and off of the motherboard fan.

  13. Asus ZenBook UX303U Motherboard Fan Replacement: étape 13, image 1 de 3 Asus ZenBook UX303U Motherboard Fan Replacement: étape 13, image 2 de 3 Asus ZenBook UX303U Motherboard Fan Replacement: étape 13, image 3 de 3
    • Using tweezers, disconnect the cable connector from the motherboard fan.

  14. Asus ZenBook UX303U Motherboard Fan Replacement: étape 14, image 1 de 2 Asus ZenBook UX303U Motherboard Fan Replacement: étape 14, image 2 de 2
    • Lift the fan up and off of the white pegs that secure it into place.

Conclusion

To reassemble your device, follow these instructions in reverse order.

Une autre personne a terminé cette réparation.

Luis Perez

Membre depuis le 02/14/18

598 Réputation

2 tutoriels rédigés

Équipe

USF Tampa, Team S3-G5, Nance Spring 2018 Membre de l'équipe USF Tampa, Team S3-G5, Nance Spring 2018

USFT-NANCE-S18S3G5

3 membres

9 tutoriels rédigés

Un commentaire

The bottom of the pictured device may feature Phillips #00 screws, but I also have this laptop and the screws around the edge of the bottom panel are Torx T5s on my device.

Nick Brennan - Réponse

Ajouter un commentaire

Nombre de vues :

Dernières 24 heures : 0

7 derniers jours : 0

30 derniers jours : 9

Total : 2,162