Aller au contenu principal

BLU Dash 3.5 Screen Assembly Replacement

Ce dont vous avez besoin

  1. BLU Dash 3.5 Screen Assembly Replacement, Battery: étape 1, image 1 de 3 BLU Dash 3.5 Screen Assembly Replacement, Battery: étape 1, image 2 de 3 BLU Dash 3.5 Screen Assembly Replacement, Battery: étape 1, image 3 de 3
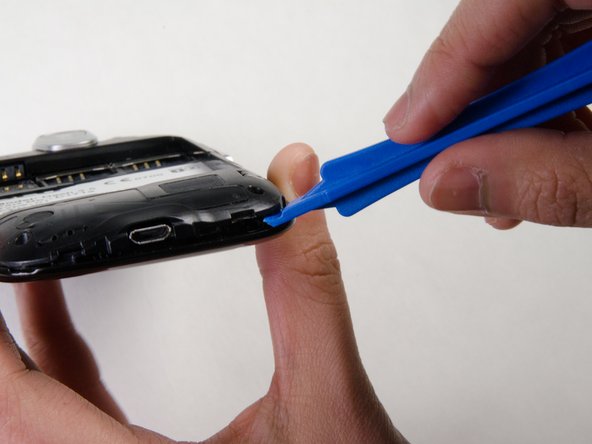
    • Start by locating the slot on the lower right corner of the device.

    • Insert the opening tool into the slot.

    • Pry the back cover off. Once the corner is off, continue around the perimeter of the phone pulling the back off with your fingers.

    • A fingernail can work to open the back in place of an opening tool.

  2. BLU Dash 3.5 Screen Assembly Replacement: étape 2, image 1 de 2 BLU Dash 3.5 Screen Assembly Replacement: étape 2, image 2 de 2
    • Locate the indentation at the bottom of the battery.

    • Insert your thumb and pull the battery out.

  3. BLU Dash 3.5 Screen Assembly Replacement, Volume and Lock Button: étape 3, image 1 de 2 BLU Dash 3.5 Screen Assembly Replacement, Volume and Lock Button: étape 3, image 2 de 2
    • Use the 000 Phillips screwdriver to remove the four 4.5 mm screws from the corners of the interior back panel.

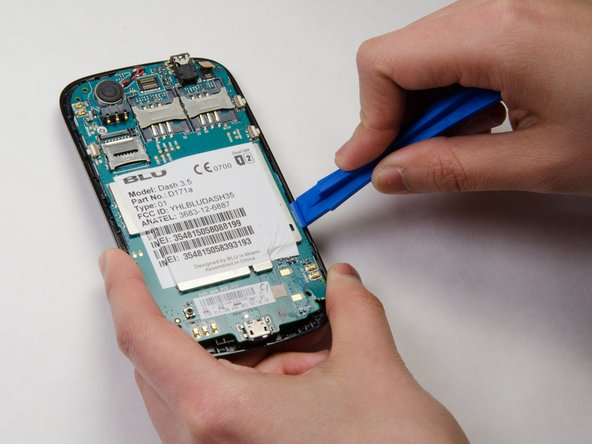
    • Use the opening tool to pry open the plastic back panel to expose the motherboard.

  4. BLU Dash 3.5 Screen Assembly Replacement: étape 4, image 1 de 2 BLU Dash 3.5 Screen Assembly Replacement: étape 4, image 2 de 2
    • Remove volume and lock buttons by lifting them gently from the casing.

  5. BLU Dash 3.5 Screen Assembly Replacement, Screen Assembly: étape 5, image 1 de 2 BLU Dash 3.5 Screen Assembly Replacement, Screen Assembly: étape 5, image 2 de 2
    • Use tweezers to lift the tab where the cable is connected.

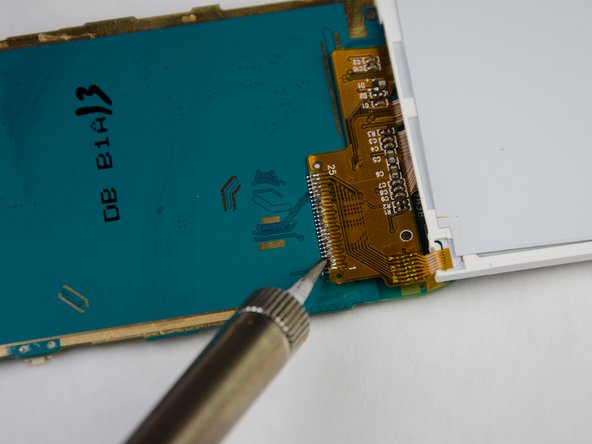
    • Use the opening tool to pry the motherboard from the front face plate.

  6. BLU Dash 3.5 Screen Assembly Replacement: étape 6, image 1 de 2 BLU Dash 3.5 Screen Assembly Replacement: étape 6, image 2 de 2
    • Use opening tool to pry off the screen.

    • Use a soldering tool to melt the contact between the motherboard and the screen

    • Solder new screen contacts to the motherboard.

Conclusion

To reassemble your device, follow these instructions in reverse order.

Une autre personne a terminé cette réparation.

Jeffrey Dlugosz

Membre depuis le 09/29/15

104 Réputation

1 tutoriel rédigé

Équipe

Ohio State, Team 1-2, Garvin Fall 2015 Membre de l'équipe Ohio State, Team 1-2, Garvin Fall 2015

OSU-GARVIN-F15S1G2

4 membres

2 tutoriels rédigés

0 commentaires

Ajouter un commentaire

Nombre de vues :

Dernières 24 heures : 1

7 derniers jours : 4

30 derniers jours : 5

Total : 689