Aller au contenu principal

Battery Disconnect

Conditions préalables uniquement
Ce tutoriel est uniquement destiné à être utilisé comme prérequis d'autres tutoriels. Il ne se suffit pas à lui-même.

Ce dont vous avez besoin

  1. Battery Disconnect, Samsung Galaxy A50 SIM Tray Replacement: étape 1, image 1 de 3 Battery Disconnect, Samsung Galaxy A50 SIM Tray Replacement: étape 1, image 2 de 3 Battery Disconnect, Samsung Galaxy A50 SIM Tray Replacement: étape 1, image 3 de 3
    • Insert a SIM card eject tool, a SIM eject bit or a straightened paper clip into the hole on the SIM tray located at the left side of the phone.

    • Press firmly to eject the tray.

    • Remove the SIM card tray.

    • When reinserting the cards, make sure to properly orient them in the tray.

  2. Battery Disconnect, Back Cover: étape 2, image 1 de 1
    • Start by switching off your phone.

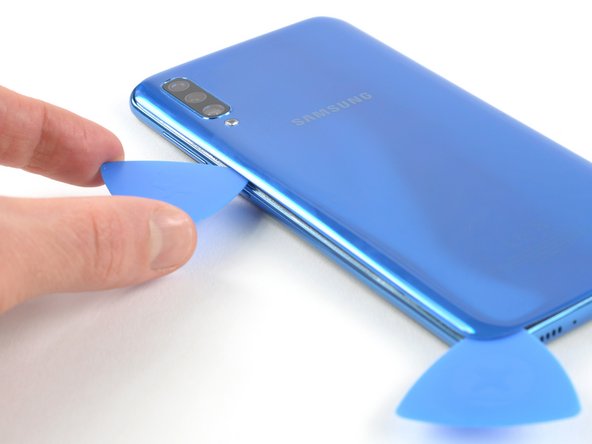
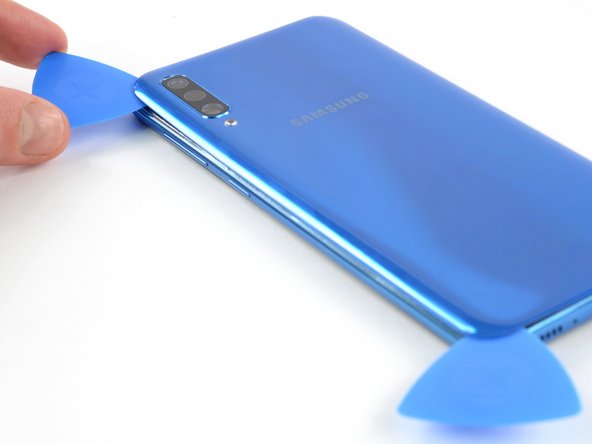
    • Heat an iOpener and apply it to the back cover to soften the adhesive.

    • The adhesive of the Samsung Galaxy A50 is very strong. A hair dryer, heat gun, or hot plate may also be used if you aren't able to open the device with the iOpener. Be careful not to overheat the phone—the AMOLED display and internal battery are both susceptible to heat damage.

  3. Battery Disconnect: étape 3, image 1 de 3 Battery Disconnect: étape 3, image 2 de 3 Battery Disconnect: étape 3, image 3 de 3
    • Insert an opening pick at the bottom of your phone near the USB-C port.

    • If you can't get between the back cover and midframe with your opening pick, you can use a suction handle or strong tape to pull up the back cover to create a gap.

    • Slide the opening pick to the bottom left corner.

  4. Battery Disconnect: étape 4, image 1 de 2 Battery Disconnect: étape 4, image 2 de 2
    • Insert a second opening pick and slide it from the bottom to the top left corner to cut the adhesive.

    • If you have trouble, apply more heat to further soften the adhesive. Follow the iOpener instructions to avoid overheating.

    • Leave the opening picks in place to prevent the adhesive from resealing.

  5. Battery Disconnect: étape 5, image 1 de 3 Battery Disconnect: étape 5, image 2 de 3 Battery Disconnect: étape 5, image 3 de 3
    • Insert a third opening pick under the top left corner of the back cover.

    • Slide the opening pick along the top edge of the phone.

    • Leave the opening pick in the top right corner to prevent the adhesive from resealing.

  6. Battery Disconnect: étape 6, image 1 de 3 Battery Disconnect: étape 6, image 2 de 3 Battery Disconnect: étape 6, image 3 de 3
    • Insert a fourth opening pick under the top right corner of the back cover.

    • Slide the tip of the opening pick along the side of the phone to the bottom right corner to cut the adhesive.

    • Leave the opening pick in the bottom right corner to prevent the adhesive from resealing.

  7. Battery Disconnect: étape 7, image 1 de 1
    • Remove the back cover.

    • After installing the back cover, apply strong, steady pressure to your phone for several minutes to help the adhesive form a good bond—a stack of heavy books works well.

  8. Battery Disconnect, Midframe: étape 8, image 1 de 1
    • Remove the 13 Phillips #00 screws (4 mm length).

  9. Battery Disconnect: étape 9, image 1 de 3 Battery Disconnect: étape 9, image 2 de 3 Battery Disconnect: étape 9, image 3 de 3
    • Insert an opening pick between the display and the midframe at the bottom of your phone above the USB-C port.

    • Slide the pick along the bottom edge to release the clips.

  10. Battery Disconnect: étape 10, image 1 de 3 Battery Disconnect: étape 10, image 2 de 3 Battery Disconnect: étape 10, image 3 de 3
    • Continue sliding the pick along the left edge of the phone to release the clips.

  11. Battery Disconnect: étape 11, image 1 de 2 Battery Disconnect: étape 11, image 2 de 2
    • Slide the opening pick along the top edge.

  12. Battery Disconnect: étape 12, image 1 de 3 Battery Disconnect: étape 12, image 2 de 3 Battery Disconnect: étape 12, image 3 de 3
    • Slide your opening pick along the right edge towards the bottom right corner.

  13. Battery Disconnect: étape 13, image 1 de 2 Battery Disconnect: étape 13, image 2 de 2
    • Make sure you free all the clips securing the midframe.

    • Separate the midframe from the phone.

  14. Battery Disconnect, Battery Disconnect: étape 14, image 1 de 2 Battery Disconnect, Battery Disconnect: étape 14, image 2 de 2
    • Use a spudger to disconnect the battery by prying the connector straight up from its socket.

Conclusion

To reassemble your device, follow these instructions in reverse order.

Adriana Zwink

Membre depuis le 12/18/19

48 256 Réputation

167 tutoriels rédigés

Équipe

iFixit Membre de l'équipe iFixit

Staff

135 membres

16 817 tutoriels rédigés

0 commentaires

Ajouter un commentaire

Nombre de vues :

Dernières 24 heures : 0

7 derniers jours : 0

30 derniers jours : 0

Total : 50