Aller au contenu principal

Battery Removal

Conditions préalables uniquement
Ce tutoriel est uniquement destiné à être utilisé comme prérequis d'autres tutoriels. Il ne se suffit pas à lui-même.

Ce dont vous avez besoin

  1. Battery Removal, Safety precautions: étape 1, image 1 de 1
    • Before you begin your repair, unplug your UPS.

  2. Battery Removal, Remove the front bezel: étape 2, image 1 de 2 Battery Removal, Remove the front bezel: étape 2, image 2 de 2
    • Plastic clips secure the front bezel.

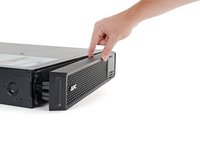
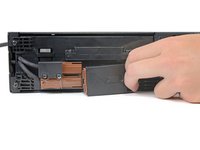
    • Pull the left edge of the front bezel away from the device to release the plastic clip.

  3. Battery Removal: étape 3, image 1 de 3 Battery Removal: étape 3, image 2 de 3 Battery Removal: étape 3, image 3 de 3
    • Continue pulling the left edge of the front bezel away from the device until the right clip releases.

    • Remove the front bezel.

  4. Battery Removal, Disconnect the battery: étape 4, image 1 de 3 Battery Removal, Disconnect the battery: étape 4, image 2 de 3 Battery Removal, Disconnect the battery: étape 4, image 3 de 3
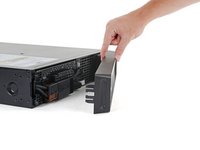
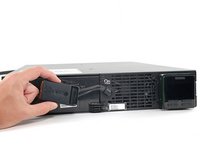
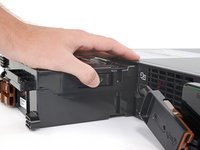
    • Use the cutout in the battery connector to pull it toward the right edge of the device and disconnect it.

  5. Battery Removal, Reposition the battery connector: étape 5, image 1 de 3 Battery Removal, Reposition the battery connector: étape 5, image 2 de 3 Battery Removal, Reposition the battery connector: étape 5, image 3 de 3
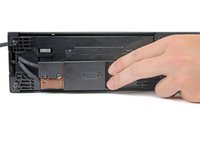
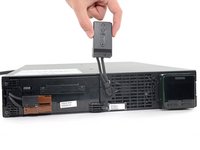
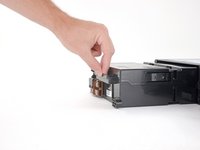
    • Lift and rotate the battery connector to move it out of the way of the battery assembly.

  6. Battery Removal, Unfasten the battery assembly: étape 6, image 1 de 1
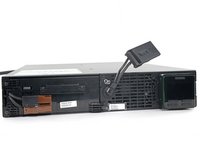
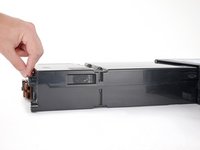
    • Use a Phillips driver to remove the three 23 mm‑long screws securing the battery assembly.

  7. Battery Removal, Remove the battery assembly: étape 7, image 1 de 2 Battery Removal, Remove the battery assembly: étape 7, image 2 de 2
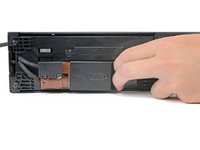
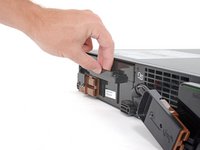
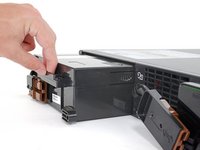
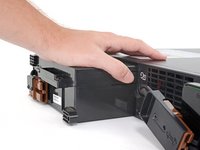
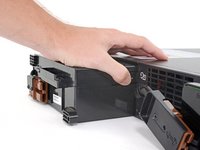
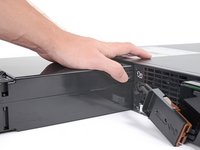
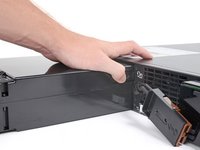
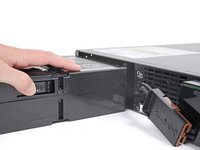
    • Pull the battery assembly out of the housing until it stops at its first plastic tab.

    • You'll feel the assembly stop abruptly and hear the plastic tab "click."

  8. Battery Removal: étape 8, image 1 de 3 Battery Removal: étape 8, image 2 de 3 Battery Removal: étape 8, image 3 de 3
    • Depress the plastic tab while pulling on the battery assembly until it clears the tab.

  9. Battery Removal: étape 9, image 1 de 2 Battery Removal: étape 9, image 2 de 2
    • Continue pulling the battery assembly out of the housing until it stops at its second plastic tab.

    • You'll feel the assembly stop abruptly and hear the plastic tab "click."

  10. Battery Removal: étape 10, image 1 de 3 Battery Removal: étape 10, image 2 de 3 Battery Removal: étape 10, image 3 de 3
    • Depress the plastic tab while pulling on the battery assembly until it’s free from the housing.

Conclusion

To reassemble your device, follow these instructions in reverse order.

Alex Diaz-Kokaisl

Membre depuis le 01/16/22

162 362 Réputation

769 tutoriels rédigés

Équipe

iFixit Membre de l'équipe iFixit

Staff

118 membres

19 453 tutoriels rédigés

0 commentaires

Ajouter un commentaire

Nombre de vues :

Dernières 24 heures : 0

7 derniers jours : 0

30 derniers jours : 0

Total : 5