Introduction
Description générale et démontage.
Ce dont vous avez besoin
-
-
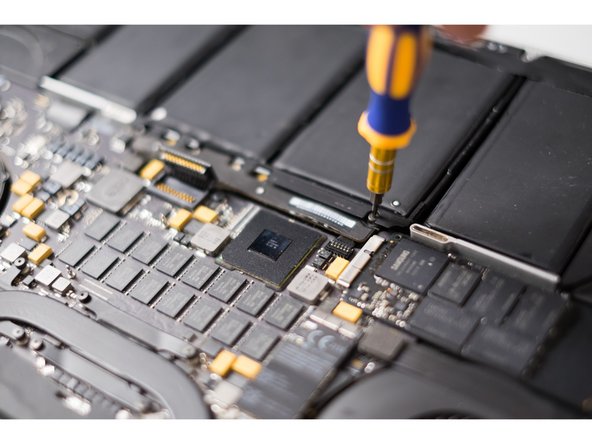
Retirez les vis à pentalobe suivantes qui fixent le boîtier inférieur au MacBook Pro :
-
Huit de 3,0 mm
-
Deux de 2,3 mm
-
-
-
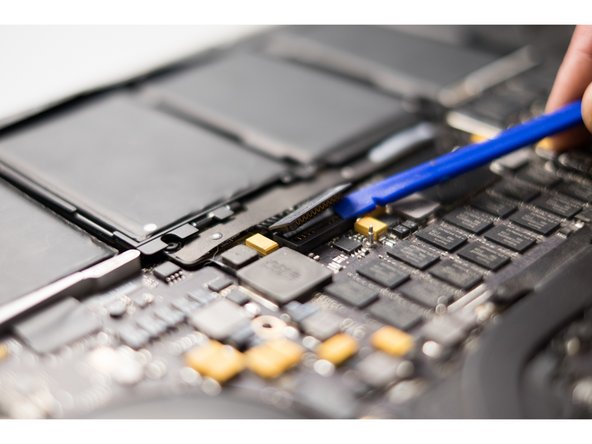
À l'aide de l'extrémité plate d'un tournevis ou d'une spatule, faites doucement levier sur le connecteur de la batterie pour le sortir de son emplacement sur la carte logique.
-
Pliez les câbles de la batterie vers l'arrière et hors de votre plan travail, en veillant à ce que le connecteur de la batterie n'entre pas accidentellement en contact avec la carte logique.
-
-
-
-
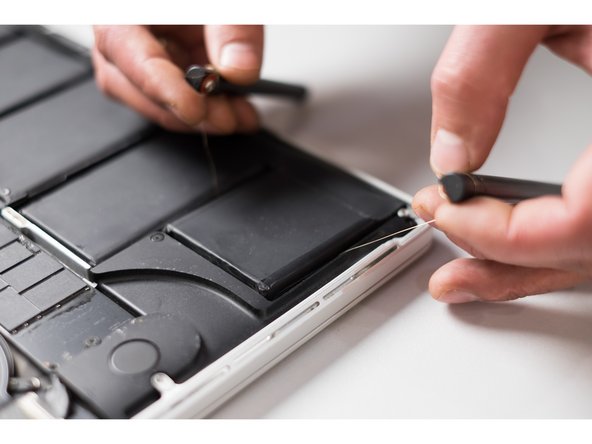
Remarque : coupez soigneusement la couche de ruban adhésif sous la batterie avec une ficelle fine. Tirez lentement d'avant en arrière. Ne faites pas levier avec des outils métalliques.
The High E String from my acoustic guitar worked like a charm. Dental floss, not so much!
Can you buy a tool like this? If so whats it called because I cant find it and I don't have a guitar lol... !
I used a 28ga (.32mm) Kanthal wire which I borrowed from my vaper roommate. That was much too thick so the process went really slowly. Took more than an hour and a half to cut all the batteries. I would recommend to get at least 34ga Kanthal if that's what you have to work with
You can get a 34ga (.16mm) Kanthal wire from any vape shop. I used a 28ga (.32mm) and it worked, but it was much too thick and I had to go really slow
I recommend something like this: http://a.co/cYzsvbP
First off, I recommend having a second set of hands to help hold the MacBook pro in place. It’s probably doable by yourself, but have someone else hold the laptop in place while you cut the adhesive.
Second, we tried using a single strand of cat6 wire. (one of the 4 twisted wires inside a cat6 cable). This was fruitless, because the wire didn’t have enough tensile strength, nor could it sheer anything with a rounded plastic sheath on the outside. We had success with grabber nylon twine, which we use for pulling wires through the wall. Make sure whatever you use has tensile strength and is able to actually cut.
I had good luck using 17 lb. monofilament fishing line tied to two pencils. Do one battery at a time, starting at the outside. Get the line under the plastic carriage in the middle two batteries. Sawing fast seems to soften the adhesive rather than going slow. After you get the individual batteries loose, then slide the line under the pairs. When the whole six pack is loose slide it forward out of the way.
I used 3 strands of dental floss connected on both sides to a clothes pin. Then sliding back and forth with the floss under the cell and within 10 minutes all 4 cells were out. The cleaning of the remnant glue strips with the adhesive remover took way more time.
kitchen twine did the thing for this step for me
Wow - that is difficult… I spent a long time trying to find something suitable - eventually I found some 90kg strength kitestring and that did the trick - was not comfortable with using anything conductive…
-
-
-
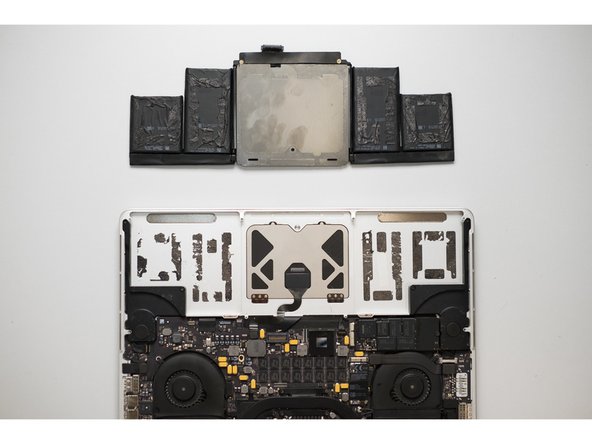
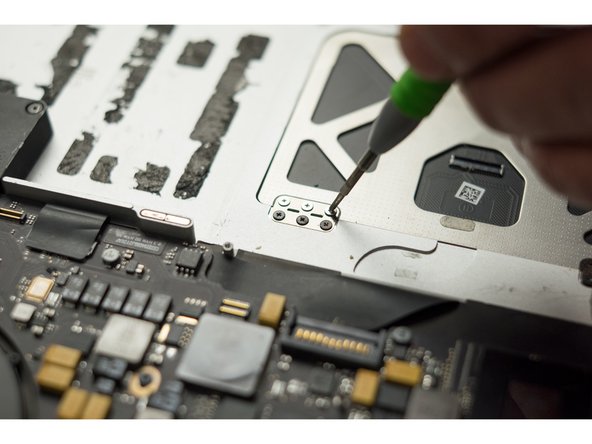
Veuillez soulever la plaque sous la batterie à l'aide d'un poinçon métallique.
It is too hard to get the center 2 batteries off the metal plate. I used a plastic drinking straw like a funnel, tucked it under the batteries to directly get to the glue and used a few drops of 70% rubbing alc with a dropper. (i did not have the 91% Isopropyl Alcohol although 91% is recommended as it dies quickly) I did this to both the batteries on both sides while gently pulling the string down to cut through the glue. Once my batteries were off I used the plastic spudger to go under the metal plate which is glued on all sides.
The middle two cells sit on a black back plate. This protects the trackpad, so you’ll be fine using the cutting wire. The only place to watch out for is right at the top, near the battery connector. If you look just to the right of the battery connector, you’ll see another connector which is for the trackpad. Follow that wire and just make sure you’re careful with the wire around it.
You’ll also find that the adhesive doesn’t start right at the top of the battery. Rather, it starts about 1cm from the top. So, you shouldn’t have any trouble avoiding the trackpad wire.
-
-
-
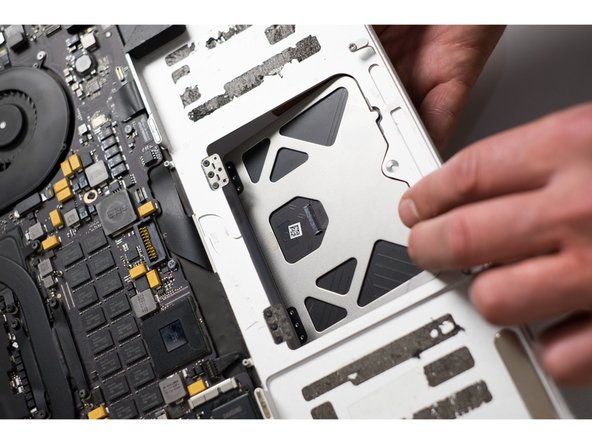
Retirer la batterie
I used the isopropyl method to ease the glue, applied with an inkjet refill syringe… I stripped a piece of copper wire (12”) and twisted the strands to make the wire string to cut the glue. Took less time to remove the battery that I thought it would. hat surprised me was I found stray small black screws stuck to the little magnets next to the battery connector, turns out they were from the fan casings, so keep an eye out for that. Great tutorial, much easier replacement than I thought beforehand.
what is a little misleading about this photo is that there is a black metal piece between the trackpad and battery that did not come off with the battery for me. You can see the bottom of it in this photo sitting on top of the battery. That piece also needs to be pried up as well as it is glued down. But you don’t need to use any metal wire or anything like that, just take the spudger and get it under it and pry it up. it will start to come off and you can pull the rest up.
That piece of metal under the batteries is really stuck on. Prying alone doesn’t do it. I used a heat gun. The glue is around the perimeter so heat there not the whole thing. Use the spudger while heating. It slowly comes up. The trackpad is then held in by two brackets with six screws. Take out the three shiny one and the pad drops down into the computer.
Does anyone know what the metal tray from between the trackpad and battery is called?
I did a battery swap and that metal tray's adhesive is not sticking anymore and is loose now. I hear the battery and that tray moving inside the case after I closed it up.
I'm not wanting to use superglue, what other adhesive could I use if the old one is worn and not sticking now? I was hoping to purchase a new one with adhesive pre-applied...
-
-
-
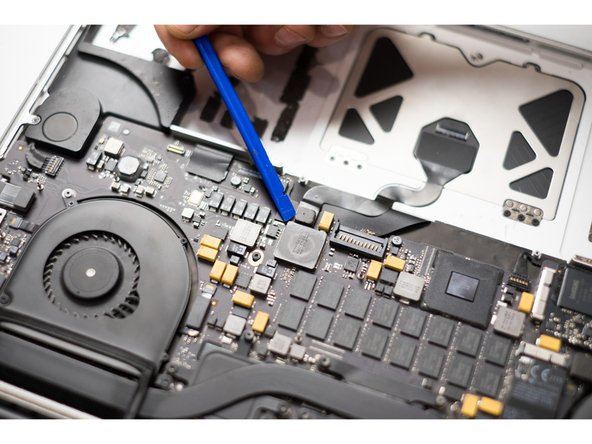
À l'aide de l'extrémité plate d'un tournevis ou d'une spatule, faites levier sur le connecteur du pavé tactile.
Caution — Photo 1 is slightly misleading — you don’t want to pry where the author is pointing with the spudger. Instead, carefully pry behind the connect, under the large black round rectangle until the connect pops out. Note the ribbon cable is held also with a small dollop of glue at the edge of the trackpad.
-


Pour réassembler votre appareil, suivez ces instructions dans l'ordre inverse.
Pour réassembler votre appareil, suivez ces instructions dans l'ordre inverse.
Annulation : je n'ai pas terminé ce tutoriel.
53 autres ont terminé cette réparation.
Merci à ces traducteurs :
100%
Pierre nous aide à réparer le monde ! Vous voulez contribuer ?
Commencez à traduire ›

Équipe

54 commentaires
You are welcome!
Hi, Could I just ask where did you get your 'Handles' for the wire string? I bought some titanium wire a while ago but literally cant grip it. I have searched ebay etc but nothing is comeing up - Maybe my search terms aren't correct.
Thanks
Hello! You can use any strong jaws. We ordered holders in China.
Hi, Thanks for that, sorry for the late reply. I have ordered a set from china so I'll see what they're like, in the meantime if anyone is interested I had some random parts laying around, I made a set out of a couple of plastic spudgers, some polymorph to enlarge the top which I sank a motherboard peg into which I can then screw some screws with the large heads into. Seems to do a pretty good job, i'll upload a pic if any1 is interested.
what did you mean by "use any strong jaws. we ordered holders in china." can you provide a link or picture or better explain?
We buy these:
An alternate to wire is dental floss, for the sticks use two bic pens. Wrap the dental floss and trap it with the cap. Have only enough length to cut under the foam adhesive strips. I was able to replace the battery in no time. You will need to do the same on the enter cells to recover the metal pad covering the trackpad connectors.
Thanks for the advice! A good idea!
Did anyone need to heat the glue up on the battery? I am trying to use my wire string and it keeps getting stuck in the adhesive. Once it gets far enough into the adhesive, it will stick and if I try to go further the wire breaks.
Heat is not necessary! The adhesive does not respond to warm! Use solid wire/fishing line/dental floss.
My trackpad is cracked, is it possible to only swap the trackpad or do i have to switch the whole top case and or battery + trackpad
You can only replace the trackpad. It is necessary to remove the battery. See our instructions.
I was able to remove the battery with a syringe and isopropyl alcohol (based on this Youtube video https://youtu.be/pLhHSIej9fs). It still took some gentle prying and a syringe, but it's a nice alternative to the wire string.
The idea is good! But the video shows the result, the process is not visible.
The glass on the trackpad on my MacBook Pro (11,5) Mid 2015 cracked. Where can I find the trackpad? So far my searching has only turned it up as part of a complete top case, which I don't need. Thanks.
I tried this for my trackpad, cleaned a bunch of gunk out and the mouse is still shaky. Even with a USB mouse plugged in it scatters. Is there anything else I can do or does anyone have ideas on the problem? Thanks
please describe the problem
The trackpad is very erratic and will go all over the screen and click on apps even though I am not touching it. It will even open/close the launchpad along with folders/apps if the mouse happens to move across the screen and click at that time. The same will happen if I use a USB mouse. It doesn't happen every time I start up but will eventually start getting worse a few minutes into use. I used the 91% alcohol method to soak the trackpad and clean around the casing inside to clear out the gunk. Thanks
Change the trackpad. Our guide will help.
Yup, that did it. Looks like the alcohol method didn't repair my old trackpad it must have been too far gone to fix. All good to go even though 2 of the screws holding the trackpad in place were stripped. Took an extra hour trying to figure out how to get them out so I could swap out the trackpad. Thanks
Hi ! In step 6 cutting the duct tape.
Does this mean that when i put pack the battery i have to glue it back somehow?
And if so, what glue you recommend?
Thank you
You do not need to glue the battery back together. I've opened mine twice now and the battery works as normal without it being glued down ridiculously tight like it was the first time.
This is poor advice, not firmly securing the battery runs the risk of them moving in case of a drop and the Mac catching fire like a Samsung Note 7.
As Jeff suovanen states on the rMBP Mid 2012 battery replacement page in the comments:
Because of the dangers they present, lithium-ion batteries need to be firmly secured. In the absence of any [http:///Anleitung/MacBook+Air+13-Inch+Mid+2013+Akku+Austausch/15205#s49235|screws or brackets to mount the battery], you need to use enough glue to make sure the battery’s not going to come loose across a broad range of user behaviors and environmental conditions over a long period of time, plus a margin for safety. Bottom line, if it’s designed to use glue, then that’s what we’re stuck with.
pmhparis -
очень понравилась идея с проволокой. ждать аналог с али времени не было, купил молибденовую струну, но она оказалась слишком хрупкой. пробовал очищенную проволоку из rj45 - она уже слишком толстая и тоже обрывалась. в итоге принял решение снять динами для лучшего доступа. а чтобы снять динамики - надо снять всё остальное. в итоге срезал клей пластиковой картой. спасибо.
рад, что помогла инструкция! а использовали проволоку для резания стекол с дисплеев, продаётся в любом магазине с запчастями для телефонов, так же можно взять струну для гитары)
great guide, thank you! I've used double dental floss as wire string, it worked great and smooth!
Thanks for the tip! A good idea!
Also done with dental floss, to replace the battery (see http://amzn.eu/1Byvn2i ).
Good! Good luck!
thank you for the guide, worked nice for change of battery. However, my keyboard malfunction and trackpad does not work after battery change
heck ribbon cable keyboard / trackpad
where i can get the metal plaque that protects trackpad from battery?
I think we can without it
One “can” live without the plate between the trackpad & the batteries but do you really want to run the risk of the battery rubbing itself open? Without Apple’s plate I’d still look to find a thin plate that I’d adapt to protect the batteries.
pmhparis -
Replaced battery according to guideline.
Difficulties connecting the new battery, - needed two attempts to make new battery correctly connected.
Issue now is that battery only charges up to 67% before it stops charging.
Have someone experienced same thing?
Maybe not all of the new battery operable
Thank you for the instructions! I spilled some lemonade over my trackpad and after a few days drying it was a little sticky. The trackpad was still functional and you could feel the click and force click but it sticks a little and you need to press harder. Is it possible to get the trackpad out and clean it with destilled water and let it dry for a while? After drying then put it back in again.
You can clean it with alcohol 96%
Do I have to Remove the metal plaque of the trackpad, if I only want to change the battery and not the trackpad?
It is easier to remove the battery with it
My trackpad started to react less sensitive to actual press-"click" (it works perfect for tapping though). Since I mostly use the real press-click (no force-touch on this model) it is very inconvenient because around 40% of press-clicks are not properly registered – enough to constantly confuse me whether the computer/internet is loading, was clicked or not.
My questions are now:
1) Are the "click"-sensors inside the trackpad? So if I change it, will I also replace the click-sensors?
2) Could I maybe somehow adjust that screw in step 11 "Adjustment of trackpad" to solve the issue without replacing? If yes how? Which direction does what?
3) Any other suggestions?
2) is your way
Clean the trash on the edges of the trackpad
Unscrew the light-colored screws
Remove trackpad.
MBPro 15 Ret 2012-13
What Philips screw driver takes the 6 screws from the pad? None of my Philips are working and I do not want to strip them? I have seen some say #000 and others say 1.5mm and 1.6. So what the heck is right. Is the screw 1.6 not the name for the driver? Frustrating
спасибо за инструкцию! но пока не воспользовался, смущает момент что аккумулятор отклеиться, а как потом обратно поставить? :) его нужно будет приклеить?
+1 to whoever suggested rubbing alcohol to help the glue let go. Also, my mom sacrificed a kitchen implement which resembles these: https://shop.kingarthurbaking.com/items/... It was the perfect combo of thin enough to flex, but stiff enough to apply force to pry the battery cells away.