Introduction
This guide describes how to remove broken or damaged joysticks on the BEBONCOOL Wireless Switch Pro Controller.
The Beboncool controller has two joysticks that can be vulnerable to damage both outside and internally. Some of the most common issues with the joystick are:
- The joystick is not responding.
- The joystick's rubber coating has been damaged affecting gameplay.
- The joystick will not extend after being pressed.
A broken or malfunctioning joystick is rather easy to identify when not getting the correct response or no response at all when navigating in most games. Using this guide to replace your joystick will most likely fix your problem.
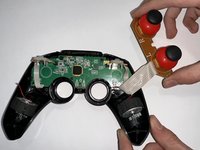
Step 4 requires you to desolder the joysticks and their motherboard.
Ce dont vous avez besoin
-
-
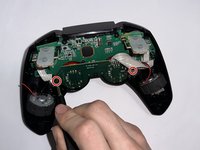
Use a Phillips #0 screwdriver to remove the seven 5 mm screws from the back of the controller.
-
-


To reassemble your device, follow these instructions in reverse order.
Équipe

Casper College, Team 1-3, Lareau Spring 2023 Membre de l'équipe Casper College, Team 1-3, Lareau Spring 2023
CASC-LAREAU-S23S1G3
3 membres
5 tutoriels rédigés