Aller au contenu principal

Bicycle Handlebar Tape Replacement

Ce dont vous avez besoin

  1. Bicycle Handlebar Tape Replacement, Handlebar Tape: étape 1, image 1 de 3 Bicycle Handlebar Tape Replacement, Handlebar Tape: étape 1, image 2 de 3 Bicycle Handlebar Tape Replacement, Handlebar Tape: étape 1, image 3 de 3
    • Undo the brake cables holding the brake calipers under tension.

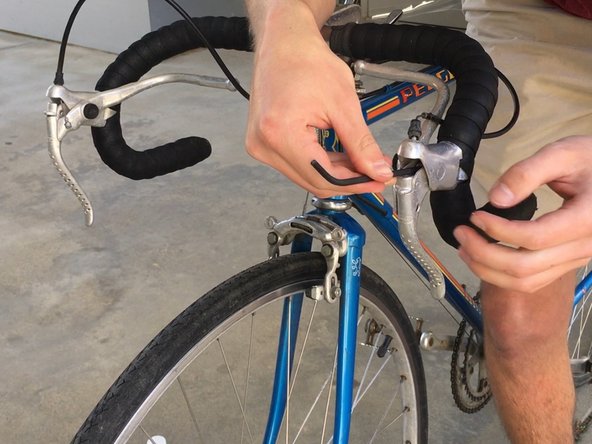
    • Depress the brake/shift levers (brifters) and insert a 5mm Allen key into the internal bolt. This bolt secures the brifters to the handlebar.

    • With the 5mm Allen key, loosen and temporarily remove brifters.

  2. Bicycle Handlebar Tape Replacement: étape 2, image 1 de 3 Bicycle Handlebar Tape Replacement: étape 2, image 2 de 3 Bicycle Handlebar Tape Replacement: étape 2, image 3 de 3
    • Remove the old tape and discard.

    • Pour some rubbing alcohol on the rag and clean any old adhesive residue off the handlebar.

  3. Bicycle Handlebar Tape Replacement: étape 3, image 1 de 3 Bicycle Handlebar Tape Replacement: étape 3, image 2 de 3 Bicycle Handlebar Tape Replacement: étape 3, image 3 de 3
    • Starting on the right side of the handlebar, wrap the new tape around the end in a clockwise direction moving inward.

    • Be sure to wrap the tape tight, but don't pull so hard that it rips!

    • Using the scissors, cut the tape at an angle towards the outside of the bar.

    • Wrap the loose end with either electrical tape or the adhesive piece provided with the handlebar tape (pictured here)

  4. Bicycle Handlebar Tape Replacement: étape 4, image 1 de 3 Bicycle Handlebar Tape Replacement: étape 4, image 2 de 3 Bicycle Handlebar Tape Replacement: étape 4, image 3 de 3
    • On the left side of the handlebar, wrap the tape around the end in a counter-clockwise direction moving inward.

    • Wrap tight, but don't rip!

    • Using the scissors, cut the tape at an angle towards the outside of the bar.

    • Wrap the loose end with either electrical tape or the adhesive piece provided with the handlebar tape (pictured).

  5. Bicycle Handlebar Tape Replacement: étape 5, image 1 de 2 Bicycle Handlebar Tape Replacement: étape 5, image 2 de 2
    • Using the 5mm Allen key, reattach and tighten the brifter levers onto the handlebar.

  6. Bicycle Handlebar Tape Replacement: étape 6, image 1 de 2 Bicycle Handlebar Tape Replacement: étape 6, image 2 de 2
    • Reattach the brake cables to the brifters and brake calipers

    • Depress the brake levers a couple of times to test and confirm that the cables were reinstalled properly before riding.

Ligne d'arrivée

Une autre personne a terminé cette réparation.

Jordan Byrnes

Membre depuis le 05/05/17

132 Réputation

1 tutoriel rédigé

Équipe

UC Davis, Team S1-G70, Coad Spring 2017 Membre de l'équipe UC Davis, Team S1-G70, Coad Spring 2017

UCD-COAD-S17S1G70

3 membres

1 tutoriel rédigé

0 commentaires

Ajouter un commentaire

Nombre de vues :

Dernières 24 heures : 0

7 derniers jours : 3

30 derniers jours : 6

Total : 550