Aller au contenu principal

Black and Decker TR1278B Lever Catch-Spring Replacement

Ce dont vous avez besoin

  1. Black and Decker TR1278B Lever Catch-Spring Replacement, Top Cover: étape 1, image 1 de 1
    • Unplug the toaster before disassembly.

    • Remove the carriage lever by pulling it away from the toaster.

  2. Black and Decker TR1278B Lever Catch-Spring Replacement: étape 2, image 1 de 1
    • Toaster will be turned upside down. Clear crumb tray or work over a paper towel.

    • Turn the toaster upside down.

    • Unscrew all four 4mm screws on the bottom using a Phillip's head #2 (PH2) screwdriver.

    • Or a slightly different model has six screws that require an allen wrench (hex key). Ones that have a ball end will not work. I had to use one that had more of a Star of David, pointy pattern to it.

  3. Black and Decker TR1278B Lever Catch-Spring Replacement: étape 3, image 1 de 1
    • Detach the bottom from the front cover using the plastic opening tool.

  4. Black and Decker TR1278B Lever Catch-Spring Replacement: étape 4, image 1 de 1
    • Turn the toaster right side up.

    • Support the bottom. The ribbon cable that connects the toaster to the front cover can be damaged.

    • Lift the front cover.

    • Lift carefully. Again the ribbon cable can be damaged.

  5. Black and Decker TR1278B Lever Catch-Spring Replacement: étape 5, image 1 de 1
    • Detach the bundled cable connector from the toaster by carefully pulling it away from the circuit board.

  6. Black and Decker TR1278B Lever Catch-Spring Replacement, Lever Catch Spring: étape 6, image 1 de 1
    • Lift the top cover up and remove it from the toaster.

  7. Black and Decker TR1278B Lever Catch-Spring Replacement: étape 7, image 1 de 1
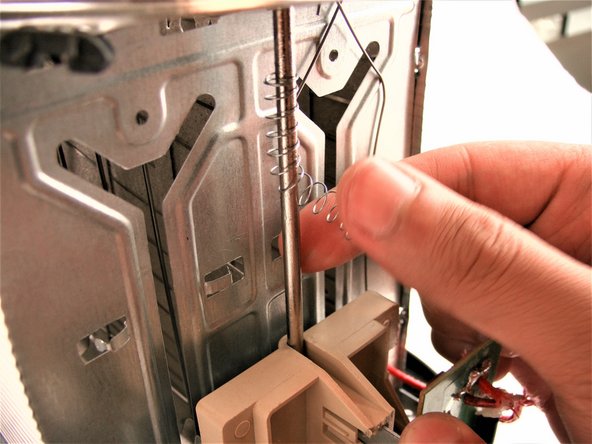
    • Locate the springs.

    • There is a top spring and bottom spring.

  8. Black and Decker TR1278B Lever Catch-Spring Replacement: étape 8, image 1 de 2 Black and Decker TR1278B Lever Catch-Spring Replacement: étape 8, image 2 de 2
    • Use needle nose tweezers to free one end of the spring.

    • Turn the spring until it is completely free.

  9. Black and Decker TR1278B Lever Catch-Spring Replacement: étape 9, image 1 de 1
    • Remove spring for replacement.

    • Repeat steps for bottom spring.

Conclusion

To reassemble your device, follow these instructions in reverse order.

Une autre personne a terminé cette réparation.

Brea-Monique

Membre depuis le 02/15/17

351 Réputation

3 tutoriels rédigés

Équipe

USF Tampa, Team 8-1, Eyestone Spring 2017 Membre de l'équipe USF Tampa, Team 8-1, Eyestone Spring 2017

USFT-EYESTONE-S17S8G1

3 membres

5 tutoriels rédigés

Un commentaire

Hi there, thanks for this guide. I have a little issue : one of the screws is quite unusual, probably because it’s not meant to be repaired by a poor peasant. It has a little pin in it and I can’t unscrew it with the tools I have. Any tips ?

ToasterMaster - Réponse

Ajouter un commentaire

Nombre de vues :

Dernières 24 heures : 0

7 derniers jours : 0

30 derniers jours : 6

Total : 1,294